X
wikiHow is a “wiki,” similar to Wikipedia, which means that many of our articles are co-written by multiple authors. To create this article, 16 people, some anonymous, worked to edit and improve it over time.
This article has been viewed 68,007 times.
Learn more...
Looms range from small cardboard sheets with notches to elaborate floor looms capable of weaving bolts of cloth or large carpets. Although looms vary in size, shape, and skill level required to successfully use them, the basic principles of weaving remain the same.You must warp the loom—create a lengthwise grid of thread—before you can artfully insert the weft thread—the threads that run from side to side—and create a rich textile.
Steps
Method 1
Method 1 of 6:
Warping a Loom
-
1Select a warping thread. The warp consists of strands of yarn or thread strung lengthwise, under tension, across the loom. The ideal warping thread has a slight spring to it. Choose wool yarn, strong cotton thread, or a non-traditional warping material, like grape vine.
-
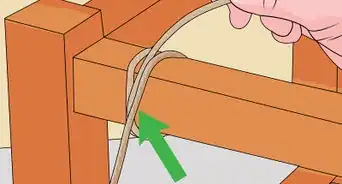
2Begin the warp. When warping a standard frame loom, start in the bottom left corner of your loom. Double-knot the end of your thread or yarn to the bottom cross-bar of your loom frame. Pull the piece of thread or yarn under and over the top cross-bar. Bring it down to the bottom cross-bar and loop it under and over.While the thread or yarn should be pulled tight, you must be able to lift the warp with one finger.
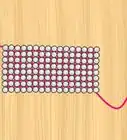
- When warping a cardboard loom, begin in the top left corner. Secure the warp thread to the back of your cardboard loom with a piece of masking tape—the tail should reach the middle of the board. Insert the thread into the first slit in the top left corner. Pull the warp thread to the bottom left corner and insert it into the first slit. Wrap the thread around the back of the cardboard loom and insert it into the next available top slit.[1]
Advertisement -
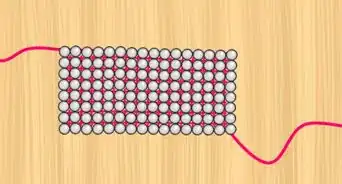
3Continue looping the thread or yarn. Loop the thread or yarn around the top cross-bar followed by the bottom cross-bar in a figure-eight pattern. As you move from left to right, evenly space the loops across the cross-bars.
- Continue to wrap the warp thread around the cardboard loom. Insert the warp thread into the next available top slit, pull it down to the bottom, slide it into the next available bottom slit. Repeat.[2]
-
4Complete the warp. Create approximately 20 loops. When the thread or yarn reaches the top right corner of the loom frame, loop it around the top cross-bar and double-knot it. Cut the thread or yarn from the spool or ball if you have not done so already.
- After you have inserted the warp thread into each slit, pull the warp thread to the back of the cardboard. Cut the warp thread so that the tail hits the middle of the cardboard loom. Secure the tail to the board with masking tape. To maintain the warp’s tension, secure each piece of warp thread to the back of the cardboard with masking tape.[3]


Advertisement
Method 2
Method 2 of 6:
Weaving on a Loom
-
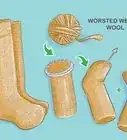
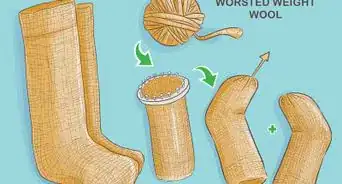
1Collect your materials. After warping your loom, gather your weaving materials. When weaving on a simple frame loom, you will need a small wooden dowel or a chopstick, a fork or another item with strong tines, such as an Afro pick, a shed stick, an assortment of springy wool, scissors, and a ruler
- When weaving on a cardboard loom, you will need an assortment of springy wool, a tapestry needle, masking tape, and scissors.[4]
-
2Cut the weft yarn. The weft consists of the threads that go through the warp from side to side. Select a ball of wool. Measure out a 4’ piece of yarn and cut it.
- The weft yarn must be long enough to make several passes through the warp.
-
3Create a natural shed. Insert the dowel into the warp threads—it should be parallel to the top cross-bar. Position the dowel just above the point where the warp threads cross in the middle of the loom. Pull the dowel to the bottom of the loom, creating tension in the warp threads. The gap created between the front and back warp threads is called a natural shed.
- When weaving on a cardboard loom, you do not need to insert a dowel or create a shed.
-
4Insert the weft thread. Pull your weft thread through shed from right to left. Leave a 4” tail of yarn on the right. Allow the weft thread to fall down towards the dowel.
- When weaving on a cardboard loom, insert the warp thread with a needle. Thread the needle with the precut warp thread. Begin at the top right corner. Leave a 3” tail at the start of the first row. Weave under the first warp thread, over the second, under the third, over the fourth. Continue weaving the thread under and over the warp until you reach the end of the line. Each line will begin with an under and end with an over.
-
5Insert the shed stick. Retrieve the shed stick. Weave the shed thick through the warp threads. Go under the bottom warp threads and over the top warp threads. Grab each end of the shed stick and turn it 90° to create a new shed.
- When the shed stick is inserted into the the warp, the gap between the top and bottom warp threads is called a shed.
- When weaving on a cardboard loom, you do not have to insert a shed stick.
-
6Weave the second row. Loosely pull the weft thread through the shed from left to right. Allow it to lay across the warp threads in an arc. Do not pull the weft thread too tight—it will cause the sides to cinch towards each other! Lay the shed stick flat and remove it from the loom. Use the fork or pick to move the second row of weft thread down towards the dowel.
- When weaving the next line on a cardboard loom, turn the needle and go under the first warp thread and over the second. Be careful not to pull too tight! Continue to the end of the line—end the line with an over. Push the second row snug against the first row with your fingertips.[5]
- The second row should be snug against the first row.
-
7Continue to weave. Insert the weft thread through the natural shed from right to left. Don’t pull it too tight! Insert the shed stick and rotate it as before. Pass the weft thread from left to right through the shed. Remove the shed stick and use the fork to push the weft threads together. Repeat this process until your 4’ piece of weft thread runs out.
- When weaving on a cardboard loom, continue to create new lines. Turn the needle, go under the first warp, and over the last warp. Keep the lines snug.[6]
-
8Insert new weft thread. When you run out of weft thread, cut another 4’ piece. Pull a short tail of the previous weft thread out the back. Insert the new piece of weft thread and pull the end through the back, creating a second tail. Continue weaving as before.
- When you run out of thread while weaving on a cardboard loom, complete the current line and leave a 3” tail that will be woven back into the weave at the end. Thread the tapestry needle with a new piece of weft thread. Leave a 3” tail at the start of the next row. Pull the tapestry needle under the first warp, over the second, under the third. Continue to the end of the row.[7]
- You do not need to tie the two tails together.
- Use this method when changing colors or materials too!
-
9Complete the process. On a loom this size, you will be able to create a 4” piece of fabric. Continue weaving the weft thread until your piece of fabric is at most 4” long. If you build a larger loom frame, you will be able to create a larger piece of fabric.
- When weaving on a cardboard loom, continue creating new rows until you have reached the bottom of the cardboard loom.[8]


Advertisement
Method 3
Method 3 of 6:
Removing Materials from a Loom
-
1Secure the top two wefts together. Select a needle with a large eye. Thread a piece of your weft yarn through the needle’s eye. Attach the top two rows together by sewing a zig-zag pattern across the weaving. This will prevent the top two rows from slipping.
-
2Push the wefts together. Remove the dowel from the bottom. Retrieve your fork. Use the fork to push the bottom wefts towards the wefts above.
-
3Secure the bottom two wefts together. Retrieve your needle. Thread the large-eyed needle with a piece of your weft yarn. Attach the bottom two wefts together by creating a zig-zag pattern across the bottom of the weaving.
-
4Cut the warp yarn and secure or snip any loose threads. Snip the warp threads that are connecting the weaving to the loom. With a needle pull the tails of the first and last weft rows into the weaving. Trim all other side tails to between ¼” to ½” long. Flip the weaving over and cut any loose threads you see.


Advertisement
Method 4
Method 4 of 6:
Removing Materials from a Cardboard Loom
-
1Remove the tape and cut the warp threads. Flip the cardboard loom over to the back. Carefully peel off the masking tape. Retrieve your scissors and cut the warp threads down the center of the cardboard loom.[9]
-
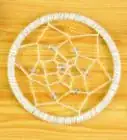
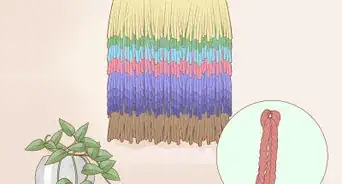
2Remove the material and trim the fringe. Carefully remove each warp thread from the slits running across the top of the cardboard loom. Starting in the right corner, tie warp threads together in pairs close to the weaving. Repeat until all the warp threads are tied in pairs. Remove each warp thread from the bottom slits. Tie the warp threads together in pairs close to the weaving. Retrieve your scissors and trim the fringe in an even line. [10]
- If you would like to create thicker fringe, use the tapestry needle to thread a length of wool between each section of warp thread. Tie thread’s tool tails together close to the weave. Continue to insert wool until you are happy with the thickness of the fringe.[11]
-
3Thread in the loose ends. Beginning at the end of the weaving, thread one loose end onto a tapestry needle at a time. Take the strand around the side and weave it into the piece—go over and under several like color rows at a time. Snip the piece of wool close to the weaving. Repeat until all the loose ends are tucked into the material.[12]


Advertisement
Method 5
Method 5 of 6:
Building a Simple Frame Loom
-
1Gather the materials. Building a simple frame loom requires a variety of wooden materials. You will need:
- 2 pieces of wood ¾” x 1 ½” x 11”
- 2 pieces of wood ¾” x 1 ½” x 16"
- 8 pieces of dowel 5/16" x 1 ½”
- 1 piece of wood ¼” x 2" x 12" (This piece of wood can not bend.)
-
2Gather the tools. To construct the simple frame loom, you will need to locate a few tools:
- Sandpaper
- Wood glue
- Electric drill with 5/16” bit
- Clamp
- Small mallet or hammer
-
3Sand the wooden pieces. Before constructing the loom, sand off all of the rough edges of the wooden pieces. Run the sandpaper briskly over the edges. Periodically run your hand over the edge to assess the progress. When properly sanded, the edge should feel smooth.
-
4Assemble the frame. Clamp one of the 16” pieces of wood to your workbench. Place the other 16” piece of wood parallel to the clamped piece of wood. Retrieve the two 11” pieces of wood. Lie one 11” piece of wood across the top corners of the the two 16” pieces of wood to form right angles. Lie the other 11” piece of wood across bottom corners of the 16” pieces of wood to form right angles. The edges should be flush.
-
5Secure the wooden frame in place. Beginning in the top right corner, drill two holes through both pieces of wood. The holes should be placed diagonally at a 45° angle. Apply glue to the sides of two pieces of dowel. Insert the dowel pieces into the drilled holes with the small mallet or hammer until the dowel is flush with the wooden surface. Wipe away any excess glue. Repeat on the other three corners.
-
6Sand the dowels. When the glue has dried, run a piece of sandpaper over the dowels. Sand down the dowels until they are flush with the wooden surface. Remove any excess dried glue from the wooden frame too.
-
7Form the shed stick. Since the shed stick runs through the weave, it is essential that it does not have any rough edges. A rough edge could cause the thread to snap! Grab the 12” piece of wood and a piece of sandpaper. Round of the ends of the wood as well a the side edges.


Advertisement
Method 6
Method 6 of 6:
Building a Cardboard Loom
-
1Gather your materials. In order to create a cardboard loom, you will need:
- A piece of cardboard, cardstock, bookboard, or mounting board.
- A ruler
- Craft knife
- Scissors[13]
-
2Cut your loom. Decide how large you would like to make your loom. The width must be an odd number of centimeters. Cut a piece of cardboard, cardstock, bookboard, or mounting board 2 cm wider than your chosen width and 1 cm longer than your chosen length.[14]
-
3Make slits. Draw a line widthwise across the top and bottom of the loom. The lines should be ½ cm from the respective ends. Mark each cm with a pencil. Cut ½ cm slits at each mark.[15]


Advertisement
Community Q&A
-
QuestionWhy cant' I use the cardboard loom on the frame loom?
 T. ChinsenTop AnswererA frame loom has a double layer of warp threads. A cardboard loom has a single layer of warp threads. With a frame loom, a heddle can be added to speed up weaving. A simple version consists of alternating slots with centered holes. Warp threads are passed through the heddle. Holed threads are held in place and slots raise or lower threads for each pass of the weft thread.
 -
QuestionHow do I use a table loom?T. ChinsenTop AnswererAny loom will have complete instructions. All manufacturers provide support for their product on a website or at the point of sale, if purchased in a store. If further details are needed, there are multiple videos online to cover specifics that may not be explained in full.
Advertisement


References
- ↑ http://www.things-to-make-and-do.co.uk/other-stuff/weaving/basic-weaving-with-a-homemade-loom.html
- ↑ http://www.things-to-make-and-do.co.uk/other-stuff/weaving/basic-weaving-with-a-homemade-loom.html
- ↑ http://www.things-to-make-and-do.co.uk/other-stuff/weaving/basic-weaving-with-a-homemade-loom.html
- ↑ http://www.things-to-make-and-do.co.uk/other-stuff/weaving/basic-weaving-with-a-homemade-loom.html
- ↑ http://www.things-to-make-and-do.co.uk/other-stuff/weaving/basic-weaving-with-a-homemade-loom.html
- ↑ http://www.things-to-make-and-do.co.uk/other-stuff/weaving/basic-weaving-with-a-homemade-loom.html
- ↑ http://www.things-to-make-and-do.co.uk/other-stuff/weaving/basic-weaving-with-a-homemade-loom.html
- ↑ http://www.things-to-make-and-do.co.uk/other-stuff/weaving/basic-weaving-with-a-homemade-loom.html
- ↑ http://www.things-to-make-and-do.co.uk/other-stuff/weaving/basic-weaving-with-a-homemade-loom.html
- ↑ http://www.things-to-make-and-do.co.uk/other-stuff/weaving/basic-weaving-with-a-homemade-loom.html
- ↑ http://www.things-to-make-and-do.co.uk/other-stuff/weaving/basic-weaving-with-a-homemade-loom.html
- ↑ http://www.things-to-make-and-do.co.uk/other-stuff/weaving/basic-weaving-with-a-homemade-loom.html
- ↑ http://www.things-to-make-and-do.co.uk/other-stuff/weaving/basic-weaving-with-a-homemade-loom.html
- ↑ http://www.things-to-make-and-do.co.uk/other-stuff/weaving/basic-weaving-with-a-homemade-loom.html
- ↑ http://www.things-to-make-and-do.co.uk/other-stuff/weaving/basic-weaving-with-a-homemade-loom.html
About This Article
Advertisement