This article was co-authored by Michele Dolan and by wikiHow staff writer, Eric McClure. Michele Dolan is a BCRPA certified Personal Trainer in British Columbia. She has been a personal trainer and fitness instructor since 2002.
There are 9 references cited in this article, which can be found at the bottom of the page.
This article has been viewed 71,825 times.
Leg lifts refer to a general group of exercises that involve raising your legs in the air. If you have an exercise ball, also known as a swiss ball, you can use it to help you perform a variety of leg lifts. You can do leg lifts on top of the ball, using the ball to brace your legs, or as an additional piece of resistance to aid in muscle growth. Always perform your leg lifts on a comfortable surface, and don’t perform any exercises without consulting a doctor first.
Steps
Performing Standard Leg Lifts
-
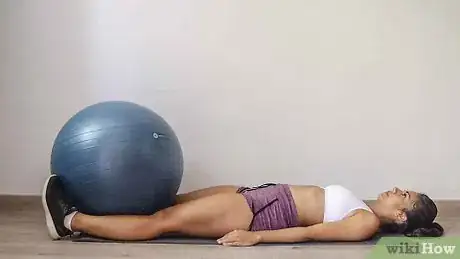
1Lay on your back with the exercise ball in between your calves. Stretch your arms out at your side with your palms flat on the floor to keep your body stable. Place the exercise ball in between your legs so that it is resting on the ground between your calves.[1]
- Lay a yoga or workout mat underneath you if you don’t have a soft floor to exercise on.
- Wear shoes while doing this to make it easier to keep the ball stable.
Tip: Standard leg lifts are an excellent way to improve your lower-back and abdominal muscles. Avoid this exercise if you have any back pain.
-
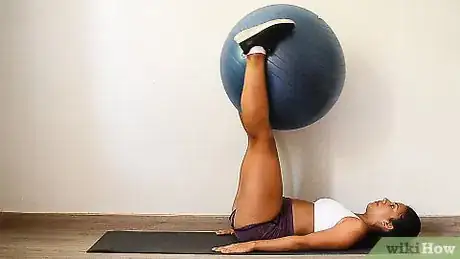
2Raise your feet up while squeezing the exercise ball between your calves. Activate your core and inner-thigh muscles to lift both of your feet up off of the floor and place each foot on opposite sides of the ball. Squeeze the exercise ball between your calves. Keep your legs straight as you squeeze it. Continue raising the ball until it’s above your hips.
- Leave your arms flat on the floor with your palms facing down throughout the entire motion. If you struggle to keep your back flat on the floor, you can put your arms under your glutes to brace yourself.
- Use your thigh muscles to keep your feet tight around the other side of the ball.
Advertisement -
3Lift the ball into the air above your hips and hold it. Keep your pelvis in a neutral position and use your calf and thigh muscles to raise the ball above your hips. Lift it slowly and keep your legs as straight as possible while you raise it. If you cannot keep your legs straight without arching your back, bend your knees to work up your strength.[2]
-
4Stop when your thighs reach a 90-degree angle and lower the ball. Once the ball is raised right above your hips, hold it there for 1-3 seconds. Then, slowly lower your legs while keeping them straight. Stop moving your legs just before the ball reaches the ground and repeat each movement.[3]
- Count 1 repetition for each time you raise and then lower the ball.
- It’s okay if this is really tough to do at first! Try bending your knees when you first start and work up to straightening them out over time.
Doing Prone Leg Lifts
-
1Get on your knees and roll your chest forward over the ball. Brace yourself on the other side of the ball by laying the palm of each hand flat against the floor on opposite sides of the ball. It will look like you’re about to do a push-up with an exercise ball in between you and the ground.[4]
- Perform this exercise under a yoga mat or section of padded flooring.
Tip: Prone leg lifts are a good strengthening exercise for your glutes, hamstrings, and core muscles. They can be tough though if you don’t tend to have good balance.
-
2Lift your legs off of the floor and find your center of gravity. With your legs in the air, move your body back and forth until you find your center of gravity. Finding your center of gravity is as simple as moving your body in small increments until you don’t need to catch yourself from slipping off of the ball.[5]
- A person’s center of gravity is usually between their belly button and waistline.
-
3Point your toes out away from you and lift your legs. Tighten your abdominal muscles, and with your toes pointed out, raise your legs together. Activate your hamstrings and thigh muscles to keep your feet straight. Keep them straight and lift them 4–12 inches (10–30 cm) until you feel your calf and back muscles tightening.[6]
- How high you lift your legs is dependent upon how flexible you are. Don’t raise your legs so high that you’re physically in pain.
-
4Lower your legs back to their original position. Keeping your legs as straight as possible, lower them back to where you started to complete 1 repetition. Take a breath and then repeat each step.[7]
- If you want an easier workout, try lifting one leg at a time while your knee is bent. Slowly work up to switching your legs before trying to raise both of your legs together.
Using the Exercise Ball for Leg Curls
-
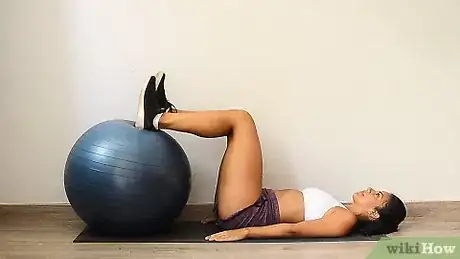
1Lay on your back and place your feet on top of the exercise ball. With your legs bent at a 90-degree angle, place your heels on top of the exercise ball. Spread your feet so that they’re shoulder-width apart. Brace yourself by laying your arms flat at your side with the palms facing the floor.[8]
- Wear shoes while doing leg curls to keep your ankles from twisting or rolling off of the exercise ball.
- Put a yoga or workout mat underneath you if you don’t have a soft floor.
Tip: Leg curls are good exercises if you want to improve your calves, hamstrings, and glutes. They will also help strengthen core muscles.
-
2Lift your hips up and extend your legs away from you. Tighten your abdominal and back muscles and raise your hips up off of the floor. Roll the ball slowly away from you with your legs. Straighten your legs out until they’re parallel with your back. Keep your arms on the ground as you do this.[9]
- If you’re performing leg curls to stretch or work your hamstring muscles only, you can keep your back flush against the floor when you roll the ball.
-
3Roll the ball back toward you while keeping your hips raised. Use the downward pressure from your heels to roll the back towards you. Continue rolling the ball until your knees are bent at a 90-degree angle. Do not lower your hips while pulling the exercise ball back.[10]
- Squeeze and tighten your abdominal muscles while you do this to keep your body from rolling to the side.
-
4Roll the ball away again and repeat each step. Count 1 repetition for each time that your knees return to a 90-degree angle. Keep your abdominal and thigh muscles activated while rolling the ball out and keep your back raised slightly off of the floor.[11]
Performing a Sideways Leg Lift
-
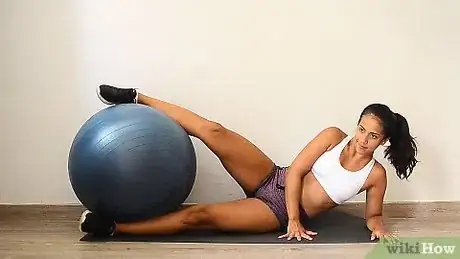
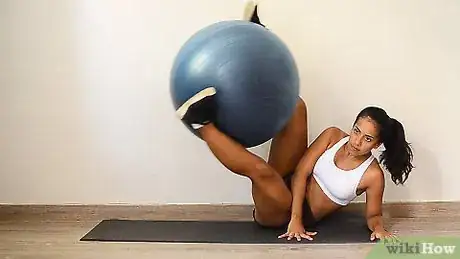
1Lay on your side with the exercise ball in between your feet. Use your calves and your shoes to grip the exercise ball between your feet. Using the arm that is closest to the floor, bend your elbow at a 90-degree angle and lay your forearm out so that it’s perpendicular to your spine. This will keep your frame stable as you raise the ball.[12]
- Wear shoes while performing this exercise. They will give you some traction to keep the ball still while you lift it.
- Put a yoga or workout mat underneath you so that your side doesn’t get sore.
Tip: Sideways leg lifts are an excellent exercise if you want to develop your obliques, outer hips, thighs, and glutes. It can also improve posture because it forces your spine to stay as straight as possible. Avoid this exercise if you have back pain.
-
2Angle your legs slightly inward and raise your legs up. To raise your legs off of the floor without putting pressure on your spine, you need to move your legs forward in the direction that you’re facing 4–6 inches (10–15 cm). With the ball between your feet, tighten your leg muscles and begin to lift the ball off of the floor.[13]
- Keep your legs as straight as possible while you do this.
-
3Lift the ball 4–12 inches (10–30 cm) off of the floor and hold it. Use your other arm to balance yourself by putting your fingertips on the floor in front of you. Lift the ball and hold it in place for 2-6 seconds.[14]
-
4Lower the ball back to the ground and take a breath. Keep your legs as straight as possible as you lower the exercise ball back to the floor. You have completed 1 repetition when the ball reaches the floor.[15]
- Switch the side that you’re lying on in between sets and brace yourself with your opposite forearm to work both sides of your body evenly.
Things You’ll Need
- Exercise ball
- Yoga or workout mat
- Sneakers
- Loose-fitting clothing
- Water bottle
References
- ↑ https://www.popworkouts.com/leg-lifts-exercise/
- ↑ https://www.popworkouts.com/leg-lifts-exercise/
- ↑ https://www.popworkouts.com/leg-lifts-exercise/
- ↑ https://youtu.be/sMaCKOKY2f0?t=19
- ↑ https://youtu.be/sMaCKOKY2f0?t=21
- ↑ https://youtu.be/sMaCKOKY2f0?t=45
- ↑ https://youtu.be/sMaCKOKY2f0?t=45
- ↑ https://youtu.be/XkESHgkTdFw?t=11
- ↑ https://youtu.be/XkESHgkTdFw?t=16
