This article was co-authored by Shun Pittman. Shun Pittman is a Master Cosmetologist, Author, Owner, and Founder of Corps d’Elite Salon and Corps d’Elite Beauty. With over 25 years of international experience, she is dedicated to and specializes in providing luxury salon services to all hair types and textures and every skin tone and shade. Her services include hair conditioning treatments, cutting, coloring, styling, extensions, and makeup application. Shun has experience working with, coaching, training, and mentoring beauty professionals from multiple companies including L'Oréal, Wella, Matrix, Paul Mitchell, Redken, Big Sexy Hair, and Toni & Guy. She is also a host for national and local media outlets and her work has been featured in The Washingtonian, The Cheddar Network, and WJLA Good Morning Washington's Beauty and Fashion Police segments. Shun is the author of “50 Things Your Hairdresser Wants YOU to Know (and a few things we don’t...)".
There are 10 references cited in this article, which can be found at the bottom of the page.
This article has been viewed 17,800 times.
Lemonade braids, also known as side braids, regained popularity due to their prominent appearance in the music video for Beyonce’s “Formation.”[1] To get Beyonce’s iconic look, start by washing, conditioning, and detangling your hair. Create sections and weave added hair extensions with your natural braids. You can also do horizontal cornrows to get the style without using hair extensions. While the process can take time, with patience, you can achieve these gorgeous braids.
Steps
Prepping Your Hair for Lemonade Braids
-
1Shampoo and condition your hair. A solid wash routine applies to all braiding methods. Since braids tend to be worn for weeks at a time, you’ll want your hair clean before styling. Use a clarifying shampoo to remove dirt, oil, and styling products from the hair and scalp.[2] Conditioner moisturizes your hair; concentrate on the ends, which are often the driest part.
- If your shampoo is too drying, only use it on the scalp. When you rinse, the shampoo will travel down your hair, gently cleansing the strands without removing all the moisture.
-
2Deep condition your clean hair. Apply your deep conditioner from root to tip; let this sit for at least 20 minutes.[3] This gives additional moisture to your hair. Some ingredients in deep conditioners can also help keep water from escaping the strands as quickly, hydrating your hair longer.
- If your hair tends to break off, use a conditioner with more protein. This gives your locks a boost of strength.
- Wear a shower cap to trap heat. The heat allows the conditioner to better penetrate the hair shafts, infusing your tresses with even more moisture.
Advertisement -
3Detangle your hair with a wide-tooth comb. Not only will detangled hair be easier to braid, it’ll make the eventual process of removing the braids a little faster.[4] With your wide-tooth comb, gently start detangling the ends of your hair. Slowly move up the strands until you can smoothly run your comb through your hair from root to tip.
- Starting at your scalp while detangling risks hitting a huge knot and tearing out entire strands of hair.
-
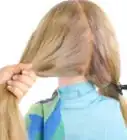
4Stretch your hair to prevent future tangles. While you wear braids, your hair sheds and the loose strands wind themselves into your hairdo. Stretching your hair so it’s less wavy or curly decreases the chance of bad tangles later and makes your hair easier to manipulate.
- You can use a blow dryer on a low heat setting, but repeated heat use can cause damage to your hair.
- If you don’t want to apply heat, try the banding method. On clean, damp, and detangled hair, take a 1–2 in (2.5–5.1 cm) section of hair, then apply a small ponytail holder at the root. Place another band about 1 in (2.5 cm) down from the first. Keep placing bands down the section at equal distances.[5]


Installing Lemonade Braids with Hair Extensions
-
1Create a section of hair in the front with a rattail comb. Then, part your hair from temple to temple; this makes a U-shape part.[6] This section will become a side bang later. Tie up this section with a scrunchie. Clip up the rest of your hair.
- The comb will make your parts more defined, but the lines might not be straight since you’re parting your own hair.
-
2Make a horizontal part at the nape of your neck. Using the tail of your comb, create a part from right to left. The section should be about 1 in (2.5 cm) wide, from nape to part. Use a dime-sized amount of styling cream to moisturize the hair before braiding.
-
3Start a three-strand braid at your nape. Begin on the left side of the horizontal section you made. Start braiding normally, crossing strands for nine or ten stitches to create the base.[7] Keep the stitches small; the braid will grow as you move from left to right.
- Don’t pull too tight on your roots. Excess tension can cause hair breakage and headaches. Plus, tight and painful braids can cause trauma to your scalp, which can lead to hair loss.[8]
-
4Add a section of hair extensions as you braid. Hold the braid with your left pointer finger and thumb so the braid doesn’t unravel. With your right hand, take a section of the extensions and slide it between your left pointer and thumb.[9]
- Your fingers should be holding the middle of the hair extension strands, not the ends. One end of the hair will fall to the left; the other should be on the right.
- Synthetic hair is cheaper to purchase and won’t frizz up due to humidity, making it great for tropical climates.
- Make sure that the hair extensions aren't more than 2.5 times longer than your natural hair. Heavy extensions can put a lot of strain on the hair follicle, which can lead to both hair breakage and hair loss.[10]
-
5Braid normally, weaving the new hair with your natural hair. Add the right side of the hair extensions to the right strand of your natural hair braid. The left strand becomes part of the middle strand in your braid.[11] Stitch the braid twice more to lock in the added hair.
- This can be tricky to do alone without a mirror, so be patient while you work.
- Practice the feed-in method on a doll or a wig first to get the hang of hand placement.
- Search YouTube for video tutorials on “feed-in braids” for a visual example.
-
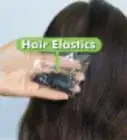
6Keep adding hair extensions as you cornrow to the right side of your head. Every 2 or 3 stitches, include more hair for a full look. You’ll need larger bundles of added hair as the braid thickens. Tie off the braid with an elastic band.
- Really thick braids will likely stay in place on their own, especially if the hair is more coarse or textured.
-
7Repeat the process of parting and braiding a new section. Let down some of your hair on the lower part of your head. Create a new 1 in (2.5 cm) section above the braid you’ve finished at your nape. Then start your braid and add new hair every few stitches. Work all the way up to the top of your head.
- Remember to cornrow from the left side of your head to the right side.
- On the sides of your head, try adding hair every 7 or 8 stitches to keep things sleek rather than bulky.
- This could take several hours, so take breaks if your arms or hands feel fatigued.
-
8Section the hair for your bangs from crown to forehead. When you’ve finished braiding most of your head, you’ll have one section left in the front. Start with one section on your right; clip away the rest. Stick to small sections, similar in size to the ones you’ve completed.
-
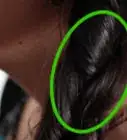
9Braid your bangs, starting with a small cornrow near your crown. Braid the hair down toward your face. The starter braid should be about 10 stitches before you begin adding hair. Add hair every two stitches as you cornrow. This will create a sweeping side fringe across your forehead.
-
10Cornrow the rest of the section until you’ve braided your bangs. When done, you can use elastic on the ends, or decorate the braids with hair beads for flair. You can also dip the ends in hot water to seal them.[12]


Doing Lemonade Braids without Hair Extensions
-
1Make a horizontal part at the nape of your neck with a rattail comb. Using the tail of your comb, create a part from right to left.The section should be about 1 in (2.5 cm) wide from nape to part. Use a dime-sized amount of styling cream to moisturize the hair.
-
2Start a three-strand braid at your nape. Begin on the left side of the horizontal section. Braid normally, crossing strands for nine or ten stitches to create the base.[13] Use small stitches; the braid will likely thicken as you proceed.
- Be gentle with your roots, especially at your temples. Too much tension could cause hair breakage or even headaches.
-
3Cornrow the section to the right side of your head. Do your best to prevent crooked braids or bulky stitches. Work until you’ve cornrowed all the way to the other side of your nape. There should be at least 4 inches (10 cm) left unbraided.
-
4Do a three-strand braid with the remaining length of hair. This allows the braid to hang on your right side. Keep your stitches about the same size for a uniform look. You can tie the end of the braid with an elastic band for security if you think it might unravel.
- Really thick braids probably won’t need an elastic.
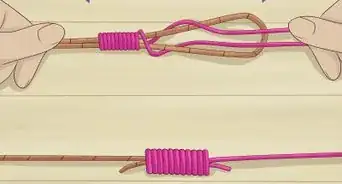
- If you’d like to add some braiding hair for length, do this before starting your three-strand braid. Loop a small section of braiding hair around the strand. Add the left side of the extension to your left braid strand, and the right side of the extension to your right braid strand. Complete a few stitches to secure the hair.
-
5Repeat the process of parting and braiding a new section. Let down some hair on the lower part of your head. Create a new 1 in (2.5 cm) section above the braid you’ve finished at your nape. Then start your braid and cornrow until you’ve reached the right side of your scalp. Repeat this until you’ve braided all your hair.


Expert Q&A
-
QuestionWhat should I do after removing my braids?
 Shun PittmanShun Pittman is a Master Cosmetologist, Author, Owner, and Founder of Corps d’Elite Salon and Corps d’Elite Beauty. With over 25 years of international experience, she is dedicated to and specializes in providing luxury salon services to all hair types and textures and every skin tone and shade. Her services include hair conditioning treatments, cutting, coloring, styling, extensions, and makeup application. Shun has experience working with, coaching, training, and mentoring beauty professionals from multiple companies including L'Oréal, Wella, Matrix, Paul Mitchell, Redken, Big Sexy Hair, and Toni & Guy. She is also a host for national and local media outlets and her work has been featured in The Washingtonian, The Cheddar Network, and WJLA Good Morning Washington's Beauty and Fashion Police segments. Shun is the author of “50 Things Your Hairdresser Wants YOU to Know (and a few things we don’t...)".
Master Cosmetologist, Global Salon Educator & AuthorI highly recommend that you detox the hair with a clarification treatment. There's professional stylists who can recommend a good clarifying shampoo and a good clarifying conditioner for your hair.
Warnings
- Wearing braids for longer than 8 weeks could cause hair damage.⧼thumbs_response⧽
You Might Also Like
This is a modal window.
This is a modal window.
This is a modal window.
This is a modal window.
This is a modal window.


This is a modal window.
This is a modal window.
This is a modal window.
This is a modal window.
This is a modal window.
This is a modal window.
References
- ↑ https://www.thetrendspotter.net/lemonade-braids/
- ↑ http://www.blackhairkitchen.com/2014/11/5-things-braiding-natural-hair/
- ↑ http://www.blackhairkitchen.com/2014/11/5-things-braiding-natural-hair/
- ↑ http://www.blackhairkitchen.com/2014/11/5-things-braiding-natural-hair/
- ↑ https://www.naturallycurly.com/curlreading/home/how-to-stretch-natural-hair-with-the-banding-method-bi
- ↑ https://www.youtube.com/watch?v=IahyxwOVCjs&feature=youtu.be&t=24
- ↑ https://www.youtube.com/watch?v=5k6SNrw_OBo&feature=youtu.be&t=111
- ↑ Shun Pittman. Master Cosmetologist, Global Salon Educator & Author. Expert Interview. 7 September 2021.
- ↑ https://www.youtube.com/watch?v=5k6SNrw_OBo&feature=youtu.be&t=143
- ↑ Shun Pittman. Master Cosmetologist, Global Salon Educator & Author. Expert Interview. 7 September 2021.
- ↑ https://www.youtube.com/watch?v=5k6SNrw_OBo&feature=youtu.be&t=148
- ↑ https://youtu.be/5k6SNrw_OBo?t=358
- ↑ https://www.youtube.com/watch?v=5k6SNrw_OBo&feature=youtu.be&t=111
About This Article