This article was co-authored by Ashley Adams. Ashley Adams is a Licensed Cosmetologist and Hair Stylist in Illinois. She completed her Cosmetology education at John Amico School of Hair Design in 2016.
This article has been viewed 47,218 times.
Ruby Rose has rocked a lot of chic, trendy styles throughout her career, but perhaps her most popular look was the style she wore in the hit show Orange is the New Black. Similar to an undercut, she left her hair long on the top, and shaved along the sides. Getting the perfect fade can be tricky, however, but with a pair of clippers and different guards, you can get the right look. If you really want to go all the way, use scissors and clippers to sculpt lines into the fade at the end.
Steps
Cutting the Base
-
1Begin with clean hair. Wash your hair before cutting it to get the best results. Allow your hair to air dry fully or use a blow dryer to speed up the process. Though many haircuts are done on wet hair, your hair should be dry when using clippers.
-
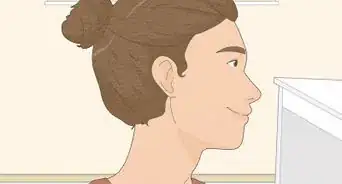
2Section off the top part of your hair. Use the handle of a rat-tail comb to make a part just above your left and right eyebrows. Angle both of the parts so that they meet at the back-center of your head. Gather the hair between those two parts and clip it out of the way. This is the hair that you will be leaving long.[1]
- You can leave the section as wide or as narrow as you want it to be.
Advertisement -
3Shave the bottom portion of your hair with a #2 guard. You need to cut everything from the parts that you made, downward. Use a clipper fitted with a #2 guard and remove the hair by sweeping the clippers in an upward motion as though you are scooping ice cream. Don't worry about being too neat here; you will clean everything up later.[2]
- If you are doing this yourself, use a 3-way mirror to check your work on the sides and back of your head.
-
4Create the outline for the fade. Take the guard off of your clipper and set it to the shortest setting possible. Hold it horizontally at your left temple, about 1 inch (2.54 centimeters) above your ear. Move it along the side of your head, towards the back-center of your neck. Repeat this step for the right side of your head.[3]
-
5Shave the hair below the outline that you made. Continue using your clippers with no guard for this step. Keep them set to the shortest setting, and only shave the hair that's below the outline.[4]
-
6Shave the hair above the outline with a #1 guard. Fit your clipper with a #1 guard. Use an upward motion as though you are scooping ice cream to shave everything between the outline and the parts you made in the beginning.[5]


Finishing the Cut
-
1Blend everything in to create the fade. You will have a noticeable difference between the top and bottom sections of your fade. Remove the guard from your clippers and over them. Next, fit your clippers with a #0 guard to blend out the bottom. Keep blending until the fade is smooth and even. At the very end, use no guard and the shortest setting to tidy everything up.[6]
-
2Cut lines into your fade with a razor. Ruby Rose has some lines sculpted into her fade. There is a short, horizontal line at her temple, and another that runs down the side of her head, towards the back. You can choose to copy these exactly, or create your own design. Decide on the look you want, then cut the lines into your fade with a razor or the edge of the trimmers.[7]
-
3Clean the lines up with a pair of clippers. Take the guard off of your clippers and set them to the shortest length. Holding the clippers horizontally, go over the lines. Try to make them as thin as possible.[8]
-
4Trim the top part of your hair, as needed. Ruby Rose has longer hair at the top of her head, but not too long. Use a pair of hairdressing scissors to but it down to about 5 to 6 inches (12.7 to 15.2 cm) long.[9]
- If your hair is very thick, you may need to use thinning scissors to remove some of the bulk.
- To get the exact look, cut the top at a slight angle. You want one side to be a little longer when you slick it to the side and back.[10]
-
5Shower off. All that shaving likely left a lot of short, itchy hairs all over your back, neck, and shoulders. Hop into the shower, and rinse them off. Get your hair wet as well; you will need it wet in order to style it.
- Alternatively, use a blow dryer to blow the cut hairs off of you, then use a spray bottle to wet your hair.
- If your hair is ethnic, naturally curly, or tightly coiled, you may want to wear your natural curls. Alternatively, you can blow dry and straighten your hair.


Getting the Style
-
1Apply volumizing and heat-protectant products. Choose your favorite product that adds volume and body. Apply it to the top part of your hair (the part that you left long). Then, apply a heat-protectant product to your hair before blow drying it.[11]
-
2Blow dry and style your hair the rest of the way as desired. For a smoother, slicked back style, blow dry your hair straight using a comb. For more voluminous look, get out a round brush. Wrap the front part of your hair around the brush, upwards and away from your face. Blow dry it, then blast it with cool air to set the style. Carefully pull the brush out.[12]
-
3Define the style with wax or pomade. Apply the product to your hands first. Rub it between your palms, then distribute it through your hair. To get more of a quiff or pomp, brush your hair up and back, then use your fingers to tousle and spike it.[13] To get the classic Ruby Rose look, brush your hair off to the side and back.
- Only apply the product to the long part of your hair, not the fade.
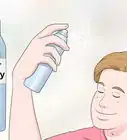
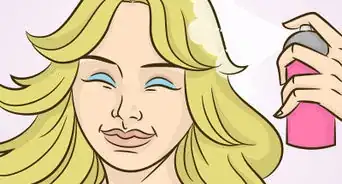
- Set the style with a long-lasting hairspray, if needed.


Community Q&A
-
QuestionIs Ruby Rose a lesbian?
 Community AnswerYes, she has been out since the age of 12.
 -
QuestionWhat is her hair color now in 2019?Community AnswerIt's a dirty blonde color.
Things You'll Need
- Clippers with #0, #1, and #2 guards
- Hairdressing scissors
- 3-sided mirror (recommended)
- Round brush
- Hair dryer
- Rat-tail comb
- Hair clips
- Heat-protectant product
- Styling wax or pomade
- Volumizing mousse
- Hairspray
References
- ↑ https://www.youtube.com/watch?v=xq8stNFk6pU
- ↑ https://www.youtube.com/watch?v=xq8stNFk6pU
- ↑ https://www.youtube.com/watch?v=xq8stNFk6pU
- ↑ https://www.youtube.com/watch?v=xq8stNFk6pU
- ↑ https://www.youtube.com/watch?v=xq8stNFk6pU
- ↑ https://www.youtube.com/watch?v=xq8stNFk6pU
- ↑ https://www.youtube.com/watch?v=xq8stNFk6pU
- ↑ https://www.youtube.com/watch?v=xq8stNFk6pU
- ↑ https://www.youtube.com/watch?v=9WkZtoi58jo
- ↑ https://hairstyleonpoint.com/ruby-roses-rockin-hairstyle/
- ↑ https://www.youtube.com/watch?v=YA8NfACwsUk
- ↑ https://www.youtube.com/watch?v=YA8NfACwsUk
- ↑ https://www.youtube.com/watch?v=YA8NfACwsUk
- ↑ https://hairstyleonpoint.com/ruby-roses-rockin-hairstyle/
- ↑ https://hairstyleonpoint.com/ruby-roses-rockin-hairstyle/
About This Article