This article was co-authored by Jeanine Hattas Wilson and by wikiHow staff writer, Christopher M. Osborne, PhD. Jeanine Hattas Wilson is a Professional Painter and the President of Hattas Public Murals, Inc. With nearly 20 years of experience, Jeanine specializes in creating, overseeing, designing, and painting murals. Jeanine holds a BA in Advertising from Marquette University and a Studio Painting Minor from The Milwaukee Institute of Art & Design. She has studied at The Atelier Artien in Paris, France, Los Angeles Academy of Figurative Art, and under renowned artists such as Robert Liberace, Michael Siegel, and William Cochran. To date, Hattas Public Murals has painted nearly 5,000 commissioned works of art in homes and commercial and public spaces.
There are 7 references cited in this article, which can be found at the bottom of the page.
This article has been viewed 55,795 times.
A “throwie” (or “throw-up”) is a style of graffiti that typically uses rounded, “bubbly” letters that are squeezed together, heavily outlined, and shaded. As with any form of graffiti, there’s plenty of room for artistic license and creativity in the look of your throwies. Master creating and reproducing your throwie on paper before considering whether you want to move to a wall or a bigger canvas.
Steps
Creating Your Bubble Letters
-
Video Player is loading.
This is a modal window.
The media could not be loaded, either because the server or network failed or because the format is not supported.1Write your chosen set of letters in pencil on a blank sheet of paper. If, for instance, you want your throwie to read “OMG,” simply write the 3 letters in standard form on an unlined sheet of paper. Place them at least 3 letter spaces apart (e.g., “O---M---G”) at this point so you’ll have room to create the “bubble” effect around each letter individually.- It’s easier to practice writing your bubble letters individually before you create them all smashed together in typical throwie style.
- Throwies usually spell out some version of the artist’s name, nickname, or initials in 3-4 letters, but you can make your throwie spell out anything you like with any number of letters you prefer.
-
Video Player is loading.
This is a modal window.
The media could not be loaded, either because the server or network failed or because the format is not supported.2Create a “bubble” outline around each letter. Essentially, you need to make each letter fatter and rounded off. This is easy to do with an “O,” but letters like “M” require you to round off several straight lines and sharp angles. Practice several times until you find the look you desire for each letter.- You may want to practice creating an entire bubble alphabet so you can create different names or words in throwie style.
Advertisement -
Video Player is loading.
This is a modal window.
The media could not be loaded, either because the server or network failed or because the format is not supported.3Squeeze the letters together and let the bubble outlines overlap. Once each individual bubble letter looks right, start over with the letters closer together. Write (for example) “OMG” in standard form with only a single letter space between each letter (“O-M-G”). Then create your bubble letters around each, allowing them to overlap.- This squashed together look is a key component of a typical throwie.
-
Video Player is loading.
This is a modal window.
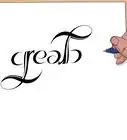
The media could not be loaded, either because the server or network failed or because the format is not supported.4Darken the overall outline and erase overlapping lines. Use a dark pen or marker to outline the entire perimeter of the smashed together letters, along with any interior elements (like the hole in the middle of “O”). Decide how you want your letters to overlap (for instance, “O” overlapping “M” overlapping “G”) and darken those interior lines accordingly. Erase any excess pencil lines after this.- Once you’ve practiced creating your throwie many times, you’ll be able to skip using the pencil and go straight to making the darker outline and interior overlaps. This is also how you’d start with a can of spray paint on a wall.
Adding Shading and Detail to Your Throwie
-
Video Player is loading.
This is a modal window.
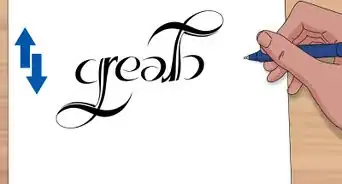
The media could not be loaded, either because the server or network failed or because the format is not supported.1Thicken the outline towards one corner for a 3D effect. A typical throwie tends to have heavier shading along part of the outline in order to give it the appearance of depth. You might, for instance, thicken the outline towards the bottom left corner of “OMG” in order to create this 3D effect.[1]- You can also thicken the outline along the entire top or bottom, or on either side, but don’t thicken both sides or both top and bottom. This will ruin the 3D effect.
-
Video Player is loading.
This is a modal window.
The media could not be loaded, either because the server or network failed or because the format is not supported.2Outline the entire throwie with another dark line. Beyond the dark outline of your bubble letters, trace a second outline that follows the same curving path. This second outline doesn’t outline the individual letters, but rather the entire grouping (e.g., “OMG”) altogether, and helps your throwie “pop” off the page (or wall).- You can make this second outline using the same color as the first, or choose a different one.
-
Video Player is loading.
This is a modal window.
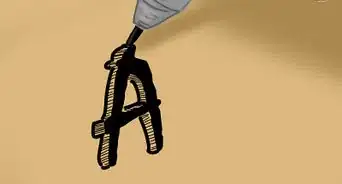
The media could not be loaded, either because the server or network failed or because the format is not supported.3Fill each letter with a light color, using a side-to-side motion. This holds true whether you’re coloring with a crayon, a marker, or a spray can. Color back and forth horizontally within each individual letter of your throwie. Try to fill in each letter fully, but also stay inside the lines.[2]- Choose a lighter fill color that stands apart from your outline color and 3D shading—for example, black outline and 3D and white fill, or dark blue outline, medium blue 3D, and yellow fill.
- Feel free to switch things up and color vertically (with an up-and-down motion), but the throwie will likely look better if you are consistent and color all the letters either horizontally or vertically.
-
Video Player is loading.
This is a modal window.
The media could not be loaded, either because the server or network failed or because the format is not supported.4Add more outline coloring or other personal touches. If you want to color in the space between your inner and outer outlines, choose a color that complements the others you've used. Then apply it with diagonal, back and forth motions-- that is, aligned with the bottom left and top right corners of the sheet of paper (or bottom right and top left).[3]- For example, you could use dark blue for the outline, white for the letter fill, light blue for the 3D shading, and gray for the space between the inner and outer outlines.
- You can also use your main outline color to create a few small curved lines on and beyond the bubble letters to give the impression that they’re expanding and about to burst.
Reproducing Your Throwie with a Stencil
-
Video Player is loading.
This is a modal window.
The media could not be loaded, either because the server or network failed or because the format is not supported.1Draw the outline of your throwie on a thin sheet of cardboard. You only really need to draw the “inner” outline of your throwie at this point, but you can draw the entire throwie for practice if desired. Make it whatever size you’d like your reproducible throwie stencil to be.[4]- For instance, if you're throwie is "OMG," you only need to create the single outline around all three smashed-together letters, and not any of the lines between or inside the letters (e.g., the middle of "O").
- Any kind of thin cardboard will do, but the front or back covers of a spiral-bound notebook are good choices.
- Stencils are used for various kinds of outdoor lettering, not only for graffiti art.
-
Video Player is loading.
This is a modal window.
The media could not be loaded, either because the server or network failed or because the format is not supported.2Cut out the outline of your throwie with a crafting knife. Once you’ve created the outline of your throwie on the thin cardboard, carefully trace over it with a sharp blade. A small crafting knife (like an X-Acto knife) is ideal for this job. Cut through the thin cardboard completely and pop out the material within your outline.[5]- The remaining cardboard sheet with the throwie-shaped hole in the middle is your stencil.
- You can discard the piece of cardboard (that's in the shape of your throwie's outline) that you cut out.
-
Video Player is loading.
This is a modal window.
The media could not be loaded, either because the server or network failed or because the format is not supported.3Lay your cardboard sheet over your chosen medium and color in the cutout. You can reproduce your throwie on any number of surfaces—plain sheets of paper, blank name tag labels, your bedroom wall, etc. Once you lay the stencil over the chosen surface, simply color in the cutout area by using a side-to-side motion with your crayon, marker, or spray can.[6]- Choose a lighter fill color to complement the darker outline color you’ll use next—for instance, gray fill and dark red outline.
-
Video Player is loading.
This is a modal window.
The media could not be loaded, either because the server or network failed or because the format is not supported.4Add outlines, shading, and other details to your reproduction. Remove the stencil and trace around the outline of the colored area with your chosen outline color (e.g., dark red). Also add the overlapping lines for your letters, 3D shading, and any interior or additional markings (e.g., name or date). Now you can crank out throwies at a rapid pace![7]- Try switching up the fill colors of your throwies to add some visual interest, or even using multiple fill colors (like yellow and green) within a single throwie.
Community Q&A
-
QuestionHow do I start to make the letters?
 Turquoisetween789Community AnswerIf you're having some trouble tracing the letters, you could write letters as you normally would, then do your best to trace the throwie letters around them. Remember: round edges!
Warnings
- Keep in mind that vandalizing property--e.g., spraying a throwie on a wall without authorization--is illegal and can get you in a lot of trouble.⧼thumbs_response⧽
- Be sure to practice on a piece of paper plenty of times before attempting larger throwies.⧼thumbs_response⧽
Things You'll Need
- plain paper
- pencil
- light and dark markers, pens, or crayons
- thin cardboard
- crafting knife
You Might Also Like
-Step-12.webp)
This is a modal window.


References
About This Article


-Step-12.webp)