This article was co-authored by Aaron Asghari and by wikiHow staff writer, Jennifer Mueller, JD. Aaron Asghari is a Professional Guitarist and the lead guitarist of The Ghost Next Door. He received his degree in Guitar Performance from the Guitar Institute of Technology program in Los Angeles. In addition to writing and performing with The Ghost Next Door, he is the founder and primary guitar instructor of Asghari Guitar Lessons.
This article has been viewed 67,030 times.
If you play your guitar frequently, the frets can become worn down over time. Frets wear unevenly due to the location of the strings, which can affect the playability of the instrument. When you dress frets, you smooth them down and round them so they are even again. With a few tools, it is possible to dress frets on your own. However, if you have a prized instrument, you're better off leaving this complicated process to a professional.
Steps
Leveling the Frets
-
1Use a notched straight-edge to check neck straightness. With your guitar flat on a table or counter, check to make sure the neck is level. Otherwise, sanding the frets could damage your guitar's playability. A notched straight-edge fits over the frets and allows you to check the levelness.[1]
- If the neck isn't straight, use a hex key to adjust the truss rod. Make small, incremental adjustments, turning only a quarter turn at a time.
EXPERT TIPAaron Asghari is a Professional Guitarist and the lead guitarist of The Ghost Next Door. He received his degree in Guitar Performance from the Guitar Institute of Technology program in Los Angeles. In addition to writing and performing with The Ghost Next Door, he is the founder and primary guitar instructor of Asghari Guitar Lessons.Professional Guitarist & Instructor Aaron Asghari
Professional Guitarist & InstructorYou can fret dress your guitar as often as you need to. One tell-tale sign that it's time is extreme buzzing or dead notes when you play.
-
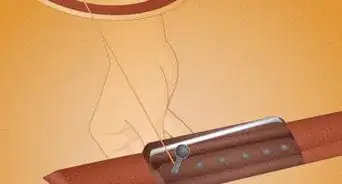
2Cover magnetic pickups. If you're dressing the frets of an electric guitar, use a dry cloth to cover the pick-ups. Otherwise, they will attract metal shavings when you sand the frets. These shavings will collect on the pole pieces of your pickups, ruining their performance.
- If you don't cover the pickups, tiny filings and particles of metal dust will get into places where you can't even see them – much less clean them out.
Advertisement -
3Secure your guitar to the table. Make sure your guitar won't move while you're sanding and crowning the frets. Clamp it to the table or wrap straps around the body to keep it held to the table. Test your method to make sure the guitar won't move.
- After you've clamped down your guitar, use a block of wood to support the neck. This helps absorb the pressure from the sanding so you don't crack your neck. Make sure the support is not lifting the neck up.
-
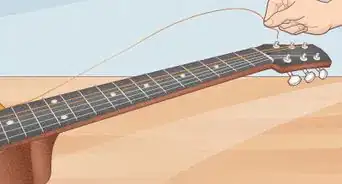
4Tape off your fretboard to protect it from shavings. Place masking tape across your fretboard so that only the frets are exposed. Leave the ends loose so that you can peel it off when you're done. Don't wrap the tape around the neck – you may ruin the guitar's finish taking it off.
- You may need narrower tape for the higher frets that are closer together on the fretboard. Take care that the tape on these frets doesn't stick to the body of your guitar.
-
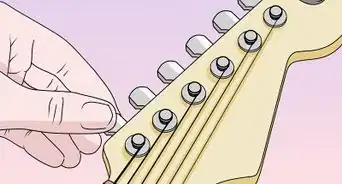
5Mark the highest point of each fret with a permanent marker. The marks will give you an indication of which parts of each fret have been leveled and which have not. When all of the marker is gone, you've sanded down far enough.
- You'll likely have to repeat this process several times. However, using a marker keeps you from sanding down too far.
-
6Use your leveling bar to sand down the frets. Affix adhesive 320-grit sandpaper to your leveling bar. Run the sandpaper side back and forth against the frets. Move it from side to side as well, to ensure that the frets are being sanded evenly.
- When you can no longer see any permanent marker on the tops of the frets, check to make sure the frets are level. If they're not, make marks on the highest points and sand again. You may have to do this several times before the frets are perfectly level.


Crowning the Frets
-
1Round the edges of each fret with a crowning file. After sanding, the tops of your frets will be flat. Use the crowning file to round off the edges of the fret until it shows no signs of flatness on top. Go slowly and have patience – this part of the process takes some time.
- Place a mark along the center of the top of the fret to help guide you. When you're done crowning, you'll have only a thin line of marker on the top of each fret.
- Crowning files come in different grits. A 300-grit typically works best on guitar frets.
- Many crowning files come with special metal plates you can set around the fret so you don't damage your fretboard. If yours didn't come with plates and you want them, you can purchase them separately. Otherwise, the masking tape should protect your fretboard as long as you're careful.
-
2Smooth the frets with sandpaper. Once all the frets are crowned, use progressively finer-grit sandpaper to sand down the frets and remove any scratches or nicks that occurred when you were leveling and crowning them.
- Start with 320-grit sandpaper, and sand the frets gently. Dust them off, then repeat the process with 600-grit sandpaper. Dust them off again, then repeat the process one last time with 800-grit sandpaper.
-
3Vacuum up any remaining metal shavings. At this point, your fretboard and the table surrounding will likely be covered in metal filings and dust. The easiest way to clean this up is with a hand vacuum.
- Make sure you've cleaned up all of the metal shavings and dust to avoid scratching the finish of your guitar.
-
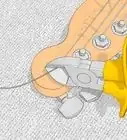
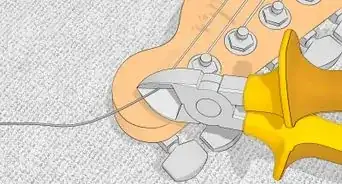
4File any fret ends that extend beyond the neck. If your guitar has been stored in a low-humidity environment, the ends may jut out beyond the sides of the neck. Filing them down makes playing more comfortable. Even if the ends don't extend beyond the neck, they may be sharp after flattening.[2]
- Filing into the fret end will prevent you from inadvertently chipping the fretboard or damaging the guitar's finish.


Finishing the Frets
-
1Polish the frets with a finishing pad. Mesh finishing pads are specifically designed to polish frets after dressing them. If you don't have finishing pads, you can use any other mesh pad. Rub each fret gently and evenly until it shines.[3]
- This step is designed to smooth out any imperfections on the surface of the fret, which will make your guitar more comfortable to play.
-
2Remove the tape from the fretboard. After all filing is done, take the loose ends of the tape and pull it off slowly and gently. If you go quickly and rip it off, you could damage the wood underneath.
- If the tape has curled around the neck, loosen it gently. Take care not to damage the finish.
- Pull evenly to avoid leaving residue behind. Metal dust could stick to the residue and damage your fretboard when you polish it.
-
3Clean any metal particles from the neck. Take a vacuum or a soft cloth and run it once more over the fretboard and surface around the neck. Make sure you've got all the metal dust that could damage the finish or make playing uncomfortable.[4]
- If you're dressing the frets on an electric guitar, make sure all the metal particles are removed from both your guitar and the table before you uncover the pickups.
-
4Polish the fretboard and frets with oil soap. Drip some oil soap or specially designed fretboard cleaner directly on the fretboard. Use a buffer or #0000 steel wool to gently rub the oil soap into the wood.
- Once you're done polishing, wipe the excess soap away with a dry cloth.


Community Q&A
-
QuestionI can't tell if it's the frets on a brand new Dean cheap electric, or the fingerboard that give me a rough feeling when I bend the strings. Any advice?
 Clem WestCommunity AnswerThree different ideas come to mind: 1) If the fingerboard isn't glossy (looks like bare wood) and looks/feels dry, try nourishing it with some coconut oil or lemon oil. Apply with a cloth and wipe off the excess some time later. 2) Change to Elixir strings. They may be more expensive, but they last much longer so they're cheaper in the long run. Their special coating will "lubricate" your playing in ways you never thought possible. 3) Tune down a bit. I know it doesn't seem that helpful, but tuning the whole guitar down to D will be easier, and sound nice! Or maybe the guitar just has crappy frets, but that would be weird for a brand new guitar.
Things You'll Need
- Hex key
- Notched straightedge
- Permanent marker
- Fret leveling bar
- 320-grit adhesive sandpaper
- 320-grit, 600-grit, and 800-grit sandpaper
- Masking tape
- Steel fret leveling block
- 300-grit fret crowning file
- Finishing pad
- Buffer or polish
- Steel wool
- Clean, lint-free cloth
Warnings
- If you have a maple fretboard, do not use a marker to mark the tops of the frets. The ink will bleed into the light wood and stain it.⧼thumbs_response⧽


References
- ↑ https://www.manchesterguitartech.co.uk/2011/04/11/dressing-the-frets-on-a-90s-fender-usa-stratocaster/
- ↑ https://www.premierguitar.com/articles/20662-guitar-shop-101-how-to-file-sharp-fret-ends
- ↑ https://www.manchesterguitartech.co.uk/2011/04/11/dressing-the-frets-on-a-90s-fender-usa-stratocaster/
- ↑ https://www.manchesterguitartech.co.uk/2011/04/11/dressing-the-frets-on-a-90s-fender-usa-stratocaster/
- ↑ https://www.premierguitar.com/articles/Understanding_Frets_and_Fret_Wear
About This Article