This article was co-authored by Lauren Kurtz. Lauren Kurtz is a Naturalist and Horticultural Specialist. Lauren has worked for Aurora, Colorado managing the Water-Wise Garden at Aurora Municipal Center for the Water Conservation Department. She earned a BA in Environmental and Sustainability Studies from Western Michigan University in 2014.
This article has been viewed 24,721 times.
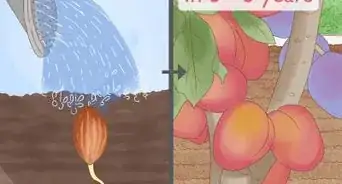
Apple trees are a great addition to a backyard garden, providing shade and delicious fruit. If you have a smaller garden and do not want to maintain a large apple tree, a dwarf apple tree may be ideal. They grow only 10 feet (3.0 m) tall, but still produce regular-sized fruit.[1] You can dwarf an apple tree you have already established in your yard by making a proper first cut to reduce its growth. You should then maintain and care for the apple tree during the first spring, summer, and winter so it stays small and thrives.
Steps
Making the First Cut
-
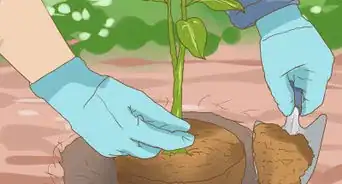
1Do the first cut as soon as the tree has been planted. Pruning the tree while it is still young and growing will ensure it takes to dwarfing. Try to do the first cut on the tree soon after it is planted at the end of winter.[2]
- Most apple tree varieties will take to dwarfing well. You may want to consult with a grower at your local gardening center or horticulture center to confirm the apple tree variety you have will be good for dwarfing.[3]
-
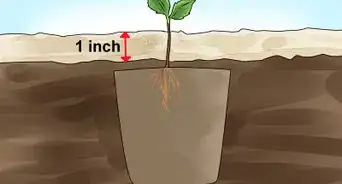
2Select a bud 18 inches (46 cm) from the ground. Look for a bud that comes to the height of your knee. The bud should protrude from a branch on the tree and still be dormant, with no fruit or foliage.[4]Advertisement
-
3Cut above the bud a 45 degree angle. Use gardening shears to make a clean cut that angles away from the bud. Make sure you cut right against the bud, but not the bud itself.[5]
-
4Prune the rest of the tree to the length of the bud. Use the bud as a guide to cut the other branches on the tree. You want the tree to be about knee height so it can grow into the size of a dwarf tree. You may end up removing a lot of the tree, but this is to be expected.[6]
- For example, if your young apple tree is 5 to 6 feet (1.5 to 1.8 m) tall, you may need to remove at least 4 to 5 feet (1.2 to 1.5 m) of the tree during the first cut. This may seem extreme, but it will ensure the tree grows to a smaller height.


Maintaining the Tree in the First Spring and Summer
-
1Examine the branches for spacing. As the first buds start to come in on the tree in early spring, look at the spacing of the branches closely. Determine if you like the arrangement of the top buds. The top buds should appear uniform, with an even display of buds on the growing branches.[7]
- If you are happy with the top buds as is, you can leave them and then revisit them in the early summer to ensure they are growing as you like.
- If you are not happy with the top buds, you can prune them.
-
2Prune the trunk of the tree. If you do not like the configuration and growth of the top buds, adjust them by cutting the trunk at a 45 degree angle just above the lower buds on the trunk. This will create a lower crotch for the tree and ensure the tree stays small.[8]
-
3Pinch off the buds on the nodes with your thumb and forefinger. The node is the cut section of the branches that start to grow. Pinch off all the buds except 1 so the bud that’s left can grow stronger and larger than multiple buds would have.[9]
-
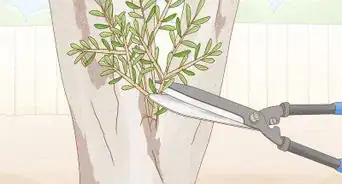
4Remove competing branches to create space. In the early summer, look over the tree to see how it is growing. You do not want the tree to have too many branches growing upward, as this will prevent sunlight from getting into the interior of the tree. Cut down any branches that are blocking sunlight in downward motion at a 45 degree angle.[10]
- If there is a branch growing vertical that you want to keep, make a cut 1⁄4 inch (0.64 cm) above a bud. Slope the cut down and away from the bud to encourage the branch to grow downward.[11]
-
5Reduce the scaffolding branches by half. Use gardening shears to cut down branches that are hanging from the trunk, known as the scaffolding branches. Reduce them to half their length using a 45 degree angle cut. Use a bud that faces the direction you want the branch to grow as a guide to your cut.[12]


Caring for the Tree in the First Winter
-
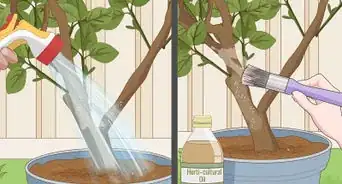
1Trim off dead or diseased branches. Use gardening shears to remove any branches that appear shriveled, dry, and brown, as they are likely dead. You should also get rid of any branches that have blisters, cork sized growths, or white powdery substances on them, as these are all signs of disease.[13]
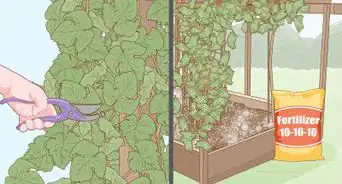
- If you’d like to prevent disease from infecting your tree in the future, you can spray it with fertilizer. Try using organic, all natural fertilizer if you plan to eat the apples on the tree.
- Speak to someone at your local gardening center or nursery for advice on fertilizer for apple trees.
-
2Prune the tree if it has stalled or looks uneven. If the tree is not growing or the branches are coming in unevenly, do not be afraid to prune it using cuts at a 45 degree angle. Try to adjust the shape of the tree to enhance its natural beauty so it grows into an even, rounded shape.[14]
- You should also make sure the interior of the tree is open to sunlight. If the interior is blocked by branches, trim them 1⁄4 inch (0.64 cm) above a bud, sloping the cut downward so the branches grow downward instead of upward.
- Keep in mind you can always adjust the shape of the apple tree throughout the seasons as it grows. After the first proper cut in winter, the tree should only grow to 10 feet (3.0 m) tall. You can then cut or trim its shape as needed.
-
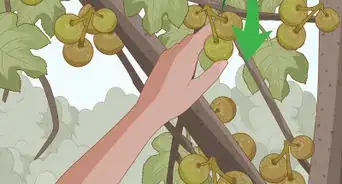
3Thin the fruit when it starts to grow. Dwarf apple trees can take years to bear fruit, particularly after a thorough pruning. When the first fruit starts to grow and is 1⁄2 to 1 inch (1.3 to 2.5 cm) in size, you will need to thin them to encourage healthy, ripe fruit to grow. Keep only one to two fruit on a branch and remove the rest by hand. Get rid of disfigured or brown fruit on the branches.[15]
- You can also remove fruit on alternate sides of the branches to thin them out. Pull off any fruit that are growing as doubles, where two apples are growing together as one.
- You want the apples to be spaced no closer than 6 to 8 inches (15 to 20 cm). This will help them grow better when the tree reaches maturity.


References
- ↑ https://ohioline.osu.edu/factsheet/hyg-1401
- ↑ http://www.motherearthnews.com/organic-gardening/gardening-techniques/small-fruit-trees-zm0z15onzdel
- ↑ https://ohioline.osu.edu/factsheet/hyg-1401
- ↑ http://www.motherearthnews.com/organic-gardening/gardening-techniques/small-fruit-trees-zm0z15onzdel
- ↑ http://www.motherearthnews.com/organic-gardening/gardening-techniques/small-fruit-trees-zm0z15onzdel
- ↑ http://www.motherearthnews.com/organic-gardening/gardening-techniques/small-fruit-trees-zm0z15onzdel
- ↑ http://www.motherearthnews.com/organic-gardening/gardening-techniques/small-fruit-trees-zm0z15onzdel
- ↑ http://www.motherearthnews.com/organic-gardening/gardening-techniques/small-fruit-trees-zm0z15onzdel
- ↑ http://www.motherearthnews.com/organic-gardening/gardening-techniques/small-fruit-trees-zm0z15onzdel
- ↑ http://www.motherearthnews.com/organic-gardening/gardening-techniques/small-fruit-trees-zm0z15onzdel
- ↑ http://www.sunset.com/garden/garden-basics/basic-pruning-cuts
- ↑ http://www.motherearthnews.com/organic-gardening/gardening-techniques/small-fruit-trees-zm0z15onzdel
- ↑ http://www.treeremoval.com/common-tree-diseases/#.Wa7ls9OGORs
- ↑ http://www.motherearthnews.com/organic-gardening/gardening-techniques/small-fruit-trees-zm0z15onzdel
- ↑ http://homeorchard.ucdavis.edu/8047.pdf
About This Article