This article was co-authored by Shun Pittman. Shun Pittman is a Master Cosmetologist, Author, Owner, and Founder of Corps d’Elite Salon and Corps d’Elite Beauty. With over 25 years of international experience, she is dedicated to and specializes in providing luxury salon services to all hair types and textures and every skin tone and shade. Her services include hair conditioning treatments, cutting, coloring, styling, extensions, and makeup application. Shun has experience working with, coaching, training, and mentoring beauty professionals from multiple companies including L'Oréal, Wella, Matrix, Paul Mitchell, Redken, Big Sexy Hair, and Toni & Guy. She is also a host for national and local media outlets and her work has been featured in The Washingtonian, The Cheddar Network, and WJLA Good Morning Washington's Beauty and Fashion Police segments. Shun is the author of “50 Things Your Hairdresser Wants YOU to Know (and a few things we don’t...)".
There are 14 references cited in this article, which can be found at the bottom of the page.
This article has been viewed 87,805 times.
Darkening your hair can give you the brand new look that you’ve been hoping for. Unfortunately, the chemicals used in traditional hair dye products may damage your hair. Luckily, there are several natural options to choose from. You can darken your hair using henna and indigo powder or use organic coffee. However, be aware that using coffee may not dye red or blonde hair completely black. These natural products can not only darken your hair, but they can also strengthen it, add shine, and stimulate hair growth.
Steps
Using Henna and Indigo
-
1Pour henna powder in a bowl and mix it with brewed chamomile tea. The first thing you’ll need to do is brew 1 cup (240 mL) of chamomile tea. The tea is used to release the dye in the henna. While it is still hot, slowly pour it in a bowl of 100% pure henna powder and mix it with a fork or whisk until you get a chunky yogurt consistency. The amount of henna you use depends on your hair length and thickness. It is recommended to use 3.5 ounces (99 g) for every 6 inches (15 cm) of hair.[1]
- Only use 100% pure henna and indigo powders instead of store-bought henna hair dye. These may contain harmful chemicals and are not completely natural.
- If you plan on visiting a professional hair colorist to lighten your hair anytime in the future, avoid using henna or indigo. These products can cause buildup in your hair that makes this process difficult.
-
2Cover the henna mixture with plastic wrap and let it sit for 8-10 hours. Your henna mixture needs to sit for a long period of time to thicken and release the dye. Once you have finished mixing the tea and henna, cover the bowl with plastic wrap and leave it in a warm spot for at least 8 hours. Leave it by a sunny window or under a lamp, as the warm temperature will allow the dye to release more quickly.[2]
- You’ll know it’s ready when you see a reddish oil sitting on the surface of the mixture.
Advertisement -
3Mix indigo powder and water in a separate bowl. Prepare your indigo powder in a separate bowl from the henna and tea mixture. Add water and mix it with a fork until the consistency is thick and creamy. The more indigo powder you use, the darker the color will turn out. When you finally mix the henna and indigo together, you’ll want the indigo to make up 75% of the mixture in order for your hair to be completely black.[3]
- For example, if you used 3.5 ounces (99 g) of henna, use at least 7.5 ounces (210 g) of indigo powder. If you do any less, your hair color will turn out dark brown or red.
-
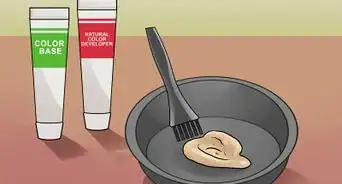
4Blend the indigo and henna mixtures together. Now, add the henna mixture in the bowl with your indigo. Stir it together with a fork until it’s blended completely. Keep stirring until the two colors become one. If there are remnants of the mixtures on the inner sides of the bowl, scrape them off with the fork and mix them into the bottom. This will ensure that everything is completely combined.[4]
- It is very important that the two mixtures are completely blended. If not, you may end up dyeing different parts of the hair different colors.
- To test if you're allergic to the henna dye, do a patch test. Apply it to your skin in an inconspicuous area, like behind your ear or on the inside of your arm, and wait 24 hours. If you don't develop any kind of allergic reaction, the dye should be safe to use on your hair.[5]
-
5Dampen your hair and protect your skin from the dye. Henna works best when applied to damp hair. Make sure it is damp, not drenched, by wetting your hair and removing excess water with a towel. When you’re done, add a thin layer of petroleum jelly on your ears and around your hairline to prevent the henna mixture from staining your skin.[6]
- Use a microfiber towel or T-shirt to dry your hair to prevent breakage.
-
6Separate your hair into sections. Start by making a vertical part down the middle of the back of your head to separate your hair into two sections. Then, divide each of those sections in half horizontally. Use hair clips to keep the hair separated.[7]
-
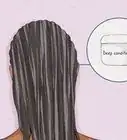
7Put on a pair of gloves and apply the henna mixture with your fingers. Apply generous amounts of the henna mixture to each section of your hair one at a time. Start with the front sections and work your way toward the back. Make sure the henna is fully massaged into every strand of your hair as well as your scalp. [8]
- Make sure you wear gloves when applying the mixture because henna will stain the skin. Cover your clothes with a towel and use plastic bags to cover your bathroom floor and sink to avoid staining your clothes and house surfaces.
-
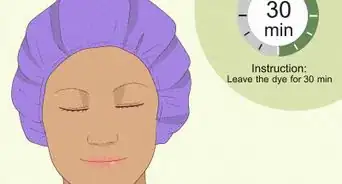
8Cover your hair with plastic wrap and let the henna sit for 2 hours. Once your hair is fully saturated with the henna mixture, push it up and wrap it with plastic wrap. The plastic wrap will hold in the moisture while the color penetrates your hair follicles. Your hair should be wet and stiff enough to fold it up on top of your head. While it is in this position get enough of the plastic wrap to cover your hair. Let it sit like this for at least 2 hours while the dye penetrates your hair strands.[9]
- It’s best to use plastic wrap as opposed to a shower cap because it will do a better job of keeping the moisture in and holding your hair up without letting it fall.
-
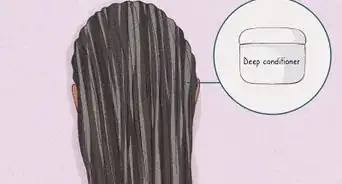
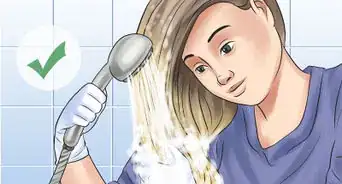
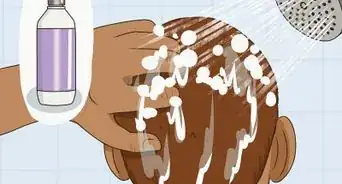
9Rinse out the henna mixture and wash your hair with shampoo and conditioner. After letting the henna sit on your hair, it’s time to rinse it out. You can use warm or cool water; just make sure all of the henna mixture is rinsed out. Once you have finished rinsing, wash your hair as you normally would with shampoo and conditioner.[10]
- Use conditioner with a nice fragrance you enjoy. Indigo is known to have an unpleasant odor.
-
10Repeat the henna hair treatment every 4-6 weeks. Although henna hair dye does last for quite a long time, the color is not permanent. The henna and indigo will start to fade after just a few weeks. Repeat this process every 4-6 weeks to keep your hair color black.[11]
- Make sure to wait at least 2 weeks between applications. It can be very drying to your hair and cause breakage if applied too frequently.


Darkening Your Hair with Coffee
-
1Shampoo and towel dry your hair. This type of dyeing should be done on clean hair that is 75-80% dry, so you’ll need to shampoo your hair before putting the coffee mixture in it. Choose a shampoo that is best for your hair type and wash thoroughly. When you’re finished, rinse the shampoo with water and partially dry it with a towel.[12]
-
2Brew 2 cups (470 mL) of dark roast coffee and let it cool down. In order to get hair as dark as possible, purchase coffee that is a dark roast, such as espresso. You can brew the coffee however you like, either with a coffee maker or on the stove. Let the coffee completely cool until you no longer see any steam coming out of the cup.[13]
- Always choose organic coffee. Non-organic coffee may contain some added chemicals.
- Make the brew as strong as possible by adding additional coffee grounds to your 2-cup (470-mL) brew. This will ensure that your hair color comes out as black as possible.
-
3Mix the finished coffee with coffee grounds. Once the coffee has completely cooled, add in 4 tbsp (~20 g) of coffee grounds. Mix both of the ingredients together with a spoon until the ground coffee dissolves and the mixture is smooth and black.[14]
- If you have particularly thick hair, double the ingredients in case you need extra.
-
4Apply the coffee mixture to your hair and leave it in for 30-45 minutes. Separate your hair into 4 even sections. Use a brush applicator to apply the coffee mixture to each section, making sure to fully saturate every strand. Use a wide tooth comb to even out the mixture throughout your hair and leave it in for no more than 45 minutes. Use a bobby pin or hair band to pin your hair up and keep it out of your face.[15]
- Don’t leave the mixture in your hair for more than 45 minutes, it will start to dry and harden. This will make it more difficult to rinse out.
- This coffee mixture can stain clothing and furniture, so be careful not to let it drip near these materials. Wrap a black towel that you don’t mind getting stained around your shoulders so you don’t ruin your clothes.
- Put a plastic shower cap on after applying the mixture to your hair so it all stays put.
-
5Rinse out the coffee mixture with water. After 30 to 45 minutes, it is time to rinse the mixture out of your hair. Stand in the shower and rinse your hair until the water runs clear. You can let your hair air dry or blow dry it. Try not to dry it with a towel, as you might rub off some of the dark color. Your hair will be darker and shiny when you’re finished.[16]
- Do not add shampoo to your rinse. It will remove all of the color you just applied.
-
6Repeat this coffee application twice a month to keep your hair black. Unfortunately, dyeing your hair with coffee is not permanent. You’ll need to apply this coffee mixture to your hair twice a month to keep the black color. If you do not continue to apply the coffee mixture, your hair will gradually turn back to its original color between washes.[17]
- If you’re covering up gray hair, apply the coffee twice in a row the first two times to ensure that the black hair lasts.


Community Q&A
-
QuestionDoesn't chamomile Lighten hair?
 Daja WilsonCommunity AnswerYes, it does. Since chamomile has the golden color in it, it can lighten your hair gently and slowly overtime.
Things You’ll Need
Using Henna and Indigo
- 100% pure henna powder
- 100% pure indigo powder
- Chamomile tea
- Cling wrap
- 2 large bowls
- Fork or whisk
- Rubber or vinyl gloves
- Shampoo and conditioner
Dyeing Hair Black with Coffee
- Dark roast coffee (organic)
- Coffee grounds
- Shampoo
- Wide tooth comb
- Booby pin or hairband
Warnings
- Always use gloves when handling the henna and indigo mixture. They will stain your skin.⧼thumbs_response⧽
- Do not use permanent hair dye after dyeing your hair with henna. The ingredients in some henna may interact poorly with the ammonia found in hair dye, causing damage. Wait at least 2 months to dye your hair after henna application, or use semi-permanent dye.⧼thumbs_response⧽


References
- ↑ https://youtu.be/64TTfLw9INY?t=88
- ↑ https://youtu.be/64TTfLw9INY?t=133
- ↑ https://youtu.be/64TTfLw9INY?t=154
- ↑ https://youtu.be/64TTfLw9INY?t=179
- ↑ Shun Pittman. Master Cosmetologist, Global Salon Educator & Author. Expert Interview. 11 May 2021.
- ↑ https://youtu.be/jWuVggtY2_I?t=247
- ↑ https://youtu.be/64TTfLw9INY?t=218
- ↑ https://youtu.be/64TTfLw9INY?t=218
- ↑ https://youtu.be/64TTfLw9INY?t=387
- ↑ https://youtu.be/64TTfLw9INY?t=449
- ↑ https://youtu.be/64TTfLw9INY?t=450
- ↑ https://www.teenvogue.com/story/how-to-dye-your-hair-with-coffee
- ↑ https://www.teenvogue.com/story/how-to-dye-your-hair-with-coffee
- ↑ https://www.teenvogue.com/story/how-to-dye-your-hair-with-coffee
- ↑ https://youtu.be/MWm1Ru_EZao?t=100
- ↑ https://youtu.be/HVPs0Mj0o6k?t=286
- ↑ https://youtu.be/HVPs0Mj0o6k?t=313
About This Article