This article was co-authored by Mia Rubie and by wikiHow staff writer, Amy Bobinger. Mia Rubie is a Nail Artist and the Owner of Sparkle San Francisco, a nail studio based in San Francisco, California. She has over eight years of nail artist and management experience and is known for her push-the-envelope designs and artistic eye for colors. Her clients include Sephora, Target, and Vogue. Her work has been featured in the San Francisco Chronicle and StyleCaster. She holds a BBA focusing on Entrepreneurial and Small Business Operations from San Francisco State University. You can find her work on her Instagram account @superflynails.
There are 12 references cited in this article, which can be found at the bottom of the page.
This article has been viewed 14,508 times.
Gel manicures are super durable—they can last up to 2 or 3 weeks! Unfortunately, the same UV-cured topcoat that makes gel polish so long-lasting also makes it really hard to take off. If you have soft gels or soak-off hard gels, file them down first, then soak them in acetone to dissolve the gel. For hard gel polish, however, you'll have to file it all the way down. If you're not sure which type of polish you have on, try the soaking process on one nail first, since that's a lot gentler on your natural nails.
Steps
Buffing and Soaking Softer Gels
-
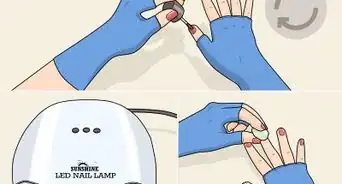
1Buff the shine off of your polish with a coarse nail file. Run the file back and forth over the entire surface of your nail until it starts to look dull. This will remove the hard topcoat, which will make it easier for the acetone to penetrate the gel polish.[1]
-
2Cut 10 pieces of aluminum foil that are 2.5 sq in (16 cm2) each. Either cut the foil with scissors or tear the pieces. Don't worry about measuring the exact size—just make sure each square is big enough to wrap all the way around your fingertip and a cotton ball.[5]
- You'll need one square for each finger, and it's a lot easier to cut or tear them before you start soaking your nails.
Advertisement -
3Soak a cotton ball in acetone. If you'd like, you can pour the acetone into a small glass bowl, then dip each cotton ball into the acetone. However, if it's easier for you, just place the cotton ball on top of the open acetone bottle, hold it in place with one finger, and tip the bottle until the cotton ball is saturated.[6]
- If you don't have cotton balls on hand, fold strips of paper towels into squares.
- Acetone is the active ingredient in most nail polish removers. Do not use acetone-free nail polish remover—it won't be strong enough to break down the gel polish.[7]
- Don't pour the acetone into a plastic bowl, since the acetone might start to break it down. And definitely never pour acetone into a styrofoam bowl—the styrofoam will dissolve quickly, leaving you with a big mess![8]
-
4Place the cotton ball on your nail, then wrap it in a foil square. Press the soaked cotton ball firmly down onto your nail. Make sure it covers the whole surface of your nail—stretch the cotton out, if you need to. Then, cover the cotton ball with the foil and wrap the top and sides around your finger to secure it in place.[9]
- Repeat this for all of the nails on that hand. Wait to do your other hand, though—it's a lot easier to do one hand first, then the other.
-
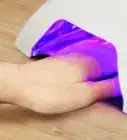
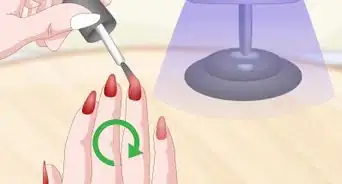
5Let the acetone soak into the polish for 10-20 minutes. If you're taking off soft gel polish, it may only take about 10 minutes before it starts to lift. Harder gels will probably need a little longer—about 20 minutes or so. If you aren't sure what kind you have, give it about 15 minutes, then take off one of the foils and check the polish.[10]
- When the wraps are ready to come off, the gel will look like it's crumbling. If you check and it isn't ready yet, replace the cotton ball and foil. If it still isn't crumbling after 25-30 minutes, you'll probably need to file the polish off.[11]
-
6Remove all of the foil and the cotton balls. Place the cotton balls and foil scraps into a bowl. Don't just put them directly onto your table or countertop, or the acetone could leave a stain.[12]
- Don't worry if you see any fibers left from the cotton balls. They'll come off when you remove the polish.
-
7Push the gel off of your nail with an orange stick. Use a wooden orange stick or a cuticle pusher to gently scrape the crumbling polish off of your nails. Just get the bulk of the color off, but don't scrape all the way down to your natural nail. Stop when there's still just a little residue left.[13]
- If all you have is a metal cuticle pusher, use that, but work gently so you don't damage the surface of your nails.[14]
-
8Remove the rest of the polish with a nail buffer. Buff your nails gently to take off any residue that was left behind. A nail buffer has a finer grit than a nail file, so it's a gentler way to finish the process.[15]
- In addition, this will restore some of the shine to your natural nails.
-
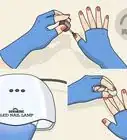
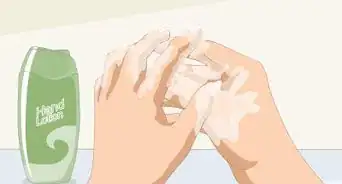
9Wash your hands, then apply cuticle oil to moisturize your nails. Gently wash your hands with mild soap to remove any acetone and dust that might be left on your fingers, then pat your hands dry with a soft towel. Also, both filing your nails and soaking them in acetone can be very drying.[16] Rub a few drops of cuticle oil into the skin around your nails to help rehydrate the area.[17]
- You can also rub hand lotion into your fingertip and nails if you'd like.[18]


Filing Hard Gels
-
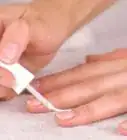
1Use nail clippers to trim your nails, if you'd like. If your nails are a little longer than you normally like, cut them before you start filing away the polish. That way, you'll have less polish to remove, making the process a little faster.[19]
- If you're happy with the length of your nails, you don't have to cut them.
-
2Use a coarse nail file. Look for one that's around 80- to 100-grit. Also, it's best to use a new file for this, because it's going to take a lot of filing to get all of that polish off.[20]
- You can find coarse nail files anywhere that manicure and nail art supplies are sold.
-
3File the surface of your nails in a cross-hatching pattern. First, run your nail file across your nail in one direction, then rotate it at a 90° angle and run the file over the same spot again. Then, move the file to a different spot on your nail and repeat the cross-hatching motion.[21]
- Don't file too long in one place, or you could accidentally file down into your natural nail.
-
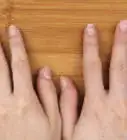
4Continue filing until there's just a thin layer of polish left on the nail. Keep filing in a cross-hatching motion until you've taken the majority of the polish off of your nail. Be sure to leave a little of the polish on your nail, though—stop once you can see the ridges in your natural nail. If you file down past that point, you could damage your nail.[22]
- Be patient—this can take as long as 10 minutes for each nail.
- Every so often, use your free hand to wipe away the dust so you can see how far you've filed.[23]
-
5Switch to a finer-grit file once you can see your nail ridges. Once you get to that very bottom layer of polish, grab a fine nail file—around 400- to 600-grit. Using that, slowly and carefully file away the gel polish that's left.[24]
- The finer grit will be less likely to damage your natural nail as you get down past the remaining polish.
- If your nail ridges aren't very prominent, it might be hard to see them through even a thin layer of polish. If that's the case, just switch to the finer nail file when there's hardly any polish left.
-
6
-
7Finish with cuticle oil and moisturizer. Apply a few drops of cuticle oil to help nourish and re-hydrate the skin at the base of your nails. This will help prevent them from becoming dry and cracked. Then, use a hand lotion to moisturize your hands, including your fingertips and the rest of your nails.[27]
- Taking off your polish can be really drying to your nails, which is why it's important to always nourish them once you're finished.
- If you'd like, you can also apply a protective base coat to help strengthen your nails.[28]


Expert Q&A
Did you know you can get expert answers for this article?
Unlock expert answers by supporting wikiHow
-
QuestionCan you peel off gel polish?
 Mia RubieMia Rubie is a Nail Artist and the Owner of Sparkle San Francisco, a nail studio based in San Francisco, California. She has over eight years of nail artist and management experience and is known for her push-the-envelope designs and artistic eye for colors. Her clients include Sephora, Target, and Vogue. Her work has been featured in the San Francisco Chronicle and StyleCaster. She holds a BBA focusing on Entrepreneurial and Small Business Operations from San Francisco State University. You can find her work on her Instagram account @superflynails.
Nail ArtistNo, don't peel off your gel polish. This can strip off the top layer of your nail, as well.
Support wikiHow by unlocking this expert answer.
-
QuestionWhy are my nails brittle after a gel manicure?Mia RubieMia Rubie is a Nail Artist and the Owner of Sparkle San Francisco, a nail studio based in San Francisco, California. She has over eight years of nail artist and management experience and is known for her push-the-envelope designs and artistic eye for colors. Her clients include Sephora, Target, and Vogue. Her work has been featured in the San Francisco Chronicle and StyleCaster. She holds a BBA focusing on Entrepreneurial and Small Business Operations from San Francisco State University. You can find her work on her Instagram account @superflynails.
Nail ArtistThe biggest reason that might happen is if you peel or pick the gel off, which will remove layers of your nail. If you're not doing that, it could be from the removal process—it involves soaking your nails in pure acetone, which is extremely dehydrating.Support wikiHow by unlocking this expert answer.
Things You'll Need
Buffing and Soaking Softer Gels
- Coarse file (80- to 100-grit)
- Acetone
- 10 cotton balls
- 10 squares of aluminum foil
- Orange wood stick
- Nail buffer
- Glass bowl (optional)
- Cuticle oil and moisturizer
Filing Hard Gels
- Nail clipper
- Coarse nail file (80- to 100-grit)
- Fine nail file (400- to 600-grit)
- Nail buffer
- Cuticle oil and moisturizer
Warnings
- Don't peel or pick the gel polish off your nails. You'll peel away layers of your nail along with it, which will leave them brittle and dry.[31]⧼thumbs_response⧽
References
- ↑ https://www.self.com/story/gel-nail-polish-mistakes
- ↑ https://www.nytimes.com/2020/04/03/style/how-to-remove-your-acrylics-or-gels-at-home.html
- ↑ https://www.nailsmag.com/391901/the-ultimate-file-guide
- ↑ https://www.thetrendspotter.net/how-to-remove-gel-nails-at-home/
- ↑ https://www.self.com/story/gel-nail-polish-mistakes
- ↑ https://www.thetrendspotter.net/how-to-remove-gel-nails-at-home/
- ↑ https://www.self.com/story/gel-nail-polish-mistakes
- ↑ https://sciencing.com/acetone-styrofoam-experiment-2768.html
- ↑ https://www.nytimes.com/2020/04/03/style/how-to-remove-your-acrylics-or-gels-at-home.html
- ↑ https://www.nytimes.com/2020/04/03/style/how-to-remove-your-acrylics-or-gels-at-home.html
- ↑ https://www.thetrendspotter.net/how-to-remove-gel-nails-at-home/
- ↑ https://www.thetrendspotter.net/how-to-remove-gel-nails-at-home/
- ↑ https://www.nytimes.com/2020/04/03/style/how-to-remove-your-acrylics-or-gels-at-home.html
- ↑ https://fashionmagazine.com/face-body/nails/what-to-do-with-your-gel-manicure-now-that-youre-in-quarantine/
- ↑ https://www.self.com/story/gel-nail-polish-mistakes
- ↑ Mia Rubie. Nail Artist. Expert Interview. 23 April 2020.
- ↑ https://www.self.com/story/gel-nail-polish-mistakes
- ↑ https://www.thetrendspotter.net/how-to-remove-gel-nails-at-home/
- ↑ https://www.vogue.com/article/how-to-remove-gel-nail-polish
- ↑ https://www.thetrendspotter.net/how-to-remove-gel-nails-at-home/
- ↑ https://www.nytimes.com/2020/04/03/style/how-to-remove-your-acrylics-or-gels-at-home.html
- ↑ https://www.nytimes.com/2020/04/03/style/how-to-remove-your-acrylics-or-gels-at-home.html
- ↑ https://www.thetrendspotter.net/how-to-remove-gel-nails-at-home/
- ↑ https://www.thetrendspotter.net/how-to-remove-gel-nails-at-home/
- ↑ https://www.thetrendspotter.net/how-to-remove-gel-nails-at-home/
- ↑ https://www.nytimes.com/2020/04/03/style/how-to-remove-your-acrylics-or-gels-at-home.html
- ↑ https://www.thetrendspotter.net/how-to-remove-gel-nails-at-home/
- ↑ https://www.nytimes.com/2020/04/03/style/how-to-remove-your-acrylics-or-gels-at-home.html
- ↑ https://youtu.be/HmmN1k28cWE?t=375
- ↑ https://www.instyle.com/beauty/nails/can-you-cut-file-nails-with-gel-manicure
- ↑ Mia Rubie. Nail Artist. Expert Interview. 23 April 2020.
About This Article