This article was co-authored by wikiHow Staff. Our trained team of editors and researchers validate articles for accuracy and comprehensiveness. wikiHow's Content Management Team carefully monitors the work from our editorial staff to ensure that each article is backed by trusted research and meets our high quality standards.
There are 17 references cited in this article, which can be found at the bottom of the page.
This article has been viewed 54,030 times.
Learn more...
uPVC (or unplasticized polyvinyl chloride) is a hard, resistant type of PVC plastic that, because of its rigidity, is often used to make the frames of windows. uPVC windows also require relatively little maintenance and provide great insulation against outside temperatures. Unless you’re installing the windows in a newly-built house or apartment, you’ll need to uninstall the existing window frames first. Then, prepare the new frame for installation and set them into the existing hole that you removed the old window frame from.
Steps
Removing an Existing Window
-
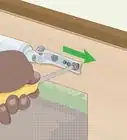
1Measure the space into which you’ll install the uPVC window. Use a tape measure to find the height and width of the rectangular hole in your wall into which you’ll install the new window. Measure both the height (vertical) and the width (horizontal) of the space in 2 or 3 places to ensure that you’re getting an accurate reading.[1]
- Once you have your new uPVC window, it’s a good idea to measure the new window to make sure that it’s the correct size and will fit into the window opening.
-
2Remove the screws holding the existing window in place. Use an electric screwdriver with a Philips head bit to unscrew all of the screws that hold the old window panels in the frame. This will reduce the weight of the frame and make it easier to remove.[2]
- It’s okay if the old window gets scuffed up while you’re removing it, or even if the glass gets broken—the old window is most likely trash anyway.
Advertisement -
3Cut the old window frame away from the wall and pry it loose. Run a utility knife around the outer edges of the window frame to cut through the sealant holding it in the hold in the wall. Also unscrew any screws that are running through the window frame and into the walls of your home. Finally, insert the end of a flat pry bar between the window frame and wall and press on the other end to wedge the window away from wall.[3]
- Be careful not to damage the wall while you’re removing the window. The window is disposable, but the wall is not.
-
4Hammer the old frame out of the wall with a soft-headed mallet. From the inside of your home, start by pounding a soft-headed mallet against the 4 corners of the window frame. This will loosen it up and prepare the frame for removal. If it’s still tight in place, hammer around the inside horizontal and vertical edges of the frame. Once the frame is loose, lift it out of the wall on the outside of the home. If the window is large, you’ll probably need another person to help you with this step.[4]
- Once you’ve removed the old window, you can dispose of it in the trash. Make sure to pick up all of the glass shards if the window shattered while you were removing it.
-
5Scrape away any sealant left around the window opening. After the old window is in the trash, use a putty knife and your utility knife to cut off any remaining sealant, broken bits of wood, and any other debris that’s left around the opening of the window. This material will only get in the way as you install the new uPVC frame.[5]
- All of this material that you’re removing can be placed into the trash.


Capping the uPVC Sill
-
1Purchase a uPVC frame slightly smaller than the wall opening. You can find high-quality uPVC windows at any window and door supply shop or at most home-improvement stores. Make sure that the window you buy is 10 millimetres (0.39 in) narrower that the space where you’ll install it. When it’s installed, there will be a gap of 5 millimetres (0.20 in) between the end of the frame and the wall on either side of the frame. The frame’s height, though, should be the same as the height of the gap in the wall.[6]
- For example, say that the wall gap measures 1,220 millimetres (48 in) in width. The appropriate width of uPVC window frame would be 1,210 millimetres (48 in).
- The extra space on the sides of the window frame so the window can expand and contract as it heats up and cools down during the day.
-
2Fit the sill endcaps to the new frame using super glue. The sill endcaps are small pieces of plastic, each roughly 4 inches (10 cm) long, that cap off the lower edges of the uPVC sills (which, at this point, are separate from the frame). Drizzle a line of superglue around the outer edges of the sill endcaps. Then, insert them into the openings at the lower left and right corners of the sill. If you’re not quite sure where they go, the window frame should have come with an installation guide that shows you in detail.[7]
- Sill endcaps prevent water from getting into the bottom corners of the uPVC windows. If water got in, it could freeze and break the entire frame open.
-
3Screw the sill into the bottom of the uPVC frame. The window frame will have come with PVC screws that are designed to hold pieces of the rigid plastic together. The sill will have holes in it where you should insert the screws. Place the screws in the holes and line the sill up with the bottom of the window frame. Then, use your electric screwdriver to tighten the screws in place and attach the sill to the frame.[8]
- Since the frame and sill are both plastic, you could crack them by overtightening the screws. Just tighten them until they won’t turn anymore.
-
4Seal the ends of the window sill with silicone caulk. To prevent water from getting into the sill and window frame, run a line of silicone caulk around the open areas around where the frame meets the sill. Also run silicone caulk on the small openings around where the sill endcaps meet the sill.[9]
- If you see any other parts of the frame and sill where you suspect that water could enter the frame, it’s a good idea to run a line of silicone over them, too.


Installing the uPVC Window Frame
-
1Hoist the new frame into the wall opening and check its level. With another person to help you, lift the uPVC window frame up into the opening in your wall. While 1 person holds it in place (so it doesn’t fall out), the other should set a level on the sides, bottom, and top of the frame to make sure it’s sitting evenly. If it’s not quite even, hammer in plastic packers between the frame and the wall until it is level. It’s common to install 2 packers on both sides of the frame to level it out.[10]
- You may need to insert your flat pry bar between the wall opening and the base of the uPVC frame to slide it into the wall opening.
- If the packers stick out past the edge of the frame, break them off with a chisel.
-
2Measure and drill fixing holes into the sides of the frame. On the left and right sides of the frame, use your tape measure to measure 15 centimetres (5.9 in) down from the top of the frame and up from the bottom. Mark the spots with a pencil. On the top and bottom of the window frame, measure in 60 centimetres (24 in) from the right and left sides, and mark these spots as well. Use your electric drill to make pilot holes over the pencil markings.[11]
- So, in total, you should drill 8 pilot holes: 2 each in the top, bottom, left, and right sides of the frame.
-
3Squeeze a bead of silicone into the 2 holes on the bottom of the frame. Before inserting fixing screws, run a pea-sized bead of silicone over both holes on the lower side of the frame. This will seal them against water and prevent any condensation or other moisture from entering the bottom of the frame.[12]
- If moisture were to get into the frame, it could freeze and crack the entire frame open.
-
4Drill the fixing screws through the frame and into the wall. Your uPVC window will have come with fixing screws that are used to anchor it into the wall. Use your electric drill and a Philips head bit to drive the 8 fixing screws through the frame. Drive the screws in until they’re tight, but make sure not to overtighten them in the wall.[13]
- uPVC window frames don’t contain any metal. Because of this, they’re relatively delicate. It’s important that you don’t overtighten the screws into the frame, or you could crack the plastic.


Fitting the Glass and Beads
-
1Snap glazing platforms into the inside edges of the sashes. The glazing platforms go into the glass-holding panels before you insert the glass itself. Glazing platforms are 3 inches (7.6 cm) long pieces of rigid plastic. Insert 1 at the top and bottom of each of the glass panels that came with the uPVC window. These will ensure that the glass panels fit properly into the panels as you install them.[14]
- The glazing platforms will come with the window when you purchase it, so you won’t need to install them separately.
- The sashes of a window frame are the moveable panels that hold individual panes of glass. Each window frame typically contains at least 2 sashes.
-
2Insert the glass panels into the uPVC window frame. Since there will be multiple panes of glass on your uPVC windows, match each pane of glass with the opening in the frame that fits it. Set the bottom of the glass into the frame first. Once it’s seated, press the top edge of the glass pane into the sash. Use the glazing shovel (a small, trowel-like plastic tool) to push the glass frames back so that they fit snugly in place.[15]
- It’s a good idea to wear gloves for this step, to keep the sharp edges of the glass pane from cutting your hand.
- The glazing tool should be included in the uPVC window kit. If not, you can purchase one at a local hardware store.
-
3Hammer the beads into the top, bottom, and sides of each sash. Glazing beads are vinyl strips that fit at the base of the sash at the outer edges of each glass frame. Match each piece of glazing bead to the glass edge of the same length. Place each bead at the point where the glass frame and the edge of the sash intersect, and gently hammer each glazing bead into place with the soft-headed mallet.[16]
- The glazing beads should snap into place easily, so you don’t need to pound on them with the hammer.
-
4Run a bead of caulk between the frame and internal wall. There will most likely be a small gap between the frame and the surrounding wall that’s roughly 1⁄16 in (0.16 cm) wide. Use silicone caulk to fill this. Run the silicone around the entire interior edge of the window frame. When you’re squeezing the caulk out of the tube, use a steady and consistent pressure to avoid breaks in the line of silicone.[17]
- If the glass panes and uPVC frame itself is dirty or covered in dust, use a chemical cleaner and a rag to wipe the glass clean.
-
5Apply a line of silicone sealant around the frame’s external surface. Like you did on the internal surfaces, run a line of silicone sealant in the gap between the external surface of your uPVC frame and the wall that it’s seated in. It’s important that this line of sealant be unbroken and not contain gaps. If there are gaps, water could seep in between the frame and the wall and damage the wall’s interior.[18]
- Also seal below the external sill of the window! You’ll probably need to crouch down in order to see below the windowsill.
- If you like, use a color of silicone sealant that matches the brick, wood, or vinyl on the outside of your home. This will be less visually disruptive than white sealant.


Things You’ll Need
- Measuring tape
- Electric drill
- Philips head bit
- Utility knife
- Flat pry bar
- Soft-headed mallet
- Putty knife
- Super glue
- PVC screws
- Silicone caulk
- Level
- Plastic packers
- Chisel
- Pencil
- Glazing platforms
- Glazing shovel
- Work gloves
Warnings
- Be careful when cutting around the old window frame using a utility knife. You could seriously injure your hand if you slip and accidentally cut yourself.⧼thumbs_response⧽
- Take care if you accidentally end up shattering the old window, since glass shards can give you a nasty cut. The best thing to do would be to put on a pair of thick work gloves, clean up the broken glass, and safely dispose of it before continuing to fit the windows.⧼thumbs_response⧽


References
- ↑ https://youtu.be/yks01Ot2R5c?t=28
- ↑ https://youtu.be/yks01Ot2R5c?t=47
- ↑ https://youtu.be/yks01Ot2R5c?t=59
- ↑ https://youtu.be/yks01Ot2R5c?t=75
- ↑ https://youtu.be/yks01Ot2R5c?t=75
- ↑ https://youtu.be/yks01Ot2R5c?t=17
- ↑ https://www.diyhowto.co.uk/articles/install-windows.htm#.XUR7029KjIV
- ↑ https://youtu.be/cixY1zh46MQ?t=177
- ↑ https://youtu.be/cixY1zh46MQ?t=189
- ↑ https://youtu.be/SOiGwpyRCf8?t=88
- ↑ https://youtu.be/cixY1zh46MQ?t=220
- ↑ https://youtu.be/cixY1zh46MQ?t=275
- ↑ https://youtu.be/cixY1zh46MQ?t=233
- ↑ https://youtu.be/cixY1zh46MQ?t=322
- ↑ https://youtu.be/cixY1zh46MQ?t=351
- ↑ https://youtu.be/cixY1zh46MQ?t=405
- ↑ https://youtu.be/cixY1zh46MQ?t=422
- ↑ https://youtu.be/cixY1zh46MQ?t=451
About This Article