This article was co-authored by April Ferri and by wikiHow staff writer, Hannah Madden. April Ferri is a Professional Hair Stylist and the Co-Owner of Widows Peak Salon, a hair salon based in Los Angeles, California. With over ten years of experience, April specializes in hair coloring and enhancing and transforming natural tones into vibrant shades for beautiful and low maintenance hair. Her work has been featured in Voyage LA Magazine, and she has worked as a stylist for LA Fashion Week.
There are 13 references cited in this article, which can be found at the bottom of the page.
This article has been viewed 12,200 times.
Highlights add tone and depth to your hair to brighten it up and give it a new life. However, sometimes highlights can come out stripey or spotty which can distract from their overall effect. Fortunately, you can spend a few hours at home using professional hair products to even out your highlights and make your hair look as good as new.
Steps
Sectioning Your Hair
-
1Brush your hair to get rid of knots and tangles. Start with dry hair and use a hair brush to smooth it out and get rid of any snarls. It’s important to see how your hair looks without any styling so you can tell what areas you need to work on.[1]
- Be gentle as you brush your hair, especially if you’ve just bleached it. Brushing too hard or too quickly can tear or break your hair.
-
2Section your hair into 3 even sections. Part your hair down the middle, then part it vertically over your ears. Pull the front 2 sections up into some clips to keep them out of the way, and leave the bottom section loose so you can work on it.[2] [3]
Did You Know? The back of your head usually processes faster since it gets less exposure to the sun. That’s why you should always start bleaching or coloring the back of your head first.
Advertisement -
3Pull out a 0.25 in (0.64 cm) section from the crown of your head. Use the tip of a hair dye brush or the pointed side of a comb to pick out a thin section from your hair. Try to work in small sections the entire time so you can see the different colors and tones of your hair.[4]
- Using small sections will make your hair take longer, but it will also make your hair look better in the long run.
-
4Clip the section up so you can see your roots. Pick the section of hair up and pull it up toward the crown of your head. Use a clip to hold it in place so you can see the roots in the part of your hair.[5]
- The roots are most likely where your highlights are the most spotty. It’s important to expose your roots to see what kind of products you need to use and where to put them.[6]


Applying Bleach and Toner
-
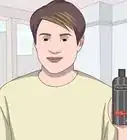
1Mix up a bleach mixture in a plastic bowl. Depending on how dark your hair is, you can use a 20 volume developer or a 30 volume developer for your bleach. Make a 1:1 ratio of bleach powder and developer, then mix them together in a plastic bowl.[7]
Tip: If your hair is dry or damaged, add a moisturizing serum to the bleach mixture. This will help to protect the health of your hair as you bleach it.
-
2Make a toner mixture in a separate plastic bowl. Read the instructions on your bottle of toner and mix it together with a 10 volume developer. Combine the ingredients with your hair dye brush until they resemble a thick paste.[8]
- Bleach lightens your hair while toner removes brassiness. It’s important to use both to fix your spotty highlights so you can lighten some areas and even out others.
-
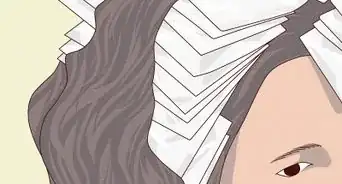
3Place a piece of foil under your first section of hair. Pull out a piece of foil that’s slightly wider than the section of hair you just pulled out. Unclip your hair, then slide the foil directly under the section. Try to keep the foil in place the entire time you are using your bleach or toner.[9]
- Using foil right away will help separate your hair sections better so you don’t get product on any areas that don’t need it.
-
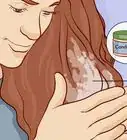
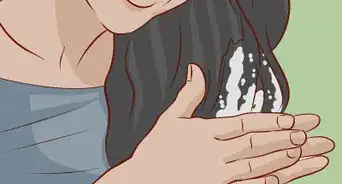
4Paint bleach onto the dark sections of your hair with a dye brush. Take a look at your hair and see where any dark spots, or your natural hair color, is peeking through. Pick them out of your hair by using the tip of a comb or a hair dye brush. Then, use your hair dye brush to lightly brush bleach onto those areas to lighten them up and match the rest of your highlights.[10]
- Try to avoid getting bleach on the sections of your hair that are already lightened. If you lighten them too much, they could get damaged.
-
5Swipe toner on the brassy sections of your hair with a hair dye brush. Look at your hair and pick out any pieces that look yellow or orange. Pick out the pieces with the end of your hair dye brush, then use a different hair dye brush to pick up some toner and swipe it onto the hair to cancel out the warm tones and cool down the blonde color.[11]
- You don’t have to be as exact with your toner as you did with the bleach since it’s not as strong or damaging to your hair.
-
6Fold the hair section into a foil to process it. Smooth the hair down on top of the foil and then fold the foil in half horizontally so it stays in place on your hair. Press down on the crease of the foil to really make it stick.[12]
- Try not to crinkle up the foil too much, or you could rub off some of the bleach or toner you just put on your hair.
- Using foils traps in the heat from the bleach to make it process faster. It also helps to section out your hair so you don’t mix up pieces that you’ve already done.
-
7Keep pulling out sections until you’ve covered your entire head. Unfortunately, fixing spotty highlights is probably going to take a long time, especially if you’re doing them on yourself. Keep working 1 section at a time and pull out small, even layers of hair so you can see what you’re working with.[13]
- It may be easier to have someone help you, especially with the back of your head.


Rinsing and Completing the Process
-
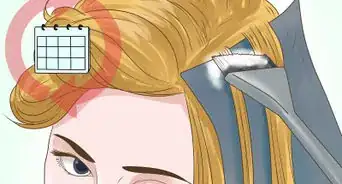
1Let the products process for about 20 minutes. Unfold a few foils occasionally to check on how your hair is doing. If you mostly worked on your roots, they will probably process faster since they are reacting to the heat of your scalp.[14]
Tip: You may need to let the products sit on your head longer if your hair is not lightening. Try not to let the bleach sit on your hair for more than 45 minutes to prevent damage.
-
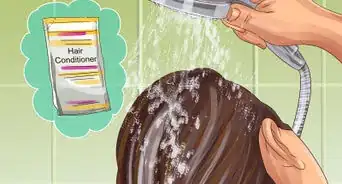
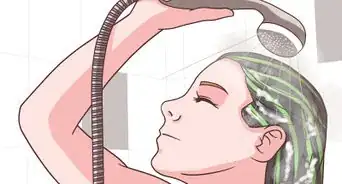
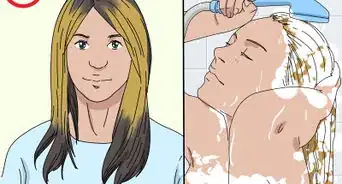
2Rinse your hair out with cool water. Head to the sink or the shower and take out all the foils. Rinse your head with cold water to remove all of the bleach and the toner.[15]
- Using cold water is less harsh on your hair and won’t strip out any of the toner that you just applied.
-
3Paint on toner to any brassy or yellow areas of your hair. The parts of your hair that you just bleached may have turned yellow or orange, depending on the hair color you started with. If you need to, use the same toner that you mixed up earlier and apply it to the sections that are brassy to cancel out the warm tones.[16]
- Try not to apply toner to the areas that already have it. You could overtone your hair and make those pieces too dark.
-
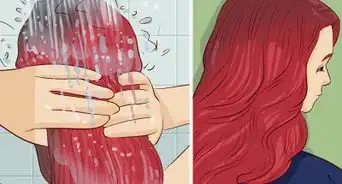
4Rinse out the toner with cool water after 10 minutes. Keep an eye on the toner in your hair as it processes to make sure it isn’t getting too dark. Head to your sink or shower to rinse it out using cool water, and then check on your hair to see how your highlights look.
-
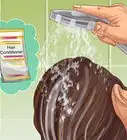
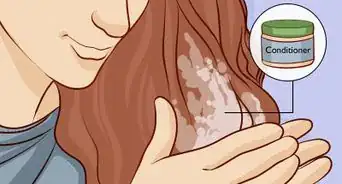
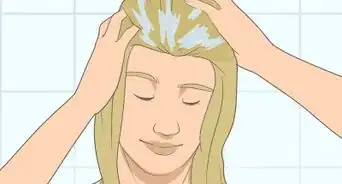
5Use a conditioner to add moisture back into your hair. Both bleach and toner can dry out or damage your hair, especially if it’s been bleached before. Apply a thin layer of conditioner all over your head, let it sit for about 5 minutes, then rinse it out.
- Apply conditioner every time you wash your hair to keep it healthy and moisturized.


Expert Q&A
-
QuestionCan you fix stripey highlights at home?
 April FerriApril Ferri is a Professional Hair Stylist and the Co-Owner of Widows Peak Salon, a hair salon based in Los Angeles, California. With over ten years of experience, April specializes in hair coloring and enhancing and transforming natural tones into vibrant shades for beautiful and low maintenance hair. Her work has been featured in Voyage LA Magazine, and she has worked as a stylist for LA Fashion Week.
Professional Hair StylistIt's really tough to do this if you aren't an experienced stylist or colorist. I'd highly suggest going to see a professional for this.
Things You’ll Need
- Brush
- Comb
- Clips
- Hair dye brush
- Plastic bowls
- Bleach powder
- Developer
- Toner
- Aluminum foil

References
- ↑ https://www.youtube.com/watch?v=0yh7K7MyevQ&feature=youtu.be&t=12
- ↑ https://www.youtube.com/watch?v=0yh7K7MyevQ&feature=youtu.be&t=31
- ↑ April Ferri. Professional Hair Stylist. Expert Interview. 8 December 2020.
- ↑ https://www.youtube.com/watch?v=UcRJfQsV3Aw&feature=youtu.be&t=206
- ↑ https://www.youtube.com/watch?v=UcRJfQsV3Aw&feature=youtu.be&t=233
- ↑ April Ferri. Professional Hair Stylist. Expert Interview. 8 December 2020.
- ↑ https://www.youtube.com/watch?v=UcRJfQsV3Aw&feature=youtu.be&t=91
- ↑ https://www.youtube.com/watch?v=UcRJfQsV3Aw&feature=youtu.be&t=91
- ↑ https://www.youtube.com/watch?v=rBuPayR6Rjk&feature=youtu.be&t=152
- ↑ https://www.youtube.com/watch?v=rBuPayR6Rjk&feature=youtu.be&t=152
- ↑ https://www.youtube.com/watch?v=UcRJfQsV3Aw&feature=youtu.be&t=285
- ↑ https://www.youtube.com/watch?v=0yh7K7MyevQ&feature=youtu.be&t=44
- ↑ https://www.youtube.com/watch?v=UcRJfQsV3Aw&feature=youtu.be&t=620
- ↑ https://www.youtube.com/watch?v=UcRJfQsV3Aw&feature=youtu.be&t=699
- ↑ https://www.youtube.com/watch?v=UcRJfQsV3Aw&feature=youtu.be&t=710
- ↑ https://www.youtube.com/watch?v=0yh7K7MyevQ&feature=youtu.be&t=600
About This Article