X
This article was co-authored by wikiHow Staff. Our trained team of editors and researchers validate articles for accuracy and comprehensiveness. wikiHow's Content Management Team carefully monitors the work from our editorial staff to ensure that each article is backed by trusted research and meets our high quality standards.
This article has been viewed 21,159 times.
Learn more...
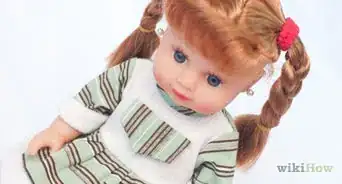
American Girl dolls are loved by children everywhere. They also can be expensive to buy as well as to fix. Luckily, you can easily fix common doll problems at home with a few simple household supplies, so your young one can go back to enjoying playtime with their favorite doll.
Steps
Method 1
Method 1 of 4:
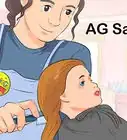
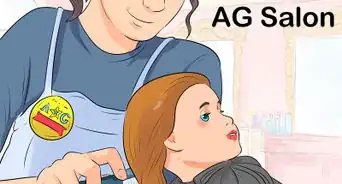
Fixing Your Doll’s Hair
-
1Mist your doll’s hair lightly with water. Fill a spray bottle with water. Cover your doll’s face with your hand or a cloth and dampen its hair by squirting water on it. Don’t soak the hair; simply moisten it so it feels damp when you touch it.[1]
- Take care not to get water in your doll’s eyes, as they are metal, and water can cause them to rust.
- Avoid brushing your doll’s hair when it’s dry, as this can cause pieces of it to break.
-
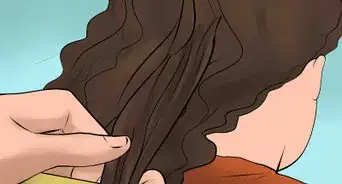
2Unknot each tangle using a small wire brush or pick. The American Girl company sells small wire brushes specifically for caring for your doll’s hair, but you can also use another small wire brush or pick from a beauty supply store. Lightly move the wire brush or pick through your doll’s dampened tangles to remove the knots.[2]
- Avoid using regular plastic brushes or combs on your doll’s hair, as they will make the hair more damaged.
- For bigger tangles and mats, simply continue working the wire through the knots until the hair is untangled. Avoid roughly pulling on the hair because you may break pieces of it off.
Advertisement -
3Allow your doll's hair to air-dry if it's straight. If your doll came with straight hair and you'd like to keep it straight, you can simply allow the dampened hair to air-dry after you brush it. Do not use a blow-dryer on its hair, as this can cause the hair to become damaged.[3]
-
4Wrap the doll’s damp hair around a pencil to create curls. If your doll had curly hair when you got it, but the curls have fallen out, you can put them back in by wrapping small strands of hair around a pencil. Grab a small strand of hair about .25 in (0.64 cm) thick and wrap it tightly around a pencil. Hold the strand of hair in place around the pencil for 1-2 minutes.[4]
- Unwrap the curl from the pencil and take another damp piece and wrap it around a pencil. Repeat this for all of your doll’s curls and allow them to air-dry.
- If you'd like to make looser curls, you can grab thicker pieces of hair to wrap around the pencil.
- Do not brush your doll’s hair after you curl it, as this will make the curls fall back out.
- If your doll had straight hair when you got it, it may not hold curls very well. This technique works best on dolls that were made with curly hair.
-
5Braid your doll’s damp hair to add waves. To add waves to your doll’s hair, divide the hair into 3 sections. Wrap the section on the right over the middle section to make it the new middle section, then wrap the section on the left over the middle, and so on.[5]
- To make your doll’s hair very wavy, add lots of small braids throughout its hair instead of one large braid.
- If you leave your doll’s braids in for a long time, its hair may become permanently wavy. If you want the waves to be temporary, take your doll’s braids out after 1 night.
-
6Do not use heat on your doll’s hair. Do not use a hair dryer, curling iron, straightening iron, or any other heat tool on your doll’s hair. Heat will cause your doll’s hair to melt.[6]


Advertisement
Method 2
Method 2 of 4:
Cleaning Your Doll’s Skin
-
1Place 2 US tbsp (30 mL) of baking soda and 1 US tbsp (15 mL) of water into a small bowl. Make a cleansing paste by using a measuring spoon to add baking soda and water to a small bowl. Stir the water into the baking soda until the powder is all absorbed into the paste.[7]
- Children should ask for help with this project if they do not usually use measuring spoons or baking soda.
- If the paste is too thick, add a few more drops of water. If it is very runny, add another pinch of baking soda to thicken it. The ideal consistency should be that of toothpaste.
-
2Apply some baking soda paste to a warm, wet washcloth. Take a washcloth and wet it using warm water from the sink. Use your finger or a spoon to add a dollop of paste onto a section of the washcloth.[8]
-
3Rub the baking soda paste in a circular motion into your doll’s skin. Take the section of washcloth with paste on it and press it firmly into your doll’s hard vinyl skin where the mark is on its face, arms, or legs. Rub the skin in a firm, circular motion with the washcloth until you see the mark fade.[9]
- If the mark doesn’t disappear after the first cleaning, apply more baking soda to your washcloth and repeat rubbing the mark until it’s gone.
- This cleansing process works with most makeup, marker, and paint stains.
-
4Wipe the residue away with a warm, wet washcloth. When your doll’s skin is clean, rinse your washcloth under warm running water until all the baking soda paste is rinsed away. Use the washcloth to wipe any leftover baking soda paste off of your doll.[10]
- Rinse your washcloth frequently as you wipe your doll if there is a lot of paste left on the skin.
- Allow your doll to air-dry or use a clean towel to dry off its skin.
-
5Do not submerge your doll in water. American Girl dolls should not be given baths with real water. Their eyes can rust if they get wet, and the stuffing inside the doll can become damaged.[11]
- Clean your doll’s skin using the baking soda and washcloth technique. Do not use other products when wiping the skin.


Advertisement
Method 3
Method 3 of 4:
Reattaching Your Doll’s Head
-
1Remove any leftover old string from the doll’s neck. Your doll’s head was attached using a piece of string or cord when it was made. If the head has fallen off, it’s probably because this string was cut. Pull out any remaining string by grabbing the end and tugging on it.
- Children should ask their parents to complete the steps of fixing their doll’s head.
-
2Thread some sturdy string into a rounded off needle or safety pin. Get some string that is similar in thickness to the string from the doll’s neck. Take a needle that has been clipped, or a safety pin, and attach the string to the needle or pin. Leave a long tail of at least 12 in (30 cm) on the end of the string.
- If you’re using a safety pin, close the end of the safety pin back up after you’ve attached the cord. You don’t want a sharp end sticking out, or the end will come out of the doll’s fabric instead of around the neck casing.
- Be sure to use a small safety pin that can easily move through the neck casing.
-
3Locate the neck casing, removing some stuffing if necessary. The neck casing is the area containing the string that you pulled out in the first step. It ends in 2 holes at the back of the doll’s neck. You will be threading the string through this casing, so if the area is very tight because of the stuffing inside the doll, pull some stuffing out with your fingers.
- Don’t throw the stuffing away; set it aside to put it back into the doll later.
-
4Push the needle through the casing, all the way around the doll’s neck. Put your needle or pin into one of the holes of the neck casing. Gather some neck casing and slide the needle or pin further into the casing, using your fingers to pinch and slide the needle along the circle from the outside.
- Continue pushing the needle or pin through the casing until you reach the hole on the other side of the back of the doll’s neck.
-
5Pull out the needle when you get to the other side of the neck casing. When you’ve got the string all the way through the doll’s neck, pull out the needle or pin with the string attached. Make the 2 ends of string even by pulling the end with the pin attached even with the other end that you cut.
- You can now remove the needle or safety pin from the end of the string.
-
6Replace any stuffing that you removed. If you removed stuffing from the doll in a previous step, put the stuffing back in with your fingers. Push the stuffing down so you have room to put the doll’s head back on.
- Leaving the stuffing out may cause your doll's body to be too loose, and its head may fall off again more easily.
-
7Replace the doll’s head and pull the cord ends tight. Put the doll’s head back into the neck hole, pushing the doll’s neck down into the body stuffing. Grab the ends of the string dangling from the back of the doll’s neck casing and pull them tight to secure the doll’s head in place.
- Test if you have the string tight enough by holding it between your fingers near the doll's neck, and turning the doll upside down. If the head stays in place, you have the string pulled tight enough.
-
8Tie a strong knot in the cord. When the head is secured because the strings are tight, tie a sturdy knot at the back of the doll’s neck to keep the ends together. Clip the remaining leftover string with scissors, leaving about 2 in (5.1 cm) on each end.
- The string ends will be covered by your doll's clothes. You'll need to leave the string in place to keep your doll's head on.


Advertisement
Method 4
Method 4 of 4:
Restringing Doll Limbs
-
1Remove your doll’s head. Work at a table with a folded towel on it to place your doll’s parts onto as you remove them. Untie the string at the back of your doll’s neck and remove its head.
- If the knot in the string is very tight, insert the sharp point of a push pin between the string pieces and wiggle it around to loosen the knot.
-
2Remove the cotton stuffing from the doll and place it into a large bowl. Pull out your doll’s stuffing one handful at a time and store it in a large bowl. Set the bowl aside until after you restring her limbs and you’re ready to put the stuffing back in.
-
3Cut the string between the white cup and knot or metal crimper. Look inside your doll’s torso at the joints where the limbs are attached. You’ll see a white tension cup and some string with either a knot at the end or a metal crimper that holds the string in place outside the cup. Use a pair of scissors to clip the string between the cup and the knot or crimper.
- Repeat step for all the doll’s limbs if you’d like to restring all of them.
-
4Remove the white tension cups from the limbs by heating them. Place the limb you’d like to restring into a plastic freezer bag, leaving the bag open at the top and the rest of the doll outside of it. Heat about 24 fl oz (710 mL) of water in a pot on the stove until it’s almost boiling. Dip the limb and joint covered in plastic into the water for 2 minutes, then remove them from the water and the bag and pull the tension cup out of the limb joint with pliers or a hemostat.
- Don’t allow water to get inside the plastic bag or any of the doll limbs. Hold the limbs you’re not restringing up above the bag and the water, and dip only the bottom of the bag where the joint is inside the water.
- Repeat this step for each limb you would like to restring.
-
5Place the tension cup on a new piece of string and secure it with a crimper. Cut some 3⁄16 or 1⁄8 in (0.48 or 0.32 cm) bungee cord into a piece that’s 6 in (15 cm) in length. Thread the tension cup and a size #18-#10 metal crimping sleeve one end of the string with the hole of the tension cup toward the metal sleeve on the end.
- Pull the string taut as you crimp the metal sleeve into place with a wire crimper.
- Repeat this step for all of the limbs that you are restringing.
-
6Put the string and tension cup back inside the limb. Heat the limb again by covering it in a plastic back and dipping it in hot water. When the limb joint is soft, push the end of the string with the metal crimper into the joint until the tension cup is inside. If you are restringing more limbs, do this for the other limbs as well.
-
7Reattach the limb to the body. Position the limb outside the doll’s body at the hole in the fabric where you removed it. Pull the string inside the doll’s body and attach another tension cup and string on the inside to hold the limb in place using the same method you used in the last step. It’s helpful to use the doll’s neck hole to work inside the body since it is the biggest hole of the doll.
- Clip the string with scissors after you have attached the tension cup and crimper to the inside. Leave about 1 in (2.5 cm) beyond the metal crimping sleeve at the end inside the doll.
- Repeat this step for any other limbs you wish to restring.
-
8Re-stuff the doll and put its head back on. When you’ve finished reattaching all the limbs you wanted to, take the stuffing from the bowl and put it back inside the doll’s body through the neck hole with your fingers. Put the doll’s head back on by stuffing the neck inside the neck hole and pulling the neck string tight, then secure the head in place by tying the string together in a tight knot.


Advertisement
Things You’ll Need
Fixing Tangled Hair
- Spray bottle
- Water
- Wire brush or pick
Cleaning Skin
- Baking soda
- Warm water
- Small bowl
- Clean washcloth
Reattaching Head
- Study string or cord that can fit in doll’s neck
- Scissors
- Rounded-off needle or small safety pin
Restringing Limbs
- Scissors
- Needle-nose pliers or a hemostat
- Wire crimper
- 3⁄16 or 1⁄8 in (0.48 or 0.32 cm) bungee cord – about 6 inches (15 cm) per limb
- #18-#10 crimp sleeves - 2 per limb


References
- ↑ http://play.americangirl.com/play/doll-hair-and-care/
- ↑ https://www.allthingswithpurpose.com/diy-fixing-your-american-girl-dolls-hair-without-a-trip-to-the-doll-hospital/
- ↑ http://play.americangirl.com/play/doll-hair-and-care/
- ↑ https://www.allthingswithpurpose.com/diy-fixing-your-american-girl-dolls-hair-without-a-trip-to-the-doll-hospital/
- ↑ https://www.allthingswithpurpose.com/diy-fixing-your-american-girl-dolls-hair-without-a-trip-to-the-doll-hospital/
- ↑ http://play.americangirl.com/play/doll-hair-and-care/
- ↑ https://www.realsimple.com/home-organizing/cleaning/more-techniques/cleaning-toys#vinyl-dolls
- ↑ http://play.americangirl.com/play/doll-hair-and-care/
- ↑ http://play.americangirl.com/play/doll-hair-and-care/
About This Article

wikiHow Staff
wikiHow Staff Writer
This article was co-authored by wikiHow Staff. Our trained team of editors and researchers validate articles for accuracy and comprehensiveness. wikiHow's Content Management Team carefully monitors the work from our editorial staff to ensure that each article is backed by trusted research and meets our high quality standards. This article has been viewed 21,159 times.
Co-authors: 10
Updated: March 9, 2022
Views: 21,159
Categories: American Girl Dolls
Advertisement