This article was co-authored by Tami Claytor. Tami Claytor is an Etiquette Coach, Image Consultant, and the Owner of Always Appropriate Image and Etiquette Consulting in New York, New York. With over 20 years of experience, Tami specializes in teaching etiquette classes to individuals, students, companies, and community organizations. Tami has spent decades studying cultures through her extensive travels across five continents and has created cultural diversity workshops to promote social justice and cross-cultural awareness. She holds a BA in Economics with a concentration in International Relations from Clark University. Tami studied at the Ophelia DeVore School of Charm and the Fashion Institute of Technology, where she earned her Image Consultant Certification.
There are 10 references cited in this article, which can be found at the bottom of the page.
This article has been viewed 88,178 times.
A beautifully folded napkin can really set the tone for any meal, and it’s fairly easy to learn to do! Whether you’re decorating for a romantic dinner, a fun brunch, or a special holiday meal, take a few minutes to fold your napkins and elevate your table setting.
Steps
Making a Simple Silverware Pouch
-
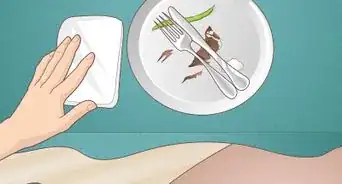
1Lay the napkin down in front of you on a flat surface. For this fold, use either a square or rectangle napkin. It helps if the napkin has already been ironed so that the final presentation will look really nice.[1]
- It’s nearly impossible to make nice folds without a flat surface. Wipe down a table, counter, or desk to use for your folding tasks.
-
2Fold the napkin twice so it is separated into quarters. Make a horizontal fold and then a vertical fold. Try your best to make the edges of the napkin line up as evenly as possible.[2]
Tip: For really crisp lines in your napkin, iron the creases after each fold.
Advertisement -
3Position the square so that the open corner is at the top left. The open corner is the one with the loose edges that can be folded back. You should be able to count 4 layers of the napkin.[3]
- Turning the napkin this way is just to help you keep things straight as you’re folding.
-
4Bring the top layer down diagonally so it creates a triangle. Fold the corner of the top layer so that it is flush with the bottom-right corner. Leave all the other layers in place.[4]
- This creates the pouch that you will eventually be able to put silverware into.
-
5Flip the napkin over and fold it vertically into thirds. Bring the leftmost edge to the center of the napkin, and then fold the right edge over the top of the left edge. Do your best to make all 3 sections as equal in size as possible.[5]
- These folds are what will hold the front pouch in place so it doesn’t come loose later on.
-
6Turn the napkin back over to reveal a diagonal pouch for the silverware. When you flip the napkin over again, you’ll see that there is now a tight pouch into which you can slip the silverware for your meal. Keep the back of the napkin against the table to hold the folds in place.[6]
- You can set this napkin on top of a dinner plate, or you can put it off to the side of the plate, just depending on what look you prefer.


Folding a Napkin into a Standing Fan
-
1Fold a rectangular or square napkin in half lengthwise. Position the napkin so that the crease of the fold is either on your left- or right-hand side, instead of on the top or bottom.[7]
Tip: A rectangular napkin will create a fuller fan, but a square napkin will give you really similar results.
-
2Bring the bottom edge of the napkin up about 1⁄4 inch (0.64 cm). This is the first fold in the process of making the actual fan. However far you end up folding this bottom edge is how wide each of your subsequent folds will need to be.[8]
- For this particular fold, it really helps the napkin keep its shape if it has crisp creases along each fold. Use an iron if you’re having trouble getting the napkin to keep its shape.
-
3Accordion-fold the napkin almost all the way to the top. Maintain the 1⁄4 inch (0.64 cm) folds all the way up so that each section is as equal in size as possible. Leave the last 1⁄4 inch (0.64 cm) at the top unfolded.[9]
- To accordion-fold, simply fold the napkin under and then over, back and forth, until the entirety of the fabric is 1⁄4 inch (0.64 cm) wide.
-
4Pick up the napkin carefully and fold it in half. After you’re done folding the napkin accordion-style, carefully pick it up from the table. Bring the 2 ends of the napkin together so that it is folded in half equally.[10]
- The napkin will look a bit like a scrunched up piece of fabric at this point, but don’t worry! It’ll turn into a fan quickly.
-
5Stand the napkin up on the table and find the exact middle location. Keep the middlemost ends of the napkin pinched together so that the 2 sides don’t separate. Set the napkin on a flat surface while you hold the middle together.[11]
- At this stage, the napkin should look like a fan. It isn’t able to fully stand up on its own yet without falling apart, but you should be able to see its final form taking shape.
-
6Create a triangle from the middle pieces’ corners to keep them in place. Take the 2 middlemost pieces, which should have corners extending out from them from the fabric left unfolded earlier, and fold those corners down in one direction to essentially fasten them together. Tuck them into the closest fold so they’ll stay in place and keep the fan together.[12]
-
7Place the napkin on a dinner plate and make the final adjustments. Carefully move the napkin to its place at the table. Look at the front of the fan—there are probably a few pleats that can be straightened or fluffed so that the napkin fully resembles a fan. [13]
- You could also make a fan for a napkin ring if you’d prefer to use rings with your place setting.


Creating a Rose
-
1Fold a square napkin in half to create a triangle. Bring the top-left corner over to meet the bottom-right corner. Leave a 1⁄4 inch (0.64 cm) border around the edges so that the bottom layer slightly extends past the top layer.[14]
- Make sure you’re working on a clean, flat surface. It’ll be much easier to roll and fold the napkin this way.
-
2Roll up the bottom of the napkin until there are 3 to 5 inches (7.6 to 12.7 cm) of material left. Position the napkin so that the long creased fold is closest to your body and the top of the triangle is pointing away from you. Roll the material upwards toward the top as tightly as you can. The material left over at the top of the napkin will later be used to create the rose leaves.[15]
Tip: Rolling will be a little easier if you keep your hands in the middle section of the napkin, rather than at the outermost edges. Focus on keeping the middle section as tight as possible and let the ends on either side be a little looser.
-
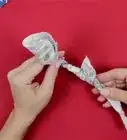
3Take the napkin and roll it again, this time from end to end. Start at one end of the already-rolled section and roll it tightly toward the other end. Stop once you get about 3 to 4 inches (7.6 to 10.2 cm) from the end to create a short “tail.”[16]
- At this stage, the napkin should be wound up pretty tightly and will be the size of a small ball.
-
4Tuck the tail into the fold that is going around the center of the napkin. This will secure the napkin so that it won’t come easily undone. If you are having a hard time pushing the end in with your fingers because of how tightly the napkin is rolled, use a butter knife to gently push the tail into the fold.[17]
- It’s okay if this part doesn’t look perfect. It’ll actually end up being covered and on the underside of the rose.
-
5Take the 2 top pieces and fold them down underneath the napkin. The triangle you left earlier when you were rolling the napkin the first time comes into play now. Take the corners of each piece and pull them out and around the edge of the napkin on either side. Flip the napkin over as you do this so that what was resting against the table just a moment ago is now facing up.[18]
- The corners end up forming the “leaves” that sit around the edge of the actual rose.
-
6Make any final adjustments and set the napkin on top of a dinner plate. Your rose should pretty much be ready to go, but if there are any small sections that need to be poked into place, now is the time to do so. You can put the rose directly on top of a plate, or you could set it off to the corner for a pretty placement option.[19]
- Avoid touching the rose too much. While it should be pretty secure, pulling at the material a lot could mess up the look of it.


Forming a Christmas Tree
-
1Lay a square napkin out flat in front of you and fold it into quarters. Use a clean, ironed napkin. Work on a flat surface so that it’s easier to make crisp folds in the napkin.[20]
- For this particular fold, use green or red napkins for an even more festive look.
-
2Position the napkin so that the open flaps are pointing at your body. There is one side of the folded napkin that has an opening. This is the side you want to move so that it’s closest to your body.[21]
-
3Bring the topmost layer up to create a triangle. Leave a small border, about 1⁄4 inch (0.64 cm) so that the top layer isn’t laying exactly flush with the bottom layers.[22]
- The border will eventually help to form the different levels of the tree.
-
4Make an upward fold with each remaining flap, always leaving a border. Bring up each remaining flap, one by one, until they are about 1⁄4 inch (0.64 cm) from being flush with the previously folded flap. If you’re having trouble getting your folds to lay flat, use an iron to make more defined creases.[23]
- In all, there should be 5 visible triangles when you’re finished making your folds.
-
5Flip the napkin over and fold the right side over about 1/3 of the way. Bring the bottom-right corner up so that it touches the edge of the left-hand side and creates another smaller triangle.[24]
-
6Repeat this fold on the left side so that the napkin is folded into thirds. The goal is to make the folds on both the left and the right sides as even as possible so that your tree will be symmetrical.[25]
- Take your time and refold if needed.
-
7Fold the top of the napkin down and flip the napkin over once again. There is a small triangle at the top of the napkin. Fold it down so that you create a flat edge. This fold actually forms the base of your Christmas tree![26]
- Peeking from behind this edge will be a much smaller triangle from the material on the other side of the napkin—leave this piece of fabric unfolded, as it is meant to be the top of your tree.
-
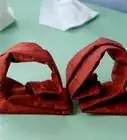
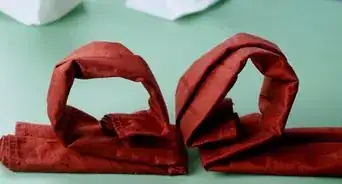
8Tuck the hanging flaps up into the napkin to finish your tree. You will make 4 final folds to hide the pointed ends of each section. Simply tuck them upwards so that they are caught within the napkin itself. Do your best to keep the folded material as flat as possible.[27]
- When you’re done, you can place the tree on a dinner plate for a festive presentation.


Expert Q&A
Did you know you can get expert answers for this article?
Unlock expert answers by supporting wikiHow
-
QuestionAre there any simple ways to fold a napkin?
 Tami ClaytorTami Claytor is an Etiquette Coach, Image Consultant, and the Owner of Always Appropriate Image and Etiquette Consulting in New York, New York. With over 20 years of experience, Tami specializes in teaching etiquette classes to individuals, students, companies, and community organizations. Tami has spent decades studying cultures through her extensive travels across five continents and has created cultural diversity workshops to promote social justice and cross-cultural awareness. She holds a BA in Economics with a concentration in International Relations from Clark University. Tami studied at the Ophelia DeVore School of Charm and the Fashion Institute of Technology, where she earned her Image Consultant Certification.
Etiquette CoachIf you have a pretty napkin ring, slip it around the napkin, then make accordion folds to create a pretty flower shape. Then, put that in the middle of the charger or inside a water glass.
Support wikiHow by unlocking this expert answer.

References
- ↑ https://www.architecturaldigest.com/story/easy-napkin-folds-for-any-dinner-party
- ↑ https://www.architecturaldigest.com/story/easy-napkin-folds-for-any-dinner-party
- ↑ https://www.architecturaldigest.com/story/easy-napkin-folds-for-any-dinner-party
- ↑ https://www.architecturaldigest.com/story/easy-napkin-folds-for-any-dinner-party
- ↑ https://www.architecturaldigest.com/story/easy-napkin-folds-for-any-dinner-party
- ↑ https://www.architecturaldigest.com/story/easy-napkin-folds-for-any-dinner-party
- ↑ https://www.napkinfoldingguide.com/16-standingfan/
- ↑ https://www.napkinfoldingguide.com/16-standingfan/
- ↑ https://www.napkinfoldingguide.com/16-standingfan/
- ↑ https://www.napkinfoldingguide.com/16-standingfan/
- ↑ https://www.napkinfoldingguide.com/16-standingfan/
- ↑ https://www.napkinfoldingguide.com/16-standingfan/
- ↑ https://www.napkinfoldingguide.com/16-standingfan/
- ↑ https://youtu.be/TbeLumQf9hw?t=16
- ↑ https://youtu.be/TbeLumQf9hw?t=27
- ↑ https://youtu.be/TbeLumQf9hw?t=46
- ↑ https://youtu.be/TbeLumQf9hw?t=54
- ↑ https://youtu.be/TbeLumQf9hw?t=74
- ↑ https://youtu.be/TbeLumQf9hw?t=87
- ↑ https://www.handimania.com/diy/christmas-tree-napkin-fold-all-steps.html
- ↑ https://www.handimania.com/diy/christmas-tree-napkin-fold-all-steps.html
- ↑ https://www.handimania.com/diy/christmas-tree-napkin-fold-all-steps.html
- ↑ https://www.handimania.com/diy/christmas-tree-napkin-fold-all-steps.html
- ↑ https://www.handimania.com/diy/christmas-tree-napkin-fold-all-steps.html
- ↑ https://www.handimania.com/diy/christmas-tree-napkin-fold-all-steps.html
- ↑ https://www.handimania.com/diy/christmas-tree-napkin-fold-all-steps.html
- ↑ https://www.handimania.com/diy/christmas-tree-napkin-fold-all-steps.html
- ↑ Tami Claytor. Etiquette Coach. Expert Interview. 29 September 2020.
About This Article

To fold a cloth napkin so it has a pocket for silverware, start by spreading the napkin out on a flat surface and folding it in half twice so it looks like a small square. Next, move the square so the open corner is at the top left. Bring the top layer down diagonally so it makes a triangle and is flush with the bottom-right corner. Then, flip it over, bring the leftmost edge to the center of the napkin, and fold the right edge over the top of the left edge so that all 3 sections are equal in size. Finally, turn the napkin back over to reveal the diagonal pouch and slip the silverware into the pouch. To learn how to fold a napkin into a rose, scroll down!