This article was co-authored by JoAnna Minneci. JoAnna Minneci is a Professional Chef based in the Nashville, Tennessee area. With more than 18 years of experience, Chef JoAnna specializes in teaching others how to cook through private cooking lessons, team-building events, and wellness and nutrition classes. She has also appeared in numerous television shows on networks such as Bravo and Food Network. Chef JoAnna received Culinary Arts training from the Art Institute of California at Los Angeles. She is also certified in sanitation, nutrition, kitchen management, and cost control.
There are 9 references cited in this article, which can be found at the bottom of the page.
This article has been viewed 110,626 times.
If you have too much fresh squash to use and want to save some for later, why not freeze it? Winter and summer squash can both be blanched and frozen. Blanching protects the flavor, color, and even the nourishing vitamins of the squash. Winter squash can also be frozen raw and saved for baked goods or soup. So, whatever season you’re in, you can have a surplus of seasonal squash stored away!
Steps
Freezing Raw Winter Squash
-
1Peel the squash using a vegetable peeler or knife. Set the squash on a cutting board and cut the rounded ends off of each side. Then, holding the squash in one hand, use a vegetable peeler in your dominant hand to peel strips of squash off away from you. If you're using a knife, hold the squash upright on your cutting board and slice downwards, removing the squash’s skin.[1]
- Once you’ve finished one section with the vegetable peeler, rotate the squash in your non-dominant hand to peel another side.
- With a knife, slice just beneath the skin on one side of the squash. Then, slice all the way down the length of the squash until this strip is completely removed. Continue slicing off other strips of skin in this manner until you make it all the way around the squash.
-
2Cut the squash into 1 inch (2.5 cm) cubes. Use a serrated kitchen knife to cut the squash into evenly-sized pieces. You can technically cut the pieces into any size, but 1 inch (2.5 cm) cubes are good for freezer bags if you don’t have a specific size in mind.[2]
- Use a cutting board whenever chopping vegetables.
Advertisement -
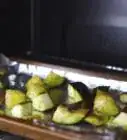
3Freeze the squash on a baking sheet for 2 hours. Line a baking sheet with parchment or wax paper. Spread the pieces of squash onto the baking sheet in a single layer, without overlapping. Place this baking sheet in the freezer and allow the squash to freeze solid for around 2 hours.[3]
- Freezing the pieces this way makes it less likely that the squash will stick together in long-term frozen storage.
-
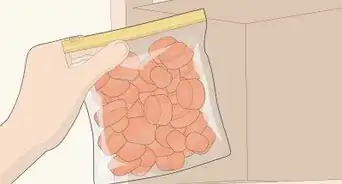
4Transfer the squash to a freezer-safe container. Take the individually frozen pieces of squash and place them into a freezer-safe plastic container or plastic bag. Leave 1⁄2 inch (1.3 cm) of empty space on the top before sealing the container.[4]
- Tupperware and plastic bags both make good storage solutions.
- If using a plastic bag, push as much air out of the bag as possible before sealing it.
-
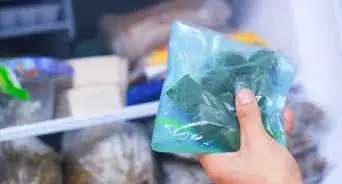
5Freeze the uncooked squash for up to 12 months. Place the containers of squash in the freezer and store them there until you are ready to use the vegetable in a dish. Label the bag or container so you know when you put it in the freezer for storage.[5]
-
6Defrost the squash or add it directly to certain soups and chilis. When you’re ready to use the squash, you can add the chunks directly to warm stews or you can thaw them for use in other recipes. To thaw the frozen squash, move the bag of squash from the freezer to the refrigerator overnight, or set it out on the counter for 3-4 hours.[6]
- You can also roast butternut squash directly from the freezer without thawing it.
Cooking and Freezing Winter Squash
-
1Preheat the oven to 400 °F (204 °C). You will be using the oven to roast the squash before freezing them. Set the oven to Bake and turn it up to 400 °F (204 °C). If you prefer, it is also possible to cook the squash in the microwave, in which case you do not need to worry about preheating the oven.
-
2Cut the squash in half using a sharp, serrated knife. Set the squash on a cutting board, and hold it steady with one hand. Using the knife, cut the squash into halves lengthwise. Set the squash halves down on the cutting board, with the flesh-side facing up.[7]
- For bigger squash like butternut squash, move slowly and carefully with the knife. Squash roll, and you don’t want the knife to slip. If the squash is smaller, like an acorn squash, it will be easier to hold it steady.
-
3Scoop out the stringy insides of the squash. Using a spoon or your hands, scoop away and discard any pulp or seeds on the inside of the squash. If you have a melon baller, this is a great tool to easily scoop and discard seeds.[8] A serrated grapefruit spoon will also help get the job done.[9]
- Compost or trash the inner bits of the squash.
- Spoons don’t cut as well through the strings of a squash as a melon baller, due to their dull edges.
-
4Place the squash, flesh-side up, on a baking sheet. If you want to add some flavor, season the squash with salt and pepper. You can also add about 1 tbsp (15 mL) of butter or honey and 1 tbsp (14.3 g) of brown sugar to the squash at this point.[10]
- If you plan to roast the squash straight out of the freezer, adding butter and brown sugar at this stage is a good idea. Otherwise, the squash will preserve better without additives, and you can just bake it as it is.
-
5Bake the squash for 25 minutes or until it is tender. Place the baking sheet in the previously preheated oven (400 °F (204 °C)) and let them bake for 25 minutes. After 25 minutes, take the baking tray out, and use a fork to check if the flesh is soft (you should be able to pierce the flesh with the fork).[11]
- To microwave the squash, place the squash pieces on a piece of microwave-safe plastic wrap on top of a microwavable plate. Cook them for 15 minutes on high, checking the squash at every 5 minute interval. Continue cooking until the flesh is soft enough to scoop it out of the skin with a spoon.[12]
- Depending on how old or hard the squash was, it may take up to 35 minutes for it to be tender.
-
6Scoop out the flesh of the squash with a spoon. Once the squash has cooled down sufficiently, use a metal spoon to dig out the softened insides of the squash away from its skin. Transfer the fleshy parts into a separate bowl and discard the hollowed out skin once you’re done.[13]
- You can also use a serrated spoon for a bit of extra help digging out the flesh.
-
7Puree the cooked squash. A puree of winter squash will hold up well in the freezer for many months. Use a blender or a food processor to puree the winter squash until all of the lumps are gone. Cooking will have softened the squash to make this step rather easy.[14]
- Alternatively, you can mash the squash with a mashing tool or even a run of the mill metal fork to achieve a similar effect.
-
8Portion and freeze small amounts of the pureed squash. Wait for the squash to cool, then portion out 1⁄2 cup (120 mL) balls of the puree, placing them on a parchment-covered baking sheet or in an ice cube tray or muffin tin. Pop the tray or tin in the freezer and let the pureed squash freeze for at least four hours, or until frozen solid.[15]
- Pureed squash will freeze best if it’s frozen in small portions, but if you’re in a rush, you can skip this step and transfer the puree to long-term storage immediately.
-
9Transfer the pureed squash to the freezer for up to 3 months. Once the smaller portions are frozen solid, spoon them into freezer-safe plastic containers or plastic bags. Place the containers of squash in your freezer and save until they’re ready to use.[16]
- If you’re using plastic bags, remove as much air as possible from the bags before you seal them.
-
10Defrost the puree for baking or cooking. Place the puree in the refrigerator overnight to thaw it, or set it out on the counter for 3-4 hours to defrost it. You can then microwave the puree or heat it on the stovetop to add it to warm dishes. You can also add it directly to soups and chilis.[17]
- Winter squash puree is a great candidate for adding to sauces, soups, dips, lasagnas, enchiladas, and baked breads or muffins.
Blanching and Freezing Summer Squash
-
1Cut the squash into rounds 1⁄4 inch (0.64 cm) thick. Use a sharp, heavy kitchen knife to slice off both ends of the squash, then slice your summer squash into the thin rounds. Move lengthwise down the squash, slicing every 1⁄4 inch (0.64 cm).[18]
- If you are freezing zucchini to make zucchini bread in the future, you should grate it instead. Use a box grater to grate the zucchini into a bowl.
- There is no need to peel the squash first in this method, as you are going to blanch it.
-
2Boil 1 gallon (3.8 L) of water per 1 pound (16 oz) of summer squash. Use a large stockpot over high heat. Place a wire basket or metal steamer into the stockpot. The wire basket should dip down into the water so that the squash will be completely immersed in the boiling water.[19]
- You are not steaming the squash in this method. Instead, you are using the wire basket as a way to easily fish the squash out of the water when ready.
-
3Put the squash into a wire basket and blanch them for 3 to 4 minutes. Place no more than 1 lb (450 g) of squash in the boiling water at a time. Cook for roughly 3 minutes. After the pieces of squash are done, remove the squash from the stockpot using the wire basket.[20]
-
4Dunk the squash in cold water or a bowl of ice for another 3 minutes. If you’re using a bowl of ice, make sure you have about 1 pound (16 oz) of ice to 1 pound (16 oz) of vegetables. If you’re using liquid water, run cold tap water continuously over the squash or change it frequently so it stays cold. Ideally, the water should be 60 °F (16 °C) or below.[23]
- Dunking the squash in ice water after you have blanched it will stop the cooking process, thereby preventing the enzymes from breaking down any further. As a result, you are left with squash that retains its color, flavor, and most of its texture.
-
5Drain the squash to remove any excess water. Pour the ice bucket filled with squash through a colander (or any kind of strainer) to remove excess water from the squash. This will prepare the squash for freezing. Pat the pieces dry with a paper towel after draining.[24]
- You can sandwich the squash between two paper towels for about 10 minutes to make sure they have dried completely.
-
6Freeze the blanched squash in a plastic bag for up to 6 months. Fill freezer-safe plastic containers or plastic bags with the squash. If using plastic bags, you can try to push as much air as possible out of the bag before sealing. Place the containers of squash in the freezer. Keep them there until you are ready to use them.[25]
- Blanched summer squash will usually stay good in a freezer for up to 6 months.
-
7Defrost the squash and use it for cooking or baking. Place the summer squash in the fridge overnight to thaw it out, or place it on the counter for 3-4 hours to defrost it. Then, use your frozen summer squash in pasta sauces, soups, casseroles, or as a side dish.[26]
-
8Finished.

Community Q&A
-
QuestionCan I freeze the squash in slices?
 Community AnswerYes! In fact, that is a very convenient way to meal prep. Just store them in plastic bags and use them within 1-2 months.
 -
QuestionCan I use seal a meal bags?
 Community AnswerYes.
 -
QuestionDo I have to blanch summer squash before freezing?
 HalleCommunity AnswerIn order for the summer squash to keep well, it is advised! Blanching protects the flavor and nutrients of the summer squash so that when you unfreeze it it will still taste good and provide healthy nutrients.
Things You'll Need
Freezing Winter Squash Raw
- Vegetable peeler or smooth knife
- Serrated kitchen knife
- Baking tray
- Freezer-safe plastic container or plastic bag
Cooking and Freezing Winter Squash
- Serrated kitchen knife
- Food processor or blender
- Freezer-safe plastic containers or plastic bags
Cooking and Freezing Summer Squash
- Serrated kitchen knife
- Large stockpot
- Wire basket or colander
- Large bowl of ice water
- Baking sheet
- Freezer-safe plastic container or plastic bag


References
- ↑ https://www.thekitchn.com/two-ways-to-freeze-winter-squash-178166
- ↑ https://www.thekitchn.com/two-ways-to-freeze-winter-squash-178166
- ↑ http://www.thekitchn.com/two-ways-to-freeze-winter-squash-178166
- ↑ https://www.thekitchn.com/two-ways-to-freeze-winter-squash-178166
- ↑ https://extension.umn.edu/preserving-and-preparing/preserving-winter-squash-and-pumpkins
- ↑ https://www.thekitchn.com/two-ways-to-freeze-winter-squash-178166
- ↑ https://www.foodnetwork.com/thanksgiving/thanksgiving-how-tos/3-ways-to-cook-butternut-squash
- ↑ https://www.thekitchn.com/the-best-tool-for-removing-pumpkin-and-squash-seeds-tips-from-the-kitchn-211414
- ↑ https://www.foodnetwork.com/thanksgiving/thanksgiving-how-tos/3-ways-to-cook-butternut-squash
- ↑ https://www.foodnetwork.com/thanksgiving/thanksgiving-how-tos/3-ways-to-cook-butternut-squash
- ↑ https://www.foodnetwork.com/thanksgiving/thanksgiving-how-tos/3-ways-to-cook-butternut-squash
- ↑ https://www.foodnetwork.com/thanksgiving/thanksgiving-how-tos/3-ways-to-cook-butternut-squash
- ↑ https://www.foodnetwork.com/thanksgiving/thanksgiving-how-tos/3-ways-to-cook-butternut-squash
- ↑ https://www.thekitchn.com/two-ways-to-freeze-winter-squash-178166
- ↑ https://www.thekitchn.com/two-ways-to-freeze-winter-squash-178166
- ↑ https://www.thekitchn.com/two-ways-to-freeze-winter-squash-178166
- ↑ https://www.thekitchn.com/two-ways-to-freeze-winter-squash-178166
- ↑ https://www.farmflavor.com/at-home/cooking/how-to-blanch-freeze-summer-squash-zucchini/
- ↑ https://nchfp.uga.edu/how/freeze/blanching.html
- ↑ https://nchfp.uga.edu/how/freeze/blanching.html
- ↑ https://www.farmflavor.com/at-home/cooking/how-to-blanch-freeze-summer-squash-zucchini/
- ↑ https://www.clemson.edu/extension/food/canning/canning-tips/26preserving-summer-squash.html
- ↑ https://nchfp.uga.edu/how/freeze/blanching.html
- ↑ https://www.farmflavor.com/at-home/cooking/how-to-blanch-freeze-summer-squash-zucchini/
- ↑ https://www.farmflavor.com/at-home/cooking/how-to-blanch-freeze-summer-squash-zucchini/
- ↑ https://www.farmflavor.com/at-home/cooking/how-to-blanch-freeze-summer-squash-zucchini/
- ↑ https://www.nytimes.com/video/dining/100000001901430/grating-squash.html
- ↑ https://www.nytimes.com/video/dining/100000001901430/grating-squash.html
About This Article

Before you freeze raw winter squash, use a vegetable peeler to remove the skin from the squash. Next, cut the squash into 1-inch cubes and spread them in a single layer on a baking sheet so that none of the pieces are touching. Place the tray in the freezer for 2-3 hours, then remove the tray and transfer the pieces of squash to a freezer-safe container or a plastic bag, leaving about a 1/2 inch of headspace before you seal the container. Finally, label the squash with the date and place the container in the freezer for 10-12 months! Keep reading to learn how to freeze squash after it’s been cooked!