This article was co-authored by wikiHow staff writer, Dan Hickey. Dan Hickey is a Writer and Humorist based in Chicago, Illinois. He has published pieces on a variety of online satire sites and has been a member of the wikiHow team since 2022. A former teaching artist at a community music school, Dan enjoys helping people learn new skills they never thought they could master. He graduated with a BM in Clarinet Performance from DePauw University in 2015 and an MM from DePaul University in 2017.
There are 9 references cited in this article, which can be found at the bottom of the page.
This article has been viewed 4,698 times.
Learn more...
If you’re feeling a draft coming from an old window, chances are it’s time to give it new glazing. Glazing is the putty material that insulates the space between a glass pane and the window frame, and thankfully, it’s a pretty straightforward process to remove the old putty and reglaze a window. We’ve put together a helpful guide to glazing windows that works for brand new windows and older ones that need a little rehabbing. Read on if you’re ready to start glazing like a pro!
Steps
Purchase a window glaze putty.
-
Window glaze comes in oil-based and latex varieties. Latex glaze dries in about 3 days and doesn’t need to be painted over, but doesn’t last as long as oil-based glaze. Oil-based glaze can take several weeks to dry but is better for neat, clean results because it won’t begin drying as soon as you apply it.[1] X Research source
- Choose latex if you need to glaze and paint your window quickly, and oil-based if you’re concerned about a perfectly clean glaze line.

Lay a protective cloth on the floor.
-
A sheet or large cloth will protect your floor while you work. Old glaze, dust, glass, and other debris will probably fall out of the window frame and make a mess. Save yourself some cleanup time and lay a cloth, sheet, or towel down beneath the window to catch the fallout.[2] X Research source
- Consider placing a second cloth on the other side of the window to catch debris as well.

Put on protective gear.
-
When you work with glass, there’s a chance it will break. Wear goggles or a face shield to protect your eyes and face from flying shards. Also put on thick gloves so you don’t get cut while handling glass. Close-toed shoes will protect your feet from any shards that fall to the floor.[3] X Research source

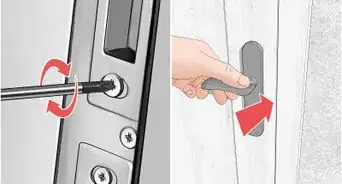
Take out the window sash.
-
The sash is the part that moves up or down inside the window frame. To remove the sash, first take out the stops (vertical bars inside the window frame in front of the sash) with a screwdriver and place them aside. Then press the jam liners (grooved side pieces that guide the sash up and down the frame) into the wall. Pull the sash carefully out of the frame by tilting the top of the sash outward.[4] X Research source
- For an upper sash, remove the parting beads (the small vertical rails in the frame between sashes) first.

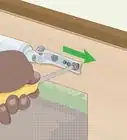
Remove the old window glazing.
-
Use a scraper or a putty knife to break the glazing into pieces. This will be easy if the glaze is old and already cracked. If the glaze is intact, use a heat gun to warm the glaze until it’s more malleable. Pry out the glazing very carefully—sudden, sharp movements can damage the frame or glass.[5] X Research source
- If you’re using a heat gun, wear gloves to protect your hands and keep the gun moving constantly to avoid overheating or cracking the glass.
- Place a thin sheet of metal (or even some folded-over aluminum foil) over the glass to distribute the heat of a heat gun evenly so the glass doesn’t crack.

Pull out the old glazing points.
-
Glazing points are the tiny metal clips that hold the glass into the frame. They’re located inside of the old glazing putty. To remove them, chip away the glaze around them so the clips are exposed. Then use pliers to carefully pull them out of the frame.[6] X Research source

Take out the glass.
-
If you’re going to reuse the glass, lift it carefully out of the frame. If it’s stuck to any remaining glaze bits, hold a heat gun 3 inches (7.6 cm) above the glass for 15 to 30 seconds to soften the old glaze. Gently push up on the edge of the glass to remove and store it somewhere safe until it’s time to re-install.[7] X Research source
- If you’re going to install new glass, simply break the glass and remove the shards. Gently tap the glass with a hammer, trying to keep the shards as big as possible. Use a knife to remove any remaining putty or glass from the frame.[8] X Research source
- Old window panes are very delicate, especially if it’s a single pane window. Be extra careful during removal not to crack or break the glass.

Check the frame for damage.
-
If a wooden frame has cracks, brush them with a two-part epoxy primer. Let the primer penetrate the wood for 15 minutes and then wipe the excess away. Then use a plastic putty knife to spread epoxy filler into and over the crack. Once it’s dry (it can take up to 24 hours), sand the epoxy until it’s smooth with the wood.[9] X Research source
- Sand the epoxy first with 80-grit sandpaper. If needed, go over it again with finer sandpaper (like 100-grit or 220-grit).
- If desired, the repaired crack can be painted over with an acrylic primer and an acrylic paint.

Buy a new piece of glass.
-
You only need to do this if you aren't reusing the original glass. Measure the opening of the window and subtract 0.125 inches (3.2 mm) from the height and width. Then go to a hardware store and have a new piece of glass cut according to your measurements.[10] X Research source
- Bring a shard of the original glass with you so the glass cutter can match the thickness.
- Double pane glass will be more expensive to cut and replace than single pane glass.

Add glaze to the frame.
-
Place a few beads of glaze inside the frame to adhere the glass. If you opted for a latex glaze, use this for your beads. If you chose an oil-based glaze, bead with an acrylic latex caulk instead. Place several beads on each edge of the frame (this is what you’ll press the glass onto).[11] X Research source

Press the glass into the frame.
-
Gently place the glass into the frame over your glazing beads. Wiggle it and firmly press down to adhere the glass to the frame. It’s OK if excess glaze or caulk oozes out onto the glass—after it hardens, just slice it off with a putty knife.[12] X Research source
- Be extra careful with thinner, single pane glass.

Insert new glazing points.
-
After the glass is pressed, add glazing points between the glass and frame. Glazing points are small, triangular metal pieces that hold the glass in the frame while the glazing putty dries. Place a glazing point about every 6 inches (15 cm) around the frame if the sides are 12 inches (30 cm) or longer. Use a point driver or a point setting tool to install them.[13] X Research source
- If the window sides are less than 12 inches (30 cm) long, placing 1 glazing point at the center of each side is sufficient.
- If you don’t have a point driver, use a putty knife to gently knock the point into place.

Spread glazing around the window’s perimeter.
-
Cover the outer edges of the glass with a thick layer of the glazing putty. It’s easiest at room temperature when the putty is more malleable (if needed, work the putty in your hands for a few minutes to heat it up). When it’s workable, roll it out into long strips and press them into the edges where the glass meets the frame.[14] X Research source
- Leave no gaps or hollow spots in the putty. Make sure it’s evenly distributed all the way around the window’s edges.
- Alternatively, oil-based putty can be heated by setting the can in a bowl of hot water for a few minutes.

Smooth out the putty.
-
Use a putty knife to press and smooth out the glazing putty. Place the knife over the putty and move it lengthwise to make a smooth, even surface and remove excess putty. Press downward while you move the knife. If needed, lubricate the knife with mineral spirits so the putty doesn’t stick to it. Run the knife over the putty as many times as needed.[15] X Research source
- For a professional look, try to smooth out the putty in one single pass per side.
- Oil-based putty will take weeks to fully dry and harden. Avoid touching it after the smoothing process.

Clean off the excess glaze.
-
Use a scraper to remove excess glaze on the glass. Use the blade to carefully cut off any extra material. After a slice is made, peel off the putty by hand or use a scraper if it has already started to harden on the glass.[16] X Research source
- Take extra care during this process not to touch or disturb the smoothed out putty.

Let the glaze dry.
-
Read the glaze instructions to see how long drying will take. You’ll have to wait until it’s thoroughly dry before you can prime or paint the window. For most products, expect a drying time of about 7 to 14 days (and possibly longer if you used an oil-based glaze). You can return the sash to the window frame while the putty dries.[17] X Research source
- If you notice any stains on the glazing, wait for it to dry and remove the dirt later rather than trying to clean it while the putty is still wet.

Paint over the glaze.
-
When the putty is dry, coat the glazing putty with an oil-based primer. Allow the primer to overlap about 0.0625 inches (1.59 mm) onto the window glass to form a weather-tight seal over the putty. Once the primer has set, you can add your final oil-based or acrylic paint layer (also letting it overlap onto the glass to strengthen the seal).[18] X Research source
- Clean the glass before painting so that there are no remaining putty oils that can get under the paint.
- Use a small brush to paint over the glazing to ensure accuracy and a clean finish.

You Might Also Like

 5 Ways to Fix a Broken Door Frame


 How to Pick Locks On Doorknobs: Knob Types & Lockpicking Tutorials


References
- ↑ https://farmihomie.com/window-glazing-putty-vs-caulk/
- ↑ https://www.readersdigest.co.uk/lifestyle/home-garden/how-to-replace-a-broken-windowpane
- ↑ https://www.readersdigest.co.uk/lifestyle/home-garden/how-to-replace-a-broken-windowpane
- ↑ https://homesteady.com/12298575/how-to-remove-the-sash-on-metal-windows
- ↑ https://www.oldhousefix.com/repairing-old-wood-windows-removing-glazing-and-paint/
- ↑ https://www.readersdigest.co.uk/lifestyle/home-garden/how-to-replace-a-broken-windowpane
- ↑ https://www.oldhousefix.com/repairing-old-wood-windows-removing-glazing-and-paint/
- ↑ https://www.readersdigest.co.uk/lifestyle/home-garden/how-to-replace-a-broken-windowpane
- ↑ https://www.thisoldhouse.com/siding/21016702/how-to-use-two-part-epoxy-to-fill-rotted-trim
- ↑ https://www.popularmechanics.com/home/interior-projects/how-to/a8043/how-to-reglaze-a-window/
- ↑ https://homesteady.com/how-5953931-reglaze-metal-windows.html
- ↑ https://homesteady.com/how-5953931-reglaze-metal-windows.html
- ↑ https://www.thisoldhouse.com/windows/21016525/how-to-replace-a-window-pane
- ↑ https://www.popularmechanics.com/home/interior-projects/how-to/a8043/how-to-reglaze-a-window/
- ↑ https://www.popularmechanics.com/home/interior-projects/how-to/a8043/how-to-reglaze-a-window/
- ↑ https://www.thisoldhouse.com/windows/21016525/how-to-replace-a-window-pane
- ↑ https://www.popularmechanics.com/home/interior-projects/how-to/a8043/how-to-reglaze-a-window/
- ↑ https://www.oldhousefix.com/repairing-old-wood-windows-glazing-painting-and-weather-stripping/
About This Article