This article was co-authored by Patrick Johns. Patrick Johns is a Home Improvement Specialist and the Owner of CatchAll Handyman Services. With more than 28 years of experience, he has worked on a variety of home improvement projects, such as carpentry, plumbing, and door and window installations in both commercial and residential properties.
There are 12 references cited in this article, which can be found at the bottom of the page.
This article has been viewed 52,425 times.
You’re sitting at home enjoying your day, when all of a sudden, you hear a loud crash. The neighbor’s baseball cracked one of your window panes! You might be worried that you’ll need a whole new window or pay an expert to fix the pane, but don’t panic yet. Replacing a window pane is a lot easier than you might think. You just need the right tools and a few hours to take care of it by yourself for a fraction of the cost.
Steps
Removing the Old Pane
-
1Lay a drop cloth or sheet under the window to avoid making a mess. Fixing a window pane can be a messy job, and you'll probably get dust, putty, and glass everywhere. Catch all of this debris by setting up a drop cloth before you start working to protect your floors.[1]
- You might want to put a drop cloth on the other side of the window too, just to be safe.
-
2Put on thick gloves and eye protection before starting. Any time you’re working with glass, there’s a risk for breaking a piece and hurting yourself. Always put on a pair of thick gloves to protect your hands, and also goggles or a face shield to protect your eyes.[2]
- If you’re wearing goggles, make sure they wrap around your eyes to protect them from all sides.
Advertisement -
3Pop off the glazing around the pane with a sharp putty knife. Window panes are held in by a putty called glazing, so you’ll have to remove this to get the pane out. Use a putty knife—the sharper the better. Find the line separating the glaze from the wood at any point, and insert the putty knife there. Then push towards the pane to break the glazing off. Continue working your way around the pane and pop off all the glazing holding it in.[3]
- If the glazing is tough to get off, try heating it up with a hairdryer or heat gun. This can soften the glazing and make removing it easier.[4]
- You could also use a razor or utility knife to get the glazing off.
-
4Scrape off any remaining glazing or glue along with border of the pane. When you break off all the big pieces of glazing, there might still be some remnants left over. Scrape your knife around the border of the pane to get rid of any leftovers holding the pane in.[5]
-
5Tape an X on both sides of the pane with duct tape. To get the pane out completely, you’ll have to break it. Prevent glass from flying everywhere by taping off the window first. Make an X across each side of the pane with duct tape so the glass stays together when you break it.[6]
- If the pane was already broken, then you might not have to crack it more. If you can get a grip on the pane, then you can just pull it out.
- If you’re removing a pane in a loose window sash, the wooden part that holds the panes, then you can place it on a workbench, cover the pane with a rag, and hit it with a hammer instead of taping it.[7]
-
6Break the pane by tapping it with a hammer or similar tool. Use either a hammer or the handle of a screwdriver and tap the pane until it breaks. Tap in a few different spots so the pane breaks all over.[8]
- You’re only trying to crack the pane. You don’t have to smack it hard to try and smash it.
-
7Pop the old pane out of position and remove all the glass. Once the pane is broken, it should come out easily. Grab it in any spot you can get a grip, and pull it out.[9] Then check along the sash for any leftover glass, and pull or scrape it out before moving on.[10]
- If there isn’t a spot to grab the pane, then try going to the other side of the window and pushing it out.
- Even though you taped the glass, some shards might still break free as you remove the pane. Check the floor and pick up any loose pieces.
- Some windows use hooks or other small metal pieces to keep the panes in place. If you see any of these, pull them out as well.
-
8Sand the border of the sash. Use coarse sandpaper and sand around the whole rabbet, or the groove where the window sits. Smooth everything down to the bare wood.[11]
- Keep your gloves on while you’re sanding. If you missed any glass pieces, you could get a serious cut.


Installing New Glass
-
1Get a replacement glass pane with the same dimensions as the old one. You can get replacement glass panes at any hardware store. Measure the length and height of the space, and use those dimensions to buy a new pane that fits into the sash.[12]
- Since wood expands, leave a bit of extra room to allow for that. In general, subtracting 1⁄8 in (0.32 cm) from your measurement leaves enough room. So if your sash space is 12 in (30 cm), get a pane that's 11 7/8 in (29.7 cm) for some extra room.
- If you can’t get a pane that fits into the sash, you could also get a larger piece of glass and cut it to fit into position.
- Hardware stores will also cut the pane for you if you bring your measurements in.
-
2Run caulk around the border of the sash. Use your caulk gun and angle it onto the notch section of the sash. Squeeze a bead of caulking on all 4 sides of the sash. This is important to cushion the glass and weather-seal the window.[13]
- Work quickly after this so the caulk doesn’t dry before you put the glass in.
- In general, silicone or polymer caulk is recommended for windows. These are flexible enough to expand with the window and make a weather-tight seal. You could also use butyl rubber.[14]
-
3Press the new pane into the caulk. Hold the new pane firmly and line it up with the sash. Slide it into the sash from the bottom first, then work your way up until the pane is completely in. Press down gently so the glass adheres to the caulk.[15]
- Make sure the pane is completely in the sash before letting go of it. If it’s still loose, it could fall out and break.
- Do your best to line up the pane perfectly the first time. Removing it to reset it will make a mess and could break the glass.
-
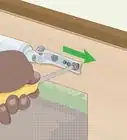
4Insert a glazer’s point in the center of each side to secure the pane. A glazer’s point is a little metal tab that helps keep the pane in place. Each one has a pointed end and a toothed end. Arrange each one so the pointed side points toward the wood. Then use your putty knife to press it into the wood at the center of the pane. Put one of these on each side of the glass.[16]
- You can get glazer’s points at hardware stores.
- If the pane is 12 in (30 cm) or longer on any side, then put points every 4–6 in (10–15 cm) instead.
-
5Knead 4 pieces of putty into 3⁄4 in (1.9 cm) thick strips. Window putty is hard at first, so you need to warm it up. Knead it between your hands to warm and soften it up. Then mold 4 strips that are about 3⁄4 in (1.9 cm) thick.[17]
- Putty usually comes in pre-made ropes. You can get it from the hardware store.
- Window putty or glazing also comes in a caulking tube. You might find this easier to work with. If you use it, apply it the same way you would apply caulk.[18]
-
6Lay a strip of putty on each side of the pane. Press the putty firmly along the side of the pane and press it into the wood to make a tight seal. Do this on all 4 sides so the window stays locked in place.[19]
- Don’t worry about keeping the putty neat. You can clean up the edges afterward.
-
7Smooth out the putty with your knife. Start at one of the corners of the window pane. Hold your putty knife at a 45-degree angle with the glass and tilt it to touch the wood on the window sash. Then press the blade down with your finger and pull the knife along that strip of putty to flatten it out. Peel off any excess putty that comes off. Repeat this on all 4 sides of the window.[20]
- If any putty gets on the glass, scrape it off with your blade before it dries.
- If you can see putty sticking out from either side of the window, then there’s a bit too much. Scrape this off as well so the window looks nice and neat.
-
8Clean up and let the putty dry for 7-10 days. Once all the putty is in place, all that’s left to do is wait. It takes 7-10 days for the putty to cure. In the meantime, clean up the mess and put your tools away while you wait for everything to set properly.[21]
- When you’re picking up your drop cloth, fold it up carefully and carry it to a garbage can to dump out. Check carefully for any shards of glass that might have fallen out while you were working.
-
9Paint the window sash if you want to. If you want some extra decoration or to cover up any nicks you made while fixing the window pane, a few coats of paint will do the job. Start by covering the putty with an oil-based primer. When that dries, you can apply a coat or 2 of paint to give you window a fresh new look.[22]
- Don’t try to paint until the putty is completely dry.
- Scrub the window when you’re done to get rid of any excess paint.


Expert Q&A
-
QuestionCan you replace window glazing?
 Patrick JohnsPatrick Johns is a Home Improvement Specialist and the Owner of CatchAll Handyman Services. With more than 28 years of experience, he has worked on a variety of home improvement projects, such as carpentry, plumbing, and door and window installations in both commercial and residential properties.
Home Improvement SpecialistSure you can! That actually is necessary for older wooden and metal windows. You need to use glazing for these ones.
Things You’ll Need
- Gloves
- Goggles
- Putty knife
- Hammer
- Duct tape
- Sheet or drop cloth
- Caulk and caulk gun
- Putty
- Primer and paint (optional)


References
- ↑ https://www.readersdigest.co.uk/lifestyle/home-garden/how-to-replace-a-broken-windowpane
- ↑ https://www.readersdigest.co.uk/lifestyle/home-garden/how-to-replace-a-broken-windowpane
- ↑ https://youtu.be/FrOqbPyvIPw?t=59
- ↑ https://www.thisoldhouse.com/windows/21016525/how-to-replace-a-window-pane
- ↑ https://youtu.be/FrOqbPyvIPw?t=82
- ↑ https://youtu.be/FrOqbPyvIPw?t=162
- ↑ https://www.thisoldhouse.com/windows/21016525/how-to-replace-a-window-pane
- ↑ https://youtu.be/FrOqbPyvIPw?t=163
- ↑ https://www.bobvila.com/articles/how-to-replace-a-window-pane-bob-vila-radio/
- ↑ https://www.readersdigest.co.uk/lifestyle/home-garden/how-to-replace-a-broken-windowpane
- ↑ https://www.bobvila.com/articles/how-to-replace-a-window-pane-bob-vila-radio/
- ↑ https://youtu.be/Dc67opK57sk?t=120
- ↑ https://www.bobvila.com/articles/how-to-replace-a-window-pane-bob-vila-radio/
- ↑ https://www.popularmechanics.com/home/how-to/a12296/4309161/
- ↑ https://youtu.be/Dc67opK57sk?t=246
- ↑ https://www.thisoldhouse.com/windows/21016525/how-to-replace-a-window-pane
- ↑ https://www.thisoldhouse.com/windows/21016525/how-to-replace-a-window-pane
- ↑ https://youtu.be/FrOqbPyvIPw?t=471
- ↑ https://youtu.be/FrOqbPyvIPw?t=438
- ↑ https://www.thisoldhouse.com/windows/21016525/how-to-replace-a-window-pane
- ↑ https://www.thisoldhouse.com/windows/21016525/how-to-replace-a-window-pane
- ↑ https://www.thisoldhouse.com/windows/21016525/how-to-replace-a-window-pane
About This Article