This article was co-authored by Steve Linton. Steve Linton is the President of Deltec Homes, a custom home building company in Asheville, North Carolina. With nearly 20 years of experience, he oversees all home building projects for Deltec Homes. He specializes in hurricane-resistant homes, green home design, and sustainable building. Steve holds a BS in Structural Engineering from Cornell University and is a LEED Accredited Professional.
This article has been viewed 49,394 times.
You need to have adequate protection when you live in coastal areas. Having the proper equipment can help guard your house and the possessions inside from hurricane and tropical force winds.[1] This article will tell you how to install hurricane shutters.
Steps
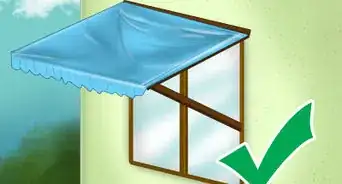
Accordion Shutters
-
1Pull out the parts and lay them out on your driveway or lawn near the window they will be protecting. Each part should come numbered and pre-drilled.
-
2Place the top track above the top of the window. Level and mark your wall to line up with the pre-drilled hole(s).Advertisement
-
3Attach this part with 2.25-inch (57.150 mm) concrete anchors and screws. The ends of these screws should remain out until the sides are put on. Make sure the track is level.
-
4Position the wheels into the top and make sure the pins face the outside. Adjust the curtains as needed so they are away from the edges. Each wheel assembly should be marked left or right.
-
5Attach one side panel with 2.25-inch (57.150 mm) concrete anchors and screws. Check that the panel is straight and flush with the top piece. The smaller part of the side panel should face inward toward the window.
-
6Fasten the bottom panel with the same-sized concrete anchors and screws. Insert the bushings at the back of the curtains into the grooves on the bottom track.
-
7Affix the start strips of the curtains to the side panels with the screws provided.
-
8Check that the sides of the accordion close and lock properly.
-
9Caulk around the sides of your accordion shutters, if desired.


Bahama Shutters
-
1Check that the build-out frame (BOF) numbers match the numbers on the shutter frames.
-
2Place the BOF frame against the window and attach an included fastener (usually a screw) to the top corner of the frame.
-
3Attach the last side panel using the same instructions as the first.
-
4Ensure the frame is even with the window and put in another screw at the opposite bottom corner. This screw should be diagonal to the first.
-
5Attach the rest of the screws into the holes provided.
-
6Place plastic plugs into the holes on the BOF and caulk around the sides of the frame, if desired.
-
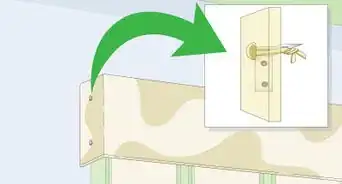
7Affix the shutter frames to the BOF by the top center pre-drilled holes with the provided screws. Install the leftover screws into the hinge holes.
-
8Attach rubber pieces to each bottom corner of the Bahama shutter frame and close the frame.
-
9Mark the center of the tabs on the build off frame and mark the center of the tabs.
-
10Pierce the center of the tabs with the included drill bit.
-
11Create threads by using a 1/4-20 or a size 7 tap.
-
12Close the shutters and insert a .25-inch (6.35 mm) screw into the tabs and BOF.
-
13Remove the screws in the tabs to install the open rod and push the shutter out.
-
14Place the rod in the tab on the shutter frame and a 3/8-inch (10 mm) hole on the bottom of the BOF. Put the screws back into the BOF.


Roll Down Shutters
-
1Lay the shutter flat with the "ears" facing up.
-
2Measure the shutter box and tracks to ensure it is 8 inches (203 mm) longer than the window or door.
-
3Attach alignment rails to the base of the box and lean the structure against a wall until you are ready to lift it.
-
4Secure the highest alignment hole and place the structure over the window into proper position. Level the structure and label the locations of other alignment holes.
-
5Mark an upright line between the operational end cap and the alignment rail.
- Make a straight line where the operational side alignment rail meets the end cap. A stamp should be made at the peak of the end cap. Put the shutter down on the ground again.
-
6Measure towards the window 5⁄8 inch (1.6 cm) (15.875 mm) on your vertical line. If your shutter is a top exit you also have to measure down 3/4 inches (19 mm) from the top line you drew.
-
7Drill marked holes including a "control" hole for the strap which should be .75 inches (1.91 cm) (19 mm). It is important that this hole be straight and even.
-
8Secure the belt through the hole and attach the structure to the brackets on the wall with concrete anchor screws.
-
9Check clearance and let the shutter lower into place. Remove the protective covering of the shutter and fasten its housing box into the wall with flat screws.
-
10Put the manual crank box on a level surface and take off the cover. Take out the big plastic gear and thread the belt through.
-
11Ensure you have a firm knot on the end of the belt and pull it to place the knot into the gear. Install motors and put back on the cover. Retighten the screws on the cover.
-
12Place the crank box into position and have an electrician run and hook up the wires in the soffit. Secure the crank box with screws.
-
13Test your shutter to make sure it rolls up and down correctly. Caulk the outer edges and remove any protective films.


Expert Q&A
Did you know you can get expert answers for this article?
Unlock expert answers by supporting wikiHow
-
QuestionWhat are the best types of hurricane shutters?
 Steve LintonSteve Linton is the President of Deltec Homes, a custom home building company in Asheville, North Carolina. With nearly 20 years of experience, he oversees all home building projects for Deltec Homes. He specializes in hurricane-resistant homes, green home design, and sustainable building. Steve holds a BS in Structural Engineering from Cornell University and is a LEED Accredited Professional.
Custom Home BuilderA hurricane shutter can be anything that you pull down over your windows to keep the force of the wind outside of your home. I don't recommend a specific one, as there are a lot of different technologies out there that serve the same purpose. What's most important is that you install some kind of hurricane shutter when a storm or hurricane is coming.
Support wikiHow by unlocking this expert answer.
Things You'll Need
- Hurricane Shutter Kit
- Drill
- Extra screws and concrete anchors


References
- ↑ Steve Linton. Custom Home Builder. Expert Interview. 16 September 2020.
- http://www.hurricaneshuttersflorida.com/accordioninstall.php
About This Article