This article was co-authored by Katherine Tlapa. Katherine Tlapa is an interior designer, currently working as a Design Specialist for Modsy, a design service based in San Francisco. She also runs her own DIY Home Design blog, My Eclectic Grace. She received her BFA in Interior Architecture from Ohio University in 2016.
This article has been viewed 106,742 times.
Decals are fun ways to advertise or express yourself. You may want to put a decal on your car window or in the window of your store. There are 2 different kinds of decals: adhesive and static cling. To apply adhesive decals, clean the area properly, remove the protective cover, position the decal, and use a hard plastic object like a credit card to apply it and remove bubbles. For static cling decals, use a wet solution to apply large decals and the dry method for small decals.
Steps
Finding a Place for the Decal
-
1Determine if the conditions are right. You should only apply decals when the weather is mild. Don’t try to apply decals when it is extremely cold or hot. Temperatures between 50–70 °F (10–21 °C) are ideal.[1]
- If you are placing decals outdoors, make sure it is not raining or windy. Aim to apply the decals when there is ample natural light, as it can be hard to tell if the glass is clean when it’s dark.
-
2Clean the window glass. Before you apply a decal, clean the area where you will put the decal. Clean the area only with either rubbing alcohol or soap and water. Don’t use a window cleaning product on the window because the residue it leaves will prevent the decal from sticking.[2]
- Let the glass air dry after cleaning it. Avoid wiping the window with a cloth or paper towel, as this can leave behind particles that could get trapped underneath the decal.
Advertisement -
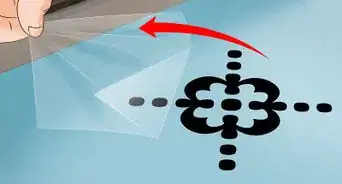
3Remove air bubbles from the decal. Prepare the decal before you place it on your window. Use something with a thin edge, like a credit card. Take the credit card or other object and rub it along the side of the decal with the clear tape from one edge to the opposite edge. The goal of this process is to remove any air bubbles.[3]
- Make sure to use enough pressure to smooth out the air bubbles.
-
4Measure the area if you have a large decal. Large decals are much more difficult to place on windows than smaller ones. With larger decals, measure the decal and the window area where you wish to place it. Make sure the decal will fit.[4]
- If the decal will fit, use a piece of tape to hold the decal in place.

Using the Peel and Stick Method for Small Decals
-
1Remove the white paper backing. Take the decal and slowly remove the white paper back from the sticker and clear plastic transfer tape. The white paper should come off without any sticking.
- If the white paper sticks to the sticker decal, replace the white paper carefully. Use the credit card again to remove any air bubbles.
-
2Position the decal. Position the decal exactly how you want it on the window. If there is a specific place you want the decal, you may want to mark the top edge or middle with tape before trying to place it. That will help you get the right spot.[5]
- Slowly and carefully place the decal on the window. Use the credit card or other object to rub over the transfer tape to securely adhere the decal to the window. Begin in 1 corner and slowly work your way across the entire decal with the credit card.
-
3Let the decal set for 24 hours. Leave the decal on the window with the transfer tape still attached for around 24 hours. This helps ensure that the decal sticks fully to the window. If you don't let the decal set, it may not adhere to the window as strongly.
-
4Remove the transfer tape. Carefully lift up 1 corner of the clear transfer tape. Slowly remove the tape, making sure to peel it at an angle from the corner. Use gentle pressure so you don’t remove the decal.
- If you remove the decal, reapply it to the window.

Applying a Large Decal
-
1Tape the decal where you want it. Place the decal where you want it on the clean window. Use 3 pieces of tape to hold the decal in place. Place 1 piece on the bottom, 1 on the top, and 1 on a side. Leave the other side empty.
-
2Cut away the white paper on one side. On the side with no tape, carefully take the transfer tape and peel it back. You should stop when you get to the tape in the middle of the bottom and top sides. Use a pair of scissors to cut away the white paper where you peeled the decal.
- You should be cutting away about 1/3 of the backing paper.
-
3Apply the free part of the decal. With the white paper backing gone, move the part of the decal back over to the window where it originally started. This part of the decal will adhere to the window where you cut away the white paper.[6]
- Use a credit card, or a large piece of hard plastic like a thin cutting board, to squeegee the decal to remove all air bubbles.
-
4Remove the remaining tape and white paper. Now that part of the decal is stuck to the window, get rid of the three pieces of tape. Lift the free edge and slowly remove the white paper backing.
-
5Stick the rest of the decal a small section at a time. All of the decal should be ready to stick to the window. Carefully place the transfer tape and decals onto the window. Stick the decal a small section at a time. Use a credit card to push the decal and transfer tape against the window. Start where the part of the decal is already on the window and use the credit card to stick the decal.
- Use the credit card to rub the decal slowly onto the window. Don’t try to stick the rest of the decal onto the window at the same time. Go from the middle outwards.
-
6Remove the transfer tape. After the decal is securely on the window, lift up 1 edge of the transfer tape. Slowly remove the transfer tape at an angle. Use only light pressure so you don’t rip off the decal.
- You may want to wait at least 24 hours to make sure the decal has adhered to the window.

Applying a Static Cling Decal
-
1Apply the cling to smooth surfaces. Static clings are made from plasticized vinyl that will stick to smooth surfaces without sticky adhesives. They won’t leave a residue when they are removed. This type of decal will stick to glass or plastic.
-
2Clean the area. Before applying the cling, you need to clean the area of the window where you want to place it. Use window cleaner with ammonia on windows before using a static cling.
- After cleaning it, let the area air dry or use a rubber squeegee to remove excess moisture. A static cling won’t stick to a wet or damp surface. However, avoid wiping the area dry with a paper towel or cloth, as this can leave behind particles or fuzz that could create bumps under the decal.
-
3Apply small decals with the dry method. The dry method can be used for small decals that are smaller than 12 inches (30 cm). Place the decal where you want it on the window. Using a rubber roller, push out the trapped air. Start in the center and work outwards.
-
4Apply large decals with the wet method. Large decals that are over 12 inches (30 cm) stick better if you use a solution to help them stick. Mix 2 teaspoons (9.9 mL) of liquid household detergent with 1 gallon (3.8 L) of cold water. Cover the side of the decal that you will stick to the window with the solution.[7]
- You can pour the solution on the decal or use a spray bottle.
-
5Place the decal on the window. Press the decal against the window. When you have the decal where you want it, press the water out from under the decal. Use a squeegee or a rubber roller. Start in the center and press outwards. Push down the edges to make sure it sticks to the window.[8]
- Wipe away moisture with paper towels.


References
- ↑ https://www.carstickers.com/instructions.php
- ↑ http://www.ebay.com/gds/How-to-install-vinyl-decals-or-stickers-for-cars-and-more-/10000000177514029/g.html
- ↑ https://www.carstickers.com/instructions.php
- ↑ https://www.carstickers.com/instructions.php
- ↑ https://www.carstickers.com/instructions.php
- ↑ http://www.ebay.com/gds/How-to-install-vinyl-decals-or-stickers-for-cars-and-more-/10000000177514029/g.html
- ↑ https://www.signs.com/blog/signage-101-installing-window-decals/
- ↑ https://www.signs.com/blog/signage-101-installing-window-decals/
About This Article

All you need to apply window decals is some rubbing alcohol and a credit card. Start by cleaning the window with rubbing alcohol so the decal will stick properly. Then, slowly remove the white paper backing of the decal. Position the decal on the window, then use a credit card to smooth over it so there aren’t any air bubbles. Leave the transfer paper on for 24 hours to ensure the decal fully sticks. After a day remove the paper. To learn how to apply larger decals, read on!