This article was co-authored by wikiHow Staff. Our trained team of editors and researchers validate articles for accuracy and comprehensiveness. wikiHow's Content Management Team carefully monitors the work from our editorial staff to ensure that each article is backed by trusted research and meets our high quality standards.
There are 21 references cited in this article, which can be found at the bottom of the page.
This article has been viewed 24,506 times.
Learn more...
If you’re a fan of off-roading, then you might already be accustomed to setting yourself apart from the pack. Whip lights are a way to show off your flair no matter where you travel. They are tubes of LED lights that stand like flags on dirt bikes, ATVs, 4x4s, motorcycles, and even trucks. They are not difficult to install even if you don’t have much mechanical experience. Wire whip lights to your vehicle’s battery so that you can show off your colors whenever you’re out on the trails.
Steps
Mounting the Light Base
-
1Locate a hole on the back end of the vehicle’s frame. Many vehicles these days, including trucks and ATVs, have a spot you can use to mount whip lights. Walk to the back end of your vehicle and search along the bumper for holes. They may be covered by bolts, but they won’t have wires or other parts running through them. Most vehicles have several different points you can take advantage of to quickly install your cool, new lights.[1]
- Another option is to drill a hole through the vehicle’s frame. For example, if you have a truck, you could drill through its bed. Place the whip light on top of the hole with the power lights hanging beneath it.
- If your vehicle doesn’t have an accessible frame hole, use mounting brackets instead. Find a spot to connect the brackets to the frame, such as on an ATV’s roll cage.
- Many offroad vehicles have holes for flagpoles. If your vehicle has one, it’s the perfect place to install a whip light.
-
2Use a socket wrench to remove the bolt covering the hole. The hole will have a metal bolt through it with a locking nut on the bottom. Reach underneath the hole to get at the nut. Rotate it counterclockwise until you’re able to slide it off the bolt. Then, move the socket wrench to the top of the bolt and turn it counterclockwise to remove it as well.[2]
- If the rear bumper is in your way, unscrew it. Look for a series of bolts around the edges of the frame that you can undo with a socket wrench.
Advertisement -
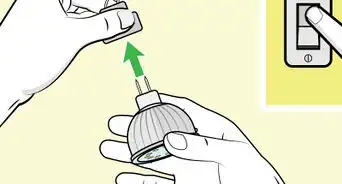
3Remove the base on the whip light by turning it counterclockwise. Every whip light has a black, plastic base at one end. Turn the base counterclockwise by hand to remove it. Set the whip light aside for later. The base is much easier to mount and wire without the light getting in your way.[3]
- Place the light on the ground, such as on a clean towel, while removing the base. Although the base isn’t difficult to remove, play it safe so you don’t end up dropping anything.
-
4Set the whip light base on top of the hole to mount it. Pick up the power cord running from the bottom of the base and slip it through the hole. Make sure the quick connect base rests flat against the frame. Then, reattach the nut to the bottom of the base and turn it clockwise to tighten it.[4]
- The base is meant to be on top of the hole so the light is above your vehicle. The power cord will also be underneath it so it can be hidden along the frame.
-
5Hang clips on the frame for an alternative place to install whip lights. There are different types of mounts available, but the common ones are rings that you can clip to different parts of your vehicle. Remove the screws on the clips, then attach them to a spot like the roll cage or another exposed bar on the frame. Slide the whip light base into the mounts and replace the screws and nut to hold it in place.[5]
- One possible spot for mounting clips is on an ATV’s roll cage. Hang clips on its outer edges right above the vehicle’s frame.
- Most mounting clips hang vertically, but there are some that can be positioned horizontally. If you’re planning on connecting the lights to a horizontal bar, use a horizontal clip. The lights will still rise straight up into the air when you use these clips.


Running Wiring to the Battery
-
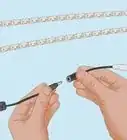
1Strip 1⁄2 in (1.3 cm) off the ends of the light’s power wires. The wires will likely be way too short to reach your vehicle’s battery, but you can fix this by splicing in additional wiring. The base usually has a red wire and a black wire. Clamp wire strippers to the end of each wire to break through the casing, leaving a small length of the underlying copper wire exposed.[6]
- Note that proper wiring varies a lot depending on the whip lights you bought. No matter where you set up the lights, the set up is similar, but you should refer to the owner’s manual that came with the whip lights for more information.
- Some whip lights come with wiring harnesses so you won’t have to splice in separate wires. Some of them have 3 wires instead of 2.
-
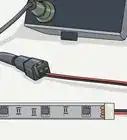
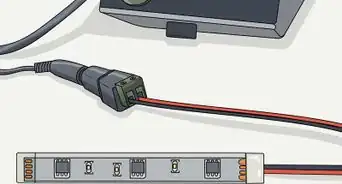
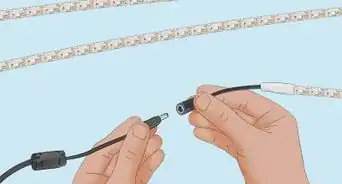
2Plug the stripped power wires into a quick connector for splicing. Quick connectors are small plugs that both cover exposed wires and help you easily connect them to other wires. To make the electrical wiring simple, get a quick disconnection with a pair of terminals to plug the wires into. Push the exposed copper wires from the cable into the terminals.[7]
- There are other ways to splice wires together, such as by soldering and covering them with a heat shrink tube. It doesn’t matter what technique you use as long as the power wires are well-connected.
- The connector usually isn’t included with whip lights. Other components, like additional wiring, also has to be bought separately online. Look online or visit your local hardware store.
-
3Connect 18-gauge power wires to the other end of the connector. Select wiring that matches the coloring of the power wires running from the whip light base, usually both a black and red wire. Strip 1⁄2 in (1.3 cm) of casing off the end of each wire to slot them into your connector. Make sure the wire colors match the ones coming from the whip light base.[8]
- For example, position the new red wire in the terminal opposite from the red base wire, for example, then do the same for the black wire.
-
4Measure the distance from the lights to the battery for the wiring. The 18-gauge wiring keeps your lights powered, but cutting it to the right length can be trickier than you might expect. To ensure you get the right length, use a tape measure to estimate the length of your vehicle. In general, you’re better off cutting the wire longer than you think you will need it to be. When you finish routing and tying it along the frame, it won’t stretch quite as far as you anticipate.
- If your whip lights come with a full power cord, then you won’t have to do any sort of measuring or cutting. It’s only necessary if you’re using additional wiring to join the power cord to the battery.
- You won’t be able to route the whole roll of wiring through the hole in the back end, so you will have to cut it in order to get it to the battery up front.
-
5Cut the 18-gauge power wires to length with pliers. Use something strong, like lineman’s pliers or wire cutters, to break through the wire. Cut both the red and black 18-gauge wires to the same length. To protect the actual wiring, don’t strip off the casing until you have finished routing them through the vehicle.[9]
- Make sure the wiring is intact and at the right length. Once you cut it, you can’t take it back. You would have to start all over to replace wires cut too short.
-
6Route the 18-gauge wires to the battery for small ATVs. Your vehicle will have its battery in the back. Look underneath and behind the seat. The battery will likely be exposed as well, so you won’t even have to remove anything to reach it. Just connect the wires directly to the battery to power the lights.[10]
- To prevent the wires from getting damaged, loop them around the frame and tie them in place before attempting to connect them to the battery.
-
7Run the 18-gauge wires through the back end if you have a larger vehicle. Look underneath your vehicle for a small opening leading to the rear seats. Tuck the wires through the opening to get them inside your ride’s cab. Check inside the cab to make sure the wires have gone all the way through it. If you are able to, you can remove the bumper so you’re better able to track the wires.[11]
- If your vehicle has an exposed battery, like some small, one-seat ATVs, then route the wires directly to the battery instead.
-
8Pull the wires along one side of the vehicle toward the front end. Reach into the cab to find the wires and pull them forward. Keep them up against one side of the vehicle. Try running the wire along the frame, if it’s exposed. If your vehicle has carpeting, pull up the carpeting to hide the wires underneath it.
- For example, if you have a truck, you may be able to pry off the plastic trim panels along the door to lift up the carpeting.
- If you’re installing multiple lights, run the wires along opposite sides.


Installing an Inline Fuse
-
1Open the hood or front cover on larger vehicles to expose the battery. If you’re working on a truck, pop open the hood. For other types of vehicles, including ATVs and 4x4s, look for a removable cover in front of the dashboard. It will have at least one bolt on its left and right sides. Use a Torx screwdriver to turn the screws counterclockwise. Pop the hood off and set it aside afterward.[12]
- Make sure you’re able to access the battery and have a clear view of what is around it.
- For trucks and other vehicles, you can remove the hood but don’t usually have to. As long as you’re able to find a hole underneath the dashboard to route the cables through, you can leave it alone.
-
2Pull out the dashboard, seats, and other components in trucks and large ATVs. Look for a pair of push pins on top of the dashboard, then pull them out with pliers. Pull the dashboard toward the front of the vehicle gently, then unplug any wires connected to it. Check for a hole you can use to route electrical wires through the dashboard and into the cab. If you don’t see one, take out parts like the seats and center console with a Torx screwdriver to give yourself a little extra room to work with.[13]
- The setup depends on your vehicle and the lights you’re installing. Some whip lights have a dashboard switch. You can pry off one of the buttons on the dashboard, then route the wires through there to install a new control button.
- The seats and other components don’t usually have to be removed, but dealing with the wiring is much easier when they are gone.
- For smaller vehicles like one-seat 4-wheelers, the battery is on the back end, so you won’t have to go through all of this extra work.
-
3Route the light’s power wires through a hole in the engine compartment. Pull the cable along the sides of your vehicle until you reach the dashboard. Depending on how you’re routing the wires, the hole can be small and hard to see. Shine a flashlight on the dashboard and center console to find it. Look for a thick rubber plug covering it.[14]
- If you’re installing a rocker switch to control the lights from the dashboard, such as on an ATV, then you can just route the wires through the dashboard.
- Cars and trucks usually have several holes. Check behind the glove compartment for an accessible one. You can use it even if it already has wires running through it.
-
4Use wire strippers to trim 1⁄2 in (1.3 cm) of casing off each wire. Expose the wires so you’re able to finish connecting them to your vehicle’s power supply. Trim the ends gently to avoid breaking the copper strands underneath the casing. After stripping one of the wires, take the copper strands and twist them together so they fit inside an electrical connector.[15]
- Cut through the insulation casing the wire rather than the copper wire itself. If the wire is damaged, swap it out with a fresh length of wire.
-
5Hang an inline fuse on the frame if your vehicle has room for one. These parts don’t usually come with whip lights, so purchase an inline fuse holder, a 3-amp fuse, and zip ties to install in your vehicle. Find an open spot close to the battery. Then, set the fuse down and wrap a couple of zip ties around it to hold it in place. Plug the 3-amp fuse into the slot on the fuse holder afterward.[16]
- You should use a fuse no matter what. It’s helpful for bigger vehicles like trucks but also good for most smaller ones. If your vehicle has an enclosed engine compartment, you can most likely find a spot to hang a fuse.
- If you have a vehicle with an exposed battery, like a small ATV, you could go without the fuse. You wouldn’t have anywhere to hang it and keep it safe. Whip lights don’t use a lot of power, so you won’t notice any problems.
- If you’re unsure about installing a fuse or what kind to get, check the owner’s manual for your whip lights.
-
6Plug the red power wire into one end of the inline fuse holder. The fuse will have a pair of terminals on it. Take the power wire running from the power lights and push it into the holder. Then, check the top of the fuse holder for a couple of screws over the terminals. Rotate the terminal screw clockwise so that the wire stays stuck in place.[17]
- The fuse is meant to be used with the power wire. It routes power to the light from the battery. If you install the black wire by accident, it won’t work.


Connecting Wiring to the Battery
-
1Cut a length of red wiring to fit between the fuse and battery. Use another piece of 18-gauge red wire. Measure the distance from the fuse to the battery or simply stretch the wire between them to figure out the proper length. Then, cut off the excess length with a wire-cutting tool and strip 1⁄2 in (1.3 cm) of casing off both ends.[18]
-
2Secure a ring terminal to one end of the red wire. Ring terminals are small connectors that fit on things like battery terminals, and they are very easy to use. Push the exposed wire into the open, insulated end of the terminal. Then, press down on the insulation with a pair of pliers to close it over the wire.[19]
- Some ring terminals double as heat shrink tubing. To connect them to wires, warm them gently with a heat gun or another heat source.
-
3Use a wrench to remove the nuts from the vehicle’s battery cables. Rotate the nuts clockwise to detach them. Each terminal on the battery will have one nut holding a power cable in place. Note which terminal connects to a black cable and which one connects to a red one. The lighting wires have to be placed on the same terminals.[20]
- The battery’s terminals will be labeled as positive or negative in case you forget where the wires go. Look for a plus sign for positive and a minus sign for negative.
- Keep in mind that the setup may vary depending on the lights and vehicle you’re using. Some whip lights don’t connect to the battery at all. If yours has a rocker switch to place on the dashboard, you will most likely join the wires to the switch instead.
-
4Secure the red wire onto the battery’s positive terminal. Slip the ring terminal over the battery terminal. Then, place the locking nut back onto the terminal. Rotate it clockwise with a wrench to secure the wire in place. As long as the wire is in place, your whip lights have a power source.[21]
- Double-check that the red wire is on the positive terminal. If you attach the wires the wrong way, the fuse could blow. Replace it to get your whip lights working again.
- Some vehicles, like big ATVs, have a metal strip called a bus bar behind the dashboard. You can connect the wires to it to power the lights.
-
5Connect the black wire to the battery’s negative terminal. Locate the black wire running from the whip lights. This one attaches directly to the battery. Remove 1⁄2 in (1.3 cm) of casing from the end if you haven’t yet, then secure a ring terminal to it. Place it on the battery terminal before reattaching the locking nut.[22]
- Depending on the way your lights work, you may have to connect it to a bus-bar or a dashboard rocker switch instead.


Installing and Testing Lights
-
1Wrap the wire connectors in electrical tape to protect them. Although they are pretty damage-resistant, cover them up so the wires are less prone to fraying. Cover the connector under the whip light first. If you used any other connectors, tie them up as well.[23]
- Another option is to fit a shrink wrap tube over each connector, but they can’t be placed once you have installed the wires. Fit them on before connecting the wires or detach them temporarily, then gently heat the tubes to shrink them over the connectors.
- On ATVs and other open vehicles, tape and shrink tubes are very helpful. Without them, the connectors are left exposed to everything.
-
2Bind the wiring to the vehicle’s frame with zip ties. Find any spots where the wiring looks a little loose and droops of the frame. Wrap a zip tie around the wires and the frame. The black and red wires can be safely bound together. Keep the wiring wrapped tightly against the frame to shield it from damage.[24]
- Keep the wiring secured as firmly to the frame as possible. It’s harder to damage when it isn’t exposed and left hanging. If you’re in a truck, you can leave it underneath the carpeting.
-
3Screw the whip light into its base on the back end of your vehicle. Slot the tube back into the base you mounted earlier. Push it down while rotating it clockwise until you feel it lock in place. Make sure the whip light is well-mounted to your vehicle. If the base feels a little loose, check that the mounts and light are both secure on the frame.[25]
- The light tube doesn’t attach to the vehicle’s frame. It only connects to the base, so it will be straight up in the air when you’re driving.
-
4Turn on the vehicle to test the lighting. Before reassembling all the parts you removed during the installation, give the lights a test run. Turn on your vehicle to power up the lights. Then, use the control switch for the lights to turn them on. If everything is working, the lights will glow and light up your ride.
- Some lighting systems have a remote switch. Some operate through a switch on the dashboard. Others use a phone app. It depends on which kind you bought.
- If the lights aren’t working, turn off your vehicle and check the connections. The wiring might be in the wrong place, for instance.
-
5Replace the hood, dashboard, and any other components you removed. If you took down any panels from inside the vehicle, put them back first. Start with the dashboard and the central console underneath it. Screw in the seats as well. Then, replace the hood. When you’re done, take your ride out to show off its new glow![26]
- Test the lights thoroughly before reassembling your vehicle. Connection issues are so much easier to fix when you don’t have to take everything back apart.


Warnings
- Handle electrical components with caution to avoid shock. Always turn off your vehicle before touching the battery or any wiring.⧼thumbs_response⧽
- Make sure you connect all wiring properly and according to the manufacturer’s instructions. If you arrange wiring wrong, it could burn out.⧼thumbs_response⧽
Things You’ll Need
- Torx screwdriver
- Pliers
- Wire cutters
- Wire strippers
- Red 18-gauge wire
- Black 18-gauge wire
- 3-amp fuse
- 3-amp inline fuse
- Wire connectors
- Ring terminals
- Electrical tape or shrink wrap


References
- ↑ http://www.plasmaglow.com/install/LED%20Whip%20Install%20Instructions.pdf
- ↑ https://www.youtube.com/watch?v=8I8EXBE3-B8&feature=youtu.be&t=49
- ↑ https://www.youtube.com/watch?v=Pi7ZqTcpLiw&feature=youtu.be&t=30
- ↑ http://www.plasmaglow.com/install/LED%20Whip%20Install%20Instructions.pdf
- ↑ https://www.youtube.com/watch?v=7BIJov7Hagw&feature=youtu.be&t=426
- ↑ https://www.bobvila.com/articles/how-to-strip-wire/
- ↑ https://www.youtube.com/watch?v=7BIJov7Hagw&feature=youtu.be&t=543
- ↑ https://www.youtube.com/watch?v=V_q8UDMlp_c&feature=youtu.be&t=138
- ↑ https://www.bobvila.com/articles/how-to-splice-wires/
- ↑ https://www.youtube.com/watch?v=V_q8UDMlp_c&feature=youtu.be&t=206
- ↑ https://www.youtube.com/watch?v=8I8EXBE3-B8&feature=youtu.be&t=125
- ↑ https://www.youtube.com/watch?v=8I8EXBE3-B8&feature=youtu.be&t=192
- ↑ https://www.youtube.com/watch?v=7BIJov7Hagw&feature=youtu.be&t=48
- ↑ https://www.youtube.com/watch?v=E-SdFw4PjjQ&feature=youtu.be&t=94
- ↑ https://www.bobvila.com/articles/how-to-strip-wire/
- ↑ https://cdn.shopify.com/s/files/1/0311/6485/8503/files/SPXWPRGB4_5_Manual_Web.pdf?v=1585169427
- ↑ https://cdn.shopify.com/s/files/1/0311/6485/8503/files/SPXWPRGB4_5_Manual_Web.pdf?v=1585169427
- ↑ https://cdn.shopify.com/s/files/1/0311/6485/8503/files/SPXWPRGB4_5_Manual_Web.pdf?v=1585169427
- ↑ https://www.youtube.com/watch?v=E-SdFw4PjjQ&feature=youtu.be&t=483
- ↑ https://www.popularmechanics.com/cars/how-to/a1454/4213127/
- ↑ https://www.youtube.com/watch?v=cSTf2WX3X8M&feature=youtu.be&t=124
- ↑ https://cdn.shopify.com/s/files/1/0311/6485/8503/files/SPXWPRGB4_5_Manual_Web.pdf?v=1585169427
- ↑ https://www.youtube.com/watch?v=V_q8UDMlp_c&feature=youtu.be&t=173
- ↑ https://www.youtube.com/watch?v=V_q8UDMlp_c&feature=youtu.be&t=201
- ↑ https://www.youtube.com/watch?v=E-SdFw4PjjQ&feature=youtu.be&t=386
- ↑ https://www.youtube.com/watch?v=cSTf2WX3X8M&feature=youtu.be&t=130
About This Article