wikiHow is a “wiki,” similar to Wikipedia, which means that many of our articles are co-written by multiple authors. To create this article, 14 people, some anonymous, worked to edit and improve it over time.
This article has been viewed 222,028 times.
Learn more...
If you find yourself installing Windows often, you may want to make life easier with a bootable Windows USB installation drive. Having this means you don’t have to worry about scratching your installation DVD, or trying to download the setup files every time. Follow this guide to turn a spare flash drive into a Windows 8 installation machine!
Steps
Creating A Windows 8 ISO
-
1Install a free burning program. There are a number of free burning utilities available online. You need one that can create ISO files.
- If you received your copy of Windows 8 as a downloadable ISO file from Microsoft, you can skip to the next section.
-
2Insert your Windows 8 DVD. Open your new burning program. Look for an option such as “Copy to Image” or “Create Image.” If prompted, select your DVD drive as the source.Advertisement
-
3Save your ISO file. Choose an easy to remember name and location for the file. The ISO you make will be equal in size to the disc you are copying. This means it can take up several gigabytes of space on your hard drive. Be sure you have enough storage available.
- Creating the ISO can take a long time, depending on the speed of your computer and DVD drive.


Creating a Bootable Drive
-
1Download the Windows 7 USB/DVD download tool. This is available for free from Microsoft. Despite its name, this tool works with Windows 8 ISOs as well. You can run this tool on virtually any version of Windows.
-
2Select the Source File. This is the ISO that you created or downloaded in the first section. Click browse to navigate to the file. Once you’ve selected it, click Next.
-
3Select USB Device. The download tool will allow you to create either a DVD or USB install. Click the USB Device.
-
4Choose your USB drive from the list of attached devices. Make sure that your flash drive is connected correctly. You will need at least 4GB space on your flash drive to copy over the Windows installation. Click Begin Copying.
-
5Wait while program works. The program will format the USB drive to boot and then copy the ISO file onto the drive. The copying process can take up to 15 minutes to complete, depending on the speed of your machine.


Setting the Computer to Boot From USB
-
1Open the BIOS. To boot from the USB drive, you will have to set the BIOS to boot from USB first instead of the hard drive. To open the BIOS, reset your computer and hit the displayed key to enter Setup. The key varies by manufacturer, but is usually F2, F10, F12, or Del.
-
2Navigate to the Boot menu in your BIOS. Change the 1st Boot Device to your USB drive. Be sure that it is inserted, or you may not be given an option to choose it. Depending on your manufacturer, it may say Removable Device or list your flash drive’s model.
-
3Save changes and reboot. If you set the boot order correctly, your Windows 8 installation will load after the manufacturer’s logo disappears.


Installing Windows 8
-
1Select your language. Once the Windows 8 installation begins, you will be prompted to select a language, time and currency format, and keyboard layout. Once you select these, click Next.
-
2Click Install Now. This will begin the installation process. The other option is for repairing an existing Windows installation.
-
3Enter your product key. This is the 25 character key that came with your purchased copy of Windows 8. It may be located on a sticker on your computer or underneath your laptop.
- You do not need to enter the dashes between the groups of characters.
- This is not an optional step. Previous versions of Windows allowed you to register your product up to 60 days after installing. You must now enter the key before installation begins.
-
4Accept the license agreement. Once you have read the agreement, check the box signifying that you accept the agreement and click next.
-
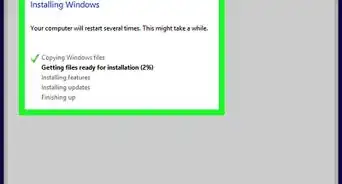
5Click Custom Install. You will have two options to install windows. Picking Custom will allow you to do a complete installation of Windows 8. Selecting upgrade can cause performance problems in the long run. It is highly recommended that you do a clean Custom Install.
-
6Delete the partition. A window will open asking where you would like to install Windows 8. In order to perform a clean install, you need to delete the old partition and start with a clean slate. Click “Drive options (advanced).” This will give you the ability to delete and create partitions.
- Select the partition of your existing operating system and click the Delete button.
- If you are installing an operating system for the first time on this hard drive, then there will be no partitions to delete.
- If your hard drive has multiple partitions, be sure to delete the correct one. Any data on a deleted partition is lost for good.
- Confirm the deletion process.[1]
-
7Select the Unallocated Space and click Next. There is no need to create a partition before you install Windows 8, this is done automatically.
-
8
-
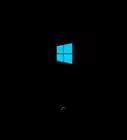
9Wait while Windows gathers information. After the computer reboots, you will see the Windows 8 logo. Beneath it will be the text “Getting devices ready” followed by a percentage. Windows is collecting information on the hardware installed in your computer.
- When this is done, the text will change to “Getting ready”.
- Your computer will restart one more time.
-
10Personalize your Windows 8. Once the computer finishes rebooting, you will be asked to pick the color scheme for your installation of Windows 8.
- You can change the color at any time in the Windows 8 settings.
-
11Enter a computer name. This is the name that the computer displays on the network. Any other device on the network will see your computer listed with this name.
-
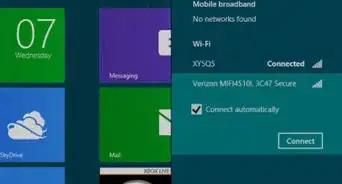
12Choose your wireless network. If you have a wireless-enable computer or device, you will see a menu asking you to choose a network. If you haven’t installed the driver for your wireless card yet, this step will automatically be skipped.
-
13
-
14Create an account. To log in to Windows, you will need an account. Microsoft recommends using a Microsoft account, so that you can make purchases in the Windows store. If you don’t have a Microsoft account, entering a valid email address will create one for free.
- If you don’t have an email address, click the “Sign up for a new email address” link to create one. This requires an internet connection.
- If you’d rather sign in the old way, without using a Microsoft account, click the bottom link. This will create a login similar to previous versions of Windows.
-
15Watch the tutorial while Windows loads. After choosing all of your settings, Windows goes through one final setup process. You will see several screens explaining how to use the new Windows. Once the loading is complete, you’ll be presented with your Start screen. You’re ready to begin using Windows 8.


Community Q&A
-
QuestionWhat is the size of a Windows 8 ISO file?
 Community Answerit is around 4 GB in size. However, you may want to get a 6 or 8 GB drive to store the installation files, just in case.
 -
QuestionDoes changing Windows XP to Windows 8 decrease computer RAM?
 Community AnswerNo, it doesn't decrease RAM. RAM is physical storage, which is permanent.
 -
QuestionCan you be able to install Windows 10 on Windows XP?Community AnswerYou may not be able to because of the old hardware on the PC that runs Windows XP. You may have to do some upgrades if you wanted to do this.
Warnings
- Going through this process will erase everything from your USB stick. Make sure to back anything up that you want to keep.⧼thumbs_response⧽
- Installing a new Windows may remove your personal data, like pictures, music, saved games, etc. Make sure to back up before installing a new Windows.⧼thumbs_response⧽


Things You'll Need
- USB stick - at least 4 GB
- Windows 8 ISO or DVD
About This Article
1. Create a Windows 8 ISO.
2. Download the Windows 7 USB/DVD download tool.
3. Run the tool.
4. Select the ISO.
5. Select USB Device.
6. Select your USB drive.
7. Click Begin copying.
8. Reboot from the USB drive and follow the on-screen instructions.