This article was co-authored by Mike Kapur and by wikiHow staff writer, Danielle Blinka, MA, MPA. Mike Kapur is a home inspector and the owner of Sonic Home Inspections, a home inspection company in Westchester, New York. With over 15 years of experience in pre-inspecting properties, Mike specializes in mold, radon, asbestos, lead, water, and air quality testing as well as hazardous materials, pest, infrared, and general home inspections. Prior to founding Sonic Home Inspections, Mike worked pre-inspecting apartments. Mike holds a BS in Accounting from Queens College and is a Certified Mold Assessor in the state of New York.
This article has been viewed 62,526 times.
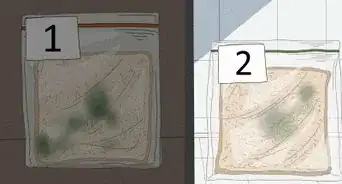
Mold is a common household problem, but it can be hazardous to your health. It may cause a stuffy nose, a sore throat, breathing problems, coughing, burning eyes, or a rash, especially if you’re allergic to it.[1] Fortunately, you may be able to kill small areas of mold on hard surface using common natural or commercial cleaners. However, you may prefer to hire a professional if you need to do a major mold remediation in your home.
Steps
Taking Safety Precautions
-
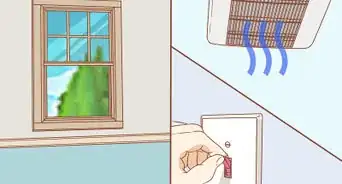
1Open a window and turn on a vent or fan to ventilate the room. Both mold and the products you’ll use to clean it can irritate your eyes, throat, and respiratory system. Opening your windows will allow the air to circulate around the room so you aren’t exposed to the fumes for too long. If you have vents in the room where you're cleaning, turn those on, as well. Additionally, angle a fan so it blows the fumes away from you and toward the window.[2]
- If it’s cold outside, you still need to open at least 1 window to allow the air to circulate in the room.
Tip: It’s best to wait for a dry, sunny day to treat the mold. As you clean the mold, spores will likely enter the air and may land on other areas of your home, which may be wet from the rain. Since mold grows best in moist areas, it will be harder to fully eradicate the mold when it’s raining.[3]
-
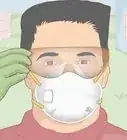
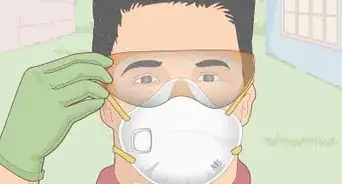
2Put on a facemask, gloves, and protective eyewear. Mold can cause an upper respiratory if you breathe in the spores. Similarly, fumes from the cleaning products can irritate your airways, eyes, and skin. Make sure you’re wearing your protective gear during the entire time you’re cleaning up the mold.[4]
- It’s also a good idea to wear long pants, a long-sleeved shirt, and rubber boots, if you have them. This will protect your skin while you clean.
Advertisement -
3Read all of the instructions for using your cleaning product. Some cleaning products contain harsh ingredients, and using them incorrectly can be harmful to your health. Additionally, you could accidentally damage the surface you’re cleaning. It’s best to read and follow the instructions carefully.[5]
- Read the precautions and warnings provided by the manufacturer.
-
4Avoid mixing bleach with ammonia. If mixed together, bleach and ammonia create toxic fumes that can be very hazardous to your health. It’s very important that you avoid combining them. Read the labels on the products you’re using so you know if they contain bleach or ammonia.[6]
- In general, it’s best to just avoid combining cleaning products all together.
-
5Throw away absorbent or porous items that are moldy. These items include things like drywall, upholstered furniture, carpet, rugs, ceiling tiles, and art, which either have holes in the surface of them or absorb liquids. Unfortunately, the mold spores can get into the pores of the material and continue to grow, even after you clean the item. Since those spores also reproduce and continue to spread the mold, it’s best to get them out of your home.[7]
- If an item can be laundered, then you may be able to salvage it. For instance, you may be able to wash a blanket or curtains in a washing machine.
Tip: If you have an item that is very important to you and you don’t want to throw it away, you may be able to hire a professional to salvage it. Things like furniture, art, and rugs may be able to be restored by someone trained in killing mold on porous materials.


Choosing a Treatment Solution
-
1Use bleach to effectively kill mold on surfaces.[8] Make a bleach solution by adding 1 cup (240 mL) of bleach to 1 gallon (3.8 L) of water. Put the solution in a bucket or spray bottle. Then, apply it directly onto the mold when you’re ready to use it.[9]
- Be very careful when cleaning with bleach. It can irritate both your lungs and your skin. Additionally, it may stain fabrics or carpet if you splash or spill it.
- Don’t ever combine bleach with ammonia or a cleaning product that contains ammonia.
-
2Opt for hydrogen peroxide as an effective bleach alternative. Get a bottle of 3% concentration hydrogen peroxide, and don’t dilute it. Pour the hydrogen peroxide into a spray bottle or a bucket. Then, spray or sponge the hydrogen peroxide directly onto the mold.[10]
- Hydrogen peroxide is both antibacterial and antifungal. Additionally, it cleans about as effectively as bleach, and it doesn’t create harsh fumes. However, it may stain fabric or carpet, so be careful not to spill or splash it.
-
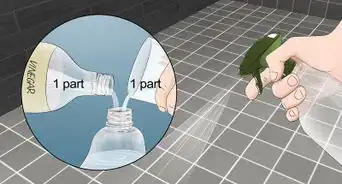
3Use white vinegar to kill the mold if you want a natural treatment.[11] Don’t dilute the vinegar before you use it. Instead, spray or sponge it directly onto the mold.[12]
- Vinegar has a very strong smell that you may not like. However, it will fade away over time. As another option, you can add your favorite essential oil to the vinegar to reduce the smell.
Variation: Add baking soda to the vinegar to create a foaming mold treatment. Add equal parts baking soda and vinegar, which will create a foaming reaction. Use a sponge or stiff-bristled brush to scrub the solution onto the mold.
-
4Use baking soda for a natural option that also removes odor. Fill a spray bottle with warm water, then add .25 tbsp (5 g) of baking soda. Shake the bottle to mix the 2 ingredients. Then, spray the baking soda onto the mold when you’re ready to use it.[13]
- Baking soda is a very effective natural cleaner. Plus, it’s odor absorbent, so it may help you get rid of the musty mold smell.
-
5Try borax for a natural mold treatment. Add 1 cup (204 g) of borax to 1 gallon (3.8 L) of water in bucket. Stir the solution to combine the ingredients, and transfer some of the solution to a spray bottle, if you have one. Then, apply the cleaner to the wall by spraying it or sponging it over the mold. [14]
- You can find borax near the laundry supplies at your local department store or online.
-
6Use tea tree oil if enjoy cleaning with essential oils. Add 1 teaspoon (4.9 mL) of tea tree oil to 1 cup (240 mL) of warm water in a spray bottle or bowl. Then, apply the treatment directly onto the mold. It’s best not to rinse tea tree oil after you apply it, as it’s nontoxic and will prevent the mold from coming back.[15]
- Tea tree oil is antifungal and antibacterial, and it may be the most effective natural cleaner for mold. Additionally, it’s not harmful to people or pets. However, it can be a bit expensive, but you don’t need very much to treat mold.
- Make sure the tea tree oil you choose is labeled as coming from Melaleuca Alternifolia, which is the technical name for tea trees.
-
7Make a 1:1 solution of clear ammonia and water for a strong cleaner.[16] Add the ingredients to a spray bottle or bucket, then shake or stir to mix them together. Next, apply the ammonia-water solution directly onto the mold with your spray bottle or a sponge.[17]
- You can find clear ammonia in your cleaning aisle. Don’t use a product that isn't labeled as “clear” to clean mold.
- Never, ever combine ammonia with bleach or a product that contains bleach.
- Ammonia may need to set longer than other mold treatments, so you may want to give it up to 3 hours to treat the mold.
-
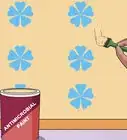
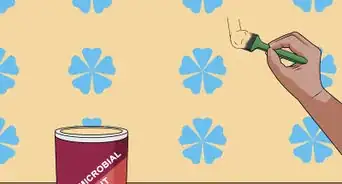
8Purchase a commercial bleach cleaner for an easy option. You can find several mold treatments available for purchase, or you can just get a cleaner that contains bleach. Check the label to make sure that the product you choose says it will kill mold.[18]
- You can find these products on the cleaning aisle at your local department store or online.


Treating the Mold
-
1Scrub the mold with soap and water to clean the surface. Add about 2 tablespoons (30 mL) of a mild dish detergent to a bucket of warm water, then stir to mix them. Dip a stiff-bristled brush into the soapy water, then scrub the affected area. Rinse the brush in the bucket often to keep the brush clean as you scrub away the mold. Remove as much of the mold as you can.[19]
- The root of the mold will likely remain on the surface, even if you don’t see it. However, scrubbing the area with soap and water will make it easier for the cleaning product you use to penetrate to the root of the mold and kill it.
-
2Apply your cleaning solution to the mold to kill it. Use a spray bottle or sponge to apply the solution to the moldy area. Go over the area several times to make sure it’s fully saturated. You want the cleaning solution to penetrate the mold to effectively kill it.[20]
- You don’t need to scrub the area at this time.
-
3Allow the cleaner to sit for 15 minutes to 1 hour so it penetrates the root. This gives the treatment time to work. Harsh treatments like bleach, hydrogen peroxide, and ammonia typically work quickly. Alternatively, natural treatments like white vinegar, baking soda, borax, and tea tree oil often require longer to work.[21]
- You may want to periodically apply more cleaner, depending on the surface you’re treating. If the liquid cleaner seems to be pooling below the mold-affected area, you may want to add more cleaner and soak up the excess liquid.
-
4Scrub the surface with a stiff-bristled brush, if necessary. If you removed all of the mold when you scrubbed the area with soap and water, then you don’t need to scrub. However, it’s best to scrub if you have lingering mold or a mold stain. Use your stiff-bristled brush to work the cleaner into the mold. Rinse your brush often to keep it clean.[22]
- If necessary, you can apply more of the cleaning solution you’re using as you scrub the area. However, don’t switch cleaners, even if you’re unhappy with the results.
-
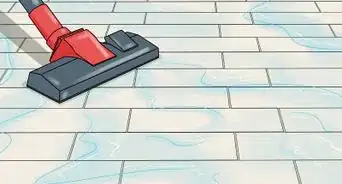
5Rinse and dry the area. You don't need to rinse the area unless you prefer not to leave a residue. However, you do need to dry it. If you want to rinse the area, use clean water to remove the remnants of the cleaning solution. Then, pat the area dry with a clean towel. To speed up the drying process, blow the area with a fan.[23]
- If you are unhappy with the results of your cleaning process, you can try again. However, before you try a different cleaner, thoroughly rinse the affected area to remove any remaining residue from your cleaning solution. Then, let the area fully dry before you try again.
Variation: You don’t need to rinse liquid cleansers, like a bleach solution, white vinegar, tea tree oil, or an ammonia solution. However, you may want to rinse harsher cleansers so that you, your family, and your pets don’t accidentally come into contact with them.


Expert Q&A
-
QuestionCan I remove black mold myself?
 Susan StockerSusan Stocker runs and owns Susan’s Green Cleaning, the #1 Green Cleaning Company in Seattle. She is well known in the region for outstanding customer service protocols — winning the 2017 Better Business Torch Award for Ethics & Integrity —and her energetic support of green cleaning practices.
Green Cleaning ExpertThere is no eco-friendly way to kill black mold. Black mold is also extremely dangerous if you inhale the pores. For these reasons, it is not recommended that you remove black mold yourself. However, if you do decide to tackle the job yourself, be sure to wear a respirator. Seal the affected area off from the rest of your home to keep the black mold from spreading. You’ll also need a special black mold removal product, since the stuff under your sink will not kill mold. -
QuestionIs bleach or vinegar better to kill mold?
 Mike KapurMike Kapur is a home inspector and the owner of Sonic Home Inspections, a home inspection company in Westchester, New York. With over 15 years of experience in pre-inspecting properties, Mike specializes in mold, radon, asbestos, lead, water, and air quality testing as well as hazardous materials, pest, infrared, and general home inspections. Prior to founding Sonic Home Inspections, Mike worked pre-inspecting apartments. Mike holds a BS in Accounting from Queens College and is a Certified Mold Assessor in the state of New York.
Certified Mold Assessor & Home Inspector, Sonic Home InspectionsYou can use either! If you're going to use bleach, I recommend you dilute it with water. -
QuestionHow do you decrease humidity?Susan StockerSusan Stocker runs and owns Susan’s Green Cleaning, the #1 Green Cleaning Company in Seattle. She is well known in the region for outstanding customer service protocols — winning the 2017 Better Business Torch Award for Ethics & Integrity —and her energetic support of green cleaning practices.
Green Cleaning ExpertTry using a dehumidifier. Place the dehumidifier in the room where the moisture is present to help lower the humidity.
Warnings
- Don’t try to treat mold by covering it with paint or caulk. This won’t kill the mold, and the paint or caulk will likely peel up.[27]⧼thumbs_response⧽
- Mold may leave discoloration behind after you clean it, so the item may not look the same after the mold treatment.[28]⧼thumbs_response⧽
- Be very careful that you don’t accidentally combine ammonia and bleach, as they will create toxic fumes that are harmful to your health.⧼thumbs_response⧽


References
- ↑ https://www.cdc.gov/mold/control_mold.htm
- ↑ https://www.cdc.gov/mold/control_mold.htm
- ↑ https://www.cdc.gov/mold/control_mold.htm
- ↑ https://www.cdc.gov/mold/control_mold.htm
- ↑ https://www.cdc.gov/mold/control_mold.htm
- ↑ https://www.cdc.gov/mold/control_mold.htm
- ↑ https://www.epa.gov/mold/mold-cleanup-your-home
- ↑ Mike Kapur. Certified Mold Assessor & Home Inspector, Sonic Home Inspections. Expert Interview. 19 August 2020.
- ↑ https://www.cdc.gov/mold/control_mold.htm
- ↑ https://moldpedia.com/mold-removal
- ↑ Mike Kapur. Certified Mold Assessor & Home Inspector, Sonic Home Inspections. Expert Interview. 19 August 2020.
- ↑ Susan Stocker. Green Cleaning Expert. Expert Interview. 8 November 2019.
- ↑ Susan Stocker. Green Cleaning Expert. Expert Interview. 8 November 2019.
- ↑ https://moldpedia.com/mold-removal
- ↑ https://moldpedia.com/mold-removal
- ↑ Mike Kapur. Certified Mold Assessor & Home Inspector, Sonic Home Inspections. Expert Interview. 19 August 2020.
- ↑ https://moldpedia.com/mold-removal
- ↑ https://www.cdc.gov/mold/control_mold.htm
- ↑ https://www.epa.gov/mold/mold-cleanup-your-home
- ↑ https://www.epa.gov/mold/mold-cleanup-your-home
- ↑ https://www.epa.gov/mold/mold-cleanup-your-home
- ↑ https://www.epa.gov/mold/mold-cleanup-your-home
- ↑ https://www.epa.gov/mold/mold-cleanup-your-home
- ↑ Susan Stocker. Green Cleaning Expert. Expert Interview. 8 November 2019.
- ↑ https://www.cdc.gov/mold/control_mold.htm
- ↑ https://www.epa.gov/mold/mold-cleanup-your-home
- ↑ https://www.epa.gov/mold/mold-cleanup-your-home
- ↑ https://www.epa.gov/mold/mold-cleanup-your-home
About This Article

To kill mold, start by scrubbing the affected area with warm, soapy water using a stiff-bristled brush. This will get rid of the surface-level mold. Then, mix together 1 cup (240 milliliters) of bleach with 1 gallon (3.8 liters) of water. Saturate the mold with the solution using a sponge, then let the cleaning solution sit for at least 15 minutes. After 15 minutes, scrub the affected area again with a stiff-bristled brush to get rid of any remaining mold. Finally, rinse the area with clean water before patting it dry with a towel.