This article was co-authored by Amy Guerrero. Amy Guerrero is an Arts and Crafts Specialist and the Owner of Sunshine Craft Co., a crafting studio based in Phoenix, Arizona. Amy specializes in macrame, DIY crafting, and teaching fiber arts. She offers monthly in-person and online workshops along with having developed a range of DIY craft kits for at-home projects. Amy holds a BS in Industrial Design from Philadelphia University. She worked as a graphic designer before starting her own business. Sunshine Craft Co. is a creative hub that offers a wide range of workshops, tools, and resources for any craft project to inspire creativity and community engagement.
This article has been viewed 612,845 times.
The garter stitch creates a reversible, stretchy fabric that lays flat and doesn't curl in on the edges. It's ideal for beginner projects, such as scarves, bags, hats, and blankets. Regardless of what you're making, the garter stitch is the most basic knitting stitch as it only has the most simple 1-row repeat. As such, it's perfect for beginners who want to learn this craft.
Steps
Preparing For the Garter Stitch
-
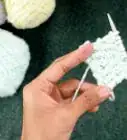
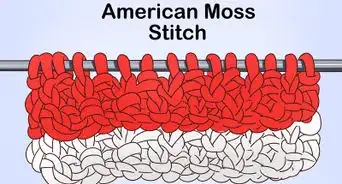
1Understand what garter stitch is. The garter stitch is the easiest knitting stitch pattern. It's commonly the first stitch novice knitters learn because it only requires you to know how to knit the basic knit stitch. Plus, the fabric lies flat and is fully reversible. So it's very easy to handle during the knitting process.[1] Garter stitch is characterized by horizontal ridges on both sides of the fabric.
-
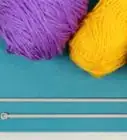
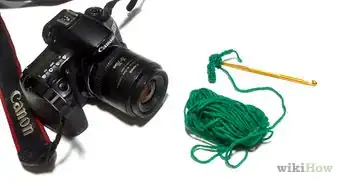
2Gather your materials. Decide on the yarn and needles you would like to use. For beginners, larger needles and thicker yarn will make learning easier. Try size 8, 14" long single-pointed knitting needles. If you're knitting in the round, use double-pointed needles.[2]
- If you have smaller needles and yarn, try to make loose stitches that allow plenty of room to maneuver.
Advertisement -
3Determine which hold you prefer. Knitters can work Continental-style or English-style. Try out both as you learn to knit, and evaluate what works best for you. These instructions are for English-style knitting, but they can be easily adapted for Continental style.
-
4Cast on your stitches. Before you begin knitting, cast-on as many stitches as your pattern requires. After you cast on all stitches, make sure to push the stitches towards the tip.


Knitting the Garter Stitch
-
1
-
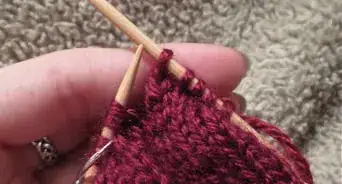
2Push the tip of the right needle into the first loop on the left needle. Push the needle into the loop from the bottom to the top.[4] When you do this, the right needle should cross behind the left needle.
- The needle tips will be making a T or X pattern.
- Make sure the yarn lies to the back of your needles.
-
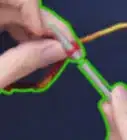
3Wrap the yarn around the right needle. Hold the yarn securely in your hand and wrap it around the back of the right needle near the tip, counter-clockwise. Then, pull the yarn clockwise across the front of the right needle so that it sits between the two needles.[5]
- The yarn can be held and wrapped using either your right or your left hand. Choose whichever feels more comfortable to you. Some people hold both needles with only the right or the left hand, and then use their free hand to wrap the yarn around the needles. Others prefer to keep holding the needles in both hands and then wrap the yarn around the needle with their right hand while the right hand still holds the right needle.
- Try holding the yarn between your thumb and forefinger.
-
4Pull the right needle through the loop. Start to gently pull the tip of the right needle back through the first loop towards you, bringing the yarn you looped around the needle with it. You might want to angle the right needle slightly towards yourself to bring the yarn through the loop.[6] Slowly pull the right needle all the way through then bring the right needle up, so that it's on top of the left needle.
- Don't pull too hard or you will pull the needle right out.
- Make sure to keep the yarn in your hand taut so that the yarn you wrapped around the right needle doesn't loosen as you pull it through the loop.
- Make sure that the yarn you wrapped around the right needle stays on the needle as you pull it through the loop.
- When you have completed this step, the right needle is in front of the left needle.
-
5Pull the loop off the left needle. Carefully lift the right needle to the right so that the old loop on the left needle slides off.[7]
- Keep the yarn taut after each stitch so that the loops are close to the needle but not so hard that you can't slide the needle into them.
- The first knit stitch should now be on the right needle.
-
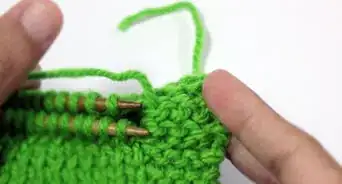
6Continue knitting. Knit all the cast-on stitches in the same way until there are no more cast-on stitches on your left needle.
- When all the stitches are on your right needle, you have finished your first row of knitting.
-
7Switch the needles in your hands. Your left hand should be the one holding all the stitches. You are now ready to start knitting your second row in exactly the same way as the first.
- What you have just finished, including the cast-on, is considered row 1.
- When you turn the project around to start the second row, the working yarn needs to be in the back.

Community Q&A
-
QuestionWhen the instructions say "knit four rows garter stitch," does that mean eight rows of knitting?
 LibraryMouseCommunity AnswerNo, just four rows. Knitting patterns are very rarely, if ever, written in ridges instead of rows.
 -
QuestionIs this the same as stockinette stitch?
 Community AnswerNo. Stockinette stitch is one row knit, one row purl. Garter stitch is only knit or only purl (aka "reverse garter").
 -
QuestionHow do I count rows in garter stitch?LibraryMouseCommunity AnswerGarter stitch comes out in ridges. Each ridge is 2 rows, so just count the ridges and then double it.
Expert Interview
Thanks for reading our article! If you'd like to learn more about doing needlework, check out our in-depth interview with Amy Guerrero.
References
- ↑ https://nimble-needles.com/stitches/how-to-knit-the-garter-stitch/
- ↑ http://www.craftyarncouncil.com/instructions_kn.php3
- ↑ http://www.dummies.com/how-to/content/how-to-knit-the-garter-stitch.html
- ↑ http://sheepandstitch.com/learn/how-to-knit/
- ↑ http://newstitchaday.com/garter-stitch/
- ↑ http://newstitchaday.com/knitting-101-how-to-knit-the-garter-stitch-for-beginners/
- ↑ http://sheepandstitch.com/learn/how-to-knit/
About This Article

To knit the garter stitch, start by casting on as many stitches as your pattern needs. Then, holding your needles in the starting position, push the tip of the right needle into the first loop on the left needle. Next, wrap the yarn around the right needle and pull the right needle through the loop. Finally, pull the loop off of the left needle and repeat with the rest of the cast-on stitches. To learn how to choose the best needles and yarn to knit garter stitches, keep reading!