This article was co-authored by wikiHow staff writer, Janice Tieperman. Janice is a professional and creative writer who has worked at wikiHow since 2019. With both a B.A. and M.A. in English from East Stroudsburg University, she has a passion for writing a wide variety of content for anyone and everyone. In her free time, you can find her working on a new crochet pattern, listening to true crime podcasts, or tackling a new creative writing project.
There are 10 references cited in this article, which can be found at the bottom of the page.
The wikiHow Video Team also followed the article's instructions and verified that they work.
This article has been viewed 341,231 times.
Learn more...
Hoping to use the stockinette stitch in an upcoming knitting project? Not to worry—this knitting technique is super easy to pick up if you know the basics of knitting. In fact, you only need to know the basic knit and purl stitches to pull it off! We’ll walk you through every step of this simple stitch, so you can easily apply it to both your flat and in-the-round projects.
Steps
Flat Projects
-
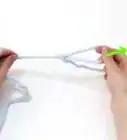
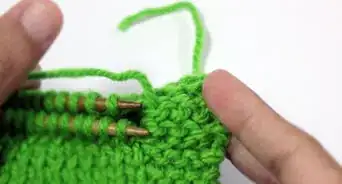
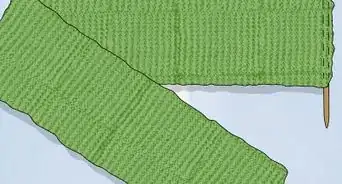
1Complete the first row with knit stitches. Slide your empty knitting needle into the front loop of the first stitch—this creates an “X” shape with your knitting needles. Take the loose section of yarn and pull it on top of the empty knitting needle, creating a new loop in the process. Then, use the empty knitting needle to pull this new loop up and behind the first stitch. Slide this original stitch off the needle, and continue knitting the rest of the stitches in the row.[1]
- Pulling a loose section of yarn over your back needle is also known as “yarning over.” When knitting, you always want to yarn over from front to back.
- This loose section of yarn always dangles from the backside of your project while you’re doing a knit stitch row.
-
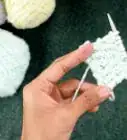
2Turn your project so the “wrong” side is facing forward. Stockinette knitting projects have 2 sides—a “right side” made up of knitting stitches, and a “wrong side” made of purl stitches. You just finished knitting on the “right side” of your project, so it’s time to flip your project over and do purl stitches on the “wrong,” bumpy side.[2]
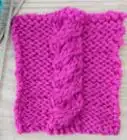
- The “right,” knitted side of the project resembles rows and columns of pointed arrows, while the “wrong,” purled side of the project resembles curly rows of bumps.
Advertisement -
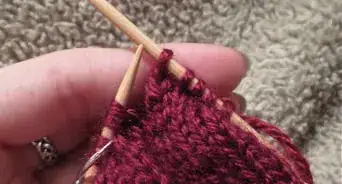
3Purl the second row of stitches. Slide your empty needle into the front loop of the first stitch, going from back to front. Then, create a new loop around the front, empty needle with your working yarn. Slide this new loop in and beneath the first stitch on the opposite needle to create your first purl stitch, and slide the old stitch completely off the needle. Repeat this purl stitch for the rest of the row.[3]
- Your loose, working yarn always needs to dangle in front of your project when you’re knitting a purl row.
- Always loop your working yarn from front to back when creating the new loop for your purl stitch.
-
4Flip your project around and knit the third row. Turn the knitting so the knitted, arrow-looking side of the yarn is facing forward. Then, use the knit stitch to finish the third row of your stockinette project.[4]
-
5Rotate your project and purl the fourth row. You know the drill—flip your knitting all the way around so the purled, bumpy side is facing you. Then, continue your project by purling along the “wrong” side of your knitting.[5]
- Remember: always purl when the “wrong” side is facing forward, and always knit when the “right” side is facing forward.
-
6Alternate between knit and purl rows until you’re happy with the size of your project. The stockinette stitch is all about balance and consistency. For every knit row you create, make sure you’re also knitting a purled row. Follow the recommendations on your knitting pattern, or just continue knitting and purling until you’re happy with the size of your project.[6]
- Many knitting patterns give a size suggestion rather than telling you how many rows to stitch. Instead of saying “complete 40 sets of stockinette stitches,” the pattern might just say “continue until knitting is 30 in (76 cm) long.”
-
7Cast off your stitches to complete the project. Knit 2 regular stitches onto your empty needle using the traditional knit stitch. Then, slip the other needle beneath the second stitch, pulling it up and over the first stitch and off the needle completely. Continue casting off by knitting another stitch onto the empty needle and pulling the second stitch off.[7]
- Slide the last of your working yarn through the final loop to finish casting off your project. Then, use a yarn needle to work the leftover section of yarn into your finished knitting.
In-the-Round Projects
-
1Knit the first row of stitches. Using the traditional knit stitch, work your way around the entire circle of stitches until you reach your original starting point.[8]
- Many knitters like to mark the beginning of their circular knitting rows with a stitch marker so they don’t lose track of where they are.
-
2Continue knitting each row until you’re finished with your project. In a flat stockinette project, you’d repeatedly flip the knitting around and switch between knitted and purled rows. However, circular projects like hats don’t need to be flipped or inverted, so you can continue knitting for the entire project.[9]
-
3Cast off to finish up your project. Circular and straight knitting needles use the same casting-off technique.[10] So, cast off your stitches as you usually would by knitting in pairs of 2 stitches. Then, pull the second stitch up and over the first stitch so it’s completely off the needle. When you have just 1 stitch left, pull the working yarn through the final loop and tighten it to secure your knitting.[11]
- Feel free to work the yarn tail into your project with a yarn needle so it doesn’t stick out.
Expert Q&A
-
QuestionWhat are common knitting mistakes?
 Jen WebberJen Webber is a Knitting Specialist and the Manager of The Quarter Stitch, a crafting store based in the French Quarter of New Orleans, Louisiana. With over 17 years of knitting and crafting experience, Jen helps educate customers and the public on best knitting practices for their DIY projects.
Knitting SpecialistThe most common mistake I usually see is a lack of blocking. Blocking a project involves either soaking or steaming the line to even out the fibers. This can help your project by avoiding different tightness in your stitches caused by external factors such as stress or hurry when knitting. -
QuestionIf a pattern says 12 rows of stocking stitches, is that 24 rows in total?
 LibraryMouseCommunity AnswerNo, it simply means 12 rows, 6 of knit and 6 of purl.
 -
QuestionWhenever I attempt to knit stockinette, one row will be smooth and the next bumpy. Any tips on fixing it?
 Community AnswerThat's how its supposed to be. The stockinette stitch has one bumpy side, while the other is smooth.
Warnings
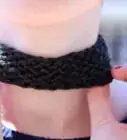
- Stockinette knitting projects aren’t great at keeping their shape, and will often curl up along the ends. Some knitters work around this pesky issue by lining their projects with rows of garter stitches.⧼thumbs_response⧽
References
- ↑ https://www.youtube.com/watch?v=rlaC5C5nJR8&t=0m25s
- ↑ https://www.youtube.com/watch?v=rlaC5C5nJR8&t=2m13s
- ↑ https://www.youtube.com/watch?v=rlaC5C5nJR8&t=2m29s
- ↑ https://www.youtube.com/watch?v=rlaC5C5nJR8&t=5m20s
- ↑ https://www.youtube.com/watch?v=rlaC5C5nJR8&T=5m20s
- ↑ https://www.stitchclinic.com/stockinette-stitch/
- ↑ https://www.youtube.com/watch?v=nSqL9urz_Xc&T=0m26s
- ↑ https://www.youtube.com/watch?v=99NXt42mGZc&t=0m55s
- ↑ https://www.stitchclinic.com/stockinette-stitch/