This article was co-authored by Kana Ishii. Kana Ishii is a Licensed Cosmetologist in the US and Japan, currently based in Beverly Hills. With more than 18 years of experience, she specializes in hair styling and coloring services such as balayage. Her work has been featured in Elle Girl Magazine, Cosmopolitan Magazine, and Modern Salon Magazine. She has also worked at major events, including The Academy Awards. Kana has won several hair competitions at some of the biggest beauty expos in the world such as the International Salon and Spa Expo and the Premier Orlando International Beauty Event.
This article has been viewed 278,177 times.
Liberty Spikes is a way of styling your hair into thick, upright spikes like those on the Statue of Liberty's crown. If you are a punk, are making a costume, or just want this cool hairstyle, check this out.
Note: Liberty spikes as explained here are different than a mohawk. Mohawks are shown here.
Steps
-
1Grow your hair long. It is recommended to have hair at least to your eyes in the front, possibly longer in the back, so that your spikes will be as durable and in-your-face as possible. Longer hair in the back is recommended because the spikes in the sides and back of your head stick out horizontally and won't be as noticeable. Since the intense styling required to keep that fierce hairdo up may stunt its growth, grow your mane out before you do any other steps.
-
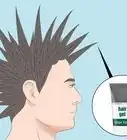
2Get some pictures of liberty spikes online or from others so you can see how it looks when it is done. While you are spiking it, use the pictures as a reference. Look at these closely, they are your best guide as to how it should look. Jorge Herrera from the band The Casualties has spiked his hair in this fashion numerous times. Do not confuse styles where the hair has multiple "loose" looking spikes or what appear to be undefined spikes/no discernible spikes at all but plenty of volume; this is called "charged" hair and is done somewhat differently than this. A quick Google search should give you some idea as to what proper liberty spikes should look like.Advertisement
-
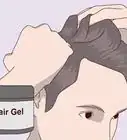
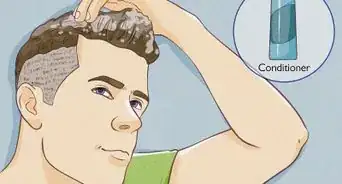
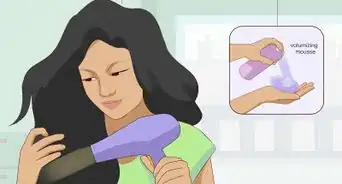
3Obtain a strong product. Most commercially available hair styling products don't have enough strength to hold your hair in liberty spikes for any reasonable amount of time. Other "products", namely things like Knox brand gelatin, glue (some punks swear by Elmer's school glue; others go so far as to use wood glue to keep their hair on end for long periods of time, especially if it's on the longer side), or clear glycerin soap are much better for keeping hair up. The thing with Knox gelatin is that you have to mix it perfectly or chunks of it will be left behind, and if left in your hair long enough, it will begin to smell.[1]
-
4Comb your hair. Free it from any tangles. Make sure you have a clean head because oily hair doesn't seem to cooperate as well.
-
5Straighten! You don't have to, but it sure makes it a lot easier if you do.[2]
-
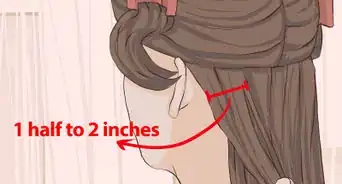
6Section off your hair into spikes with ponytail holders or hair clips. Before there is any adhesive in your hair, you can rearrange or resize them all you want. Make them so they are all over your head, are of even size, and are thick enough to stay standing. Proportion is key.[3]
-
7Tease Your Hair. Undo one rubber band and pull your hair hard enough to wear your scalp raises BARELY with it. Don't make it hurt though. Get a comb and at the base of the about to be spike comb it downwards and then upwards (for those that don't know how to tease hair). Teasing helps it stay up. You'll know when you're done because when you let go of your hair, the teased section should stick up. The teasing creates a strong base. Do not tease anymore than an inch of your spike.[4]
-
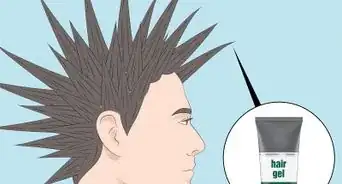
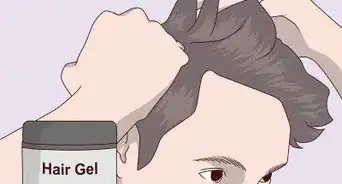
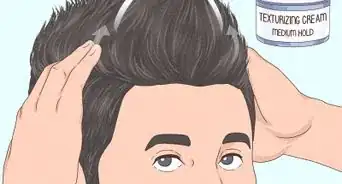
8Apply the product of your choice thickly to the first spike. If this is your first time spiking your hair this way, help from someone with more experience in crafting liberty spikes will help. Start at the bottom, closest to your scalp, and work your way up. Pay special attention to the base, as it is what keeps the spike standing, but make sure to get the whole spike very well.[5]
-
9Pull the spike as tautly as possible (almost like you're trying to gently pull it off your head) and then blow dry the spike you just added product to until tacky. It will most likely not be anywhere near completely dry, but should stay up on its own now. If it flops over or seems like it's coming apart, repeat the addition of the product and blow-drying as needed. Spikes don't have to look perfect, but if you want yours to have a visually pleasing point to them, this can be done later; right now you're focusing on creating the spike to begin with.[6]
-
10Repeat steps five and six for all the spikes you are planning to make. Once again, they should be all over your head, long, and thick.[7]
-
11If you want a more aesthetically pleasing looking spike, this is where you would put effort into making the tips pointy. To do this, reapply product (although not as heavily as you did to create the spike) and rub it up the length of the spike as you blow dry it on a low setting saving just enough product to twist the tips of your hair into a point. Done correctly, the spike should look like it's capable of stabbing or poking something.[8]
- Make sure to use dryer with low power on heat for one minute then cool for one minute.
-
12After all the spikes are up, use a small amount of the product (if you did this already to point the tips of your spikes, disregard this) to strengthen the spikes, then blow dry your hair even more. Ideally, the blow dryer should be almost touching your hair to dry the product and then a few inches from your hair to give it shape. If you use Knox gelatin as a product, use the "cool" setting so it will strengthen as quickly as possible.


Community Q&A
-
QuestionHow do I get the spikes out?
 SpaceshipCommunity AnswerIt is easy to wash out most hair gel using lots of basic shampoo. After applying the shampoo, then wash thoroughly to remove the gel.
 -
QuestionAre liberty spikes "appropriate" for school?SpaceshipCommunity AnswerThis really depends on your school’s rules on student hairstyles. Most public schools do not have a certain hair policy but many private schools have a hairstyle policy. In short, consult your school’s dress code/hair policy before getting liberty spikes.
-
QuestionWhat would happen if you used gorilla glue?
 Kevan GreenCommunity AnswerIt would severely damage the hair and may require the wearer to shave their head, or chop the hair off close to the scalp.
Warnings
- Hairspray is flammable. Do not smoke or be near open flame during or shortly after putting up your spikes.⧼thumbs_response⧽
- This is an unorthodox hairstyle that will draw odd looks and sometimes derision from members of the general public. If you are sensitive to these types of things or take offense to what others think of your appearance easily, don't give yourself liberty spikes.⧼thumbs_response⧽
- Liberty spikes are not meant to air dry and will flop over without the use of a hair dryer.⧼thumbs_response⧽
- Knox gelatin dries quickly and does not loosen its hold. Work fast, and only apply it one spike at a time.⧼thumbs_response⧽
- Exercise caution while using a blow dryer to avoid fire or shock.⧼thumbs_response⧽
- If you use hairspray in the process of spiking your hair, do not do it in an enclosed space because of the fumes and do not have anything burning (cigarettes, candles...) to avoid the risk of setting something on fire.⧼thumbs_response⧽
- Liberty spikes can be hard to get out in the shower. If you plan on spiking your hair in this manner and have something important to do the next day (such as work or school) where the spikes are not permitted, plan ahead and be ready to take a longer shower than necessary so you're not surprised and end up late for an important event.⧼thumbs_response⧽
- Should you choose not to wash the spikes out for a few days, you may have to get creative with how you sleep or reapply product to the spikes to make them nice and pointy again in the morning.⧼thumbs_response⧽
- If you live with your parents, they may be shocked by your new hairstyle, so either be prepared to have a sit-down with them over your hair or don't do it unless they give you the green light.⧼thumbs_response⧽
Things You'll Need
- Hairspray or a styling product (see step 3)
- Blow Dryer
- At least medium-length hair

References
- ↑ https://everything2.com/title/How+to+spike+your+hair
- ↑ https://www.huffpost.com/entry/flat-iron-tips_n_1316212
- ↑ https://www.youtube.com/watch?v=0piwbTivpDg
- ↑ https://www.youtube.com/watch?v=t6QsrW-Qgtk
- ↑ https://www.youtube.com/watch?v=7YwQbTBCBKs
- ↑ https://www.youtube.com/watch?v=0piwbTivpDg
- ↑ https://www.youtube.com/watch?v=0piwbTivpDg
- ↑ https://www.youtube.com/watch?v=7YwQbTBCBKs
About This Article