This article was co-authored by Sarah Fogle. Sarah Fogle is a DIY Home Improvement Specialist and the creator of Ugly Duckling House. With over a decade of experience, Sarah specializes in beginner-friendly home remodeling projects. Sarah holds an MBA from Georgia State University. She has been featured in multiple publications including Better Homes and Gardens and Make Magazine. She has also partnered with brands such as Lowe's, Home Depot, and Martha Stewart Crafts.
There are 7 references cited in this article, which can be found at the bottom of the page.
This article has been viewed 413,690 times.
A staple gun is a handheld machine that can force metal staples or small nail brads into heavy paper, plastic, wood, or thick fabrics. Staple guns come in manual, electric, and pneumatic models to fit a variety of needs, and they’re more powerful than the average desk stapler. Before you can use your staple gun for a woodworking, upholstery, or craft project, you’ll need to load the staples into the gun.
Steps
Rear-Loading a Manual Staple Gun
-
1Locate the pusher rod at the back of the gun. Point the gun so that the area where the nails come out of is facing away from you. Then, look at the back of the gun for a small metal rectangle with 2 indentations on the sides and a small hook at the top or bottom. This is the release for the pusher rod.[1] [2]
- If you’re having trouble finding it, trace from where the staples come out of the gun to the rear area, which is usually a straight line.
-
2Push in on the rod and pull it out to remove it.[3] Place your thumb and forefinger in the indentations on either side of the pusher. Then, push the rod forward and down if the hook is on the top of the rod. If the hook is on the bottom, push the rod forward and up. Once the hook is unlatched, pull the rod completely out of the gun and set it aside.[4]
- If pushing in one direction doesn’t work, try the opposite direction before pulling it out. In most cases, you’ll be able to see the hook on the rod as it unlatches when you push the rod in.
Advertisement -
3Load the staples legs-down over the guide rails.[5] Take a row of staples and position them so that the legs are facing down with the staples on top of the rails inside of the chamber. Then, let the staples slide all the way to the front of the gun. If you're going to be using a lot of staples for the project, it's a good idea to fill up the chamber with staples, leaving only about 1⁄4 in (0.64 cm) of space.[6]
- If you don’t slide the staples to the front, they can get stuck when you reinsert the pusher.
-
4Reinsert the pusher until it locks in place.[7] Position the end of the pusher without the release mechanism inside of the chamber. Hold the rod straight and push it into the chamber, hooking the back of the rod in place at the top or bottom.[8]
- With some staplers, you might feel some tension while you’re pushing the rod in. This comes from the spring on the rod touching the staplers. Keep pushing the rod until you can hook it into place.
-
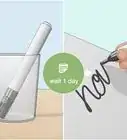
5Test the staple gun on a piece of paper or wood. To make sure the staples are loaded properly, fold a piece of paper in half or use a scrap piece of wood or fabric. Place it under or inside of the stapler and pull the trigger to release a staple. Make sure the staples are firing smoothly with no jams.[9]
- Try to test the stapler on the type of material that you’ll be using for your project.


Bottom-Loading an Electric Stapler
-
1Unplug the staple gun and lock the trigger before you begin loading it. Pull the plug out of the wall, and find the trigger lock just behind the trigger that you would use to release a staple. Shift the lock to the left or right, or press it toward the trigger to lock the trigger in place.
- Your gun may not have a trigger lock. In that case, be careful while you’re loading the staples. As long as the gun is unplugged, you should be safe.
-
2Find the magazine release buttons at the back of the stapler. The magazine release is a button that releases clip that holds the staples in place. Look at the rear part of the stapler, toward the bottom. It should have 2 small indentations on either side of the stapler for you to squeeze and pull.
- If you don’t know where your magazine is located, find where the staples come out of the gun. The release button should be on the opposite side of the bottom of the gun where the staples are fired.
-
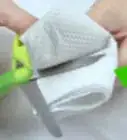
3Squeeze the release buttons and pull the tray out. Place your thumb and forefinger on either side of the release, and press in before pulling out. This will release the magazine from the gun, revealing a compartment underneath of the gun where you’ll place the staples.[10]
- If you haven’t already, you will need to lay the stapler on its side or hold it upside-down to load the staples into the gun.
-
4Place the staples upside-down in the magazine. Insert a row of staples into the compartment with the legs facing up toward you, and slide them toward the front of the stapler. Keep holding the gun upside down to keep them in place.
-
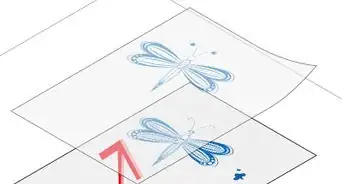
5Use the marking on the magazine release if you’re loading brad nails. If you’re using the staple gun to fire brad nails, look at the magazine rod. It should say something like “Load brads” with an arrow facing up or down. Lay a row of brad nails against the side if the compartment that the arrow is pointing toward.
- If your stapler doesn’t have an indication for how to load brad nails, it’s possible that the stapler isn’t able to fire them. Check the manual or search online to ensure that your stapler is compatible with brad nails.
-
6Slide the magazine back into the chamber until you hear it snap into place. Hold the release button between your thumb and forefinger and push the magazine back into the compartment. The click notifies you that the magazine has clipped into place and that the staples won’t fall out.[11]
- If you don’t hear a click, try pulling the magazine out and pushing it back in again.


Loading a Pneumatic Stapler
-
1Turn off the compressor and detach the stapler. Disconnect the stapler by switching the power button on the back of the compressor tank to the “off” position. Use your hand to loosen the nut on the bottom of the gun to disconnect it from the hose that attaches it to the compressor. If your trigger has a lock, be sure to activate it to prevent an accidental misfire.
- If the nut is stuck in place or won’t move when you try to turn it, use the appropriate-sized wrench to loosen it.
-
2Push on the lever at the front of the gun to disconnect the follower. Squeeze the lever at the front of the gun, and pull the rod away from the stapler to remove the magazine. Make sure you pull the follower rod all the way out to lock it into position.
- The follower is a rod that holds the magazine in place and makes sure it doesn’t move. Most pneumatic staple guns have a large one at the front of the gun, protruding from underneath the area where the staples fire out of the gun.
-
3Lay a strip of staples over the magazine rail with the legs facing down. Position the staples so that the legs are on either side of the rail. Use your hand to slide them up and down on the rail to ensure that they can move freely without getting caught on the rail.
- It’s safe to load multiple smaller rows of staples, rather than 1 large row.
-
4Release the lever at the front of the gun to move the follower into place. Unlock the follower by squeezing the lever and then releasing it. The stapler should automatically push the staples into the staple gun. If it doesn’t automatically move, give the rod small push and it should engage.
- Never force the rod to push up on the staples. This can cause a misfire later when you use the gun.
-
5Test the stapler gun by stapling into a scrap piece of wood. Reattach the compressor and put on your safety goggles before turning the gun on. Then, place the front of the gun on a piece of wood pull the trigger to ensure that only 1 staple comes out of the gun at a time. It should fire smoothly with the staple laying flush against the wood.
- Try to use a piece that is as close to the thickness of the actual items that you are stapling together or are made from the same material. For example, if you are stapling into particle board, use scrap pieces of particle board to test the stapler.


Expert Q&A
-
QuestionHow do you use staple guns safely?
 Sarah FogleSarah Fogle is a DIY Home Improvement Specialist and the creator of Ugly Duckling House. With over a decade of experience, Sarah specializes in beginner-friendly home remodeling projects. Sarah holds an MBA from Georgia State University. She has been featured in multiple publications including Better Homes and Gardens and Make Magazine. She has also partnered with brands such as Lowe's, Home Depot, and Martha Stewart Crafts.
DIY SpecialistDouble-check which end of the staple gun where the staples are supposed to come out of. On some tools, it's not always where you might think! The "legs" of the staple should always come out from the end. -
QuestionHow do you keep a staple gun from jamming?Sarah FogleSarah Fogle is a DIY Home Improvement Specialist and the creator of Ugly Duckling House. With over a decade of experience, Sarah specializes in beginner-friendly home remodeling projects. Sarah holds an MBA from Georgia State University. She has been featured in multiple publications including Better Homes and Gardens and Make Magazine. She has also partnered with brands such as Lowe's, Home Depot, and Martha Stewart Crafts.
DIY SpecialistAlways load your staple gun with sections of full, joined staples. The gun is more likely to jam if you use small, broken bits of staples. -
QuestionMy three-in-one staple shoots out double staples. I'm thinking it may be spring fatigue. What can I do?
 Community AnswerThe punching end may be too large for the staples you are using. Try checking what size they should be and maybe try using thicker staples.
Warnings
- Before loading an electric or pneumatic staple gun, always unplug it and lock the mechanism to avoid injury.⧼thumbs_response⧽
- Keep your eyes, ears and hands protected with goggles, earplugs and gloves when you’re using a heavy duty stapler.⧼thumbs_response⧽

-Step-22.webp)
References
- ↑ https://youtu.be/faDbdTD_M0w?t=13
- ↑ Sarah Fogle. DIY Specialist. Expert Interview. 27 July 2021.
- ↑ Sarah Fogle. DIY Specialist. Expert Interview. 27 July 2021.
- ↑ https://homeguides.sfgate.com/how-to-assemble-a-staple-gun-13402980.html
- ↑ Sarah Fogle. DIY Specialist. Expert Interview. 27 July 2021.
- ↑ https://smallbusiness.chron.com/load-ricoh-copier-staple-cartridge-51685.html
- ↑ Sarah Fogle. DIY Specialist. Expert Interview. 27 July 2021.
- ↑ https://homeguides.sfgate.com/how-to-assemble-a-staple-gun-13402980.html
- ↑ https://youtu.be/mM8GotDmDEM?t=35
About This Article

To rear load a manual staple gun, start by locating the push rod at the back of the gun. When you're ready to release the push rod, look for a small metal rectangle with 2 indentations on the sides and a small hook on the top or the bottom. Next, push in on the rod, and pull it out to remove it. Then, load the staples legs-down over the guide rails, replace the pusher until it locks in place, and do a test staple on scrap paper. To learn how to load a pneumatic stapler, keep reading!