This article was co-authored by wikiHow Staff. Our trained team of editors and researchers validate articles for accuracy and comprehensiveness. wikiHow's Content Management Team carefully monitors the work from our editorial staff to ensure that each article is backed by trusted research and meets our high quality standards.
The wikiHow Video Team also followed the article's instructions and verified that they work.
This article has been viewed 30,033 times.
Learn more...
Bubbles are fun to play with, but there are more things you can do with them than just watch them float and pop. With a little bit of bubble solution and food coloring, you can make beautiful bubble art. You can even use different techniques to create different types of art.
Steps
Making Popped Bubble Art
-
1Find a place that can get messy or that is easy to clean up. Bubbles are sticky to begin with, but colored bubbles can stain as well. Head outside or cover your table and floor with lots of newspaper. It would be a good idea to put on an old shirt or a smock as well.[1]
-
2Set a sheet of paper down on the table. Thick paper, such as cardstock or watercolor paper will work the best, but you can use plain printer paper too. The paper can be any size you want it to be, but it needs to be white, otherwise the colors won't show up.Advertisement
-
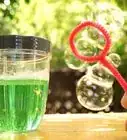
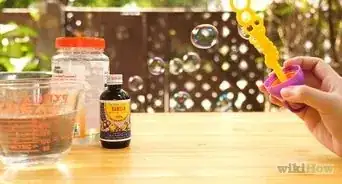
3Mix some bubble solution and food coloring with a bubble wand. Pour 1 tablespoon (15 milliliters) of bubble solution into a bowl first. Next, use a bubble wand to stir in 1 to 3 drops of liquid food coloring. Repeat this step with a new bowl and wand for each color that you want to make.
- You can use store-bought or homemade bubble solution.
- If you don't have food coloring, use 1/2 cup (120 milliliters) of bubble solution and 1 teaspoon of acrylic, poster, or tempera paint.[2]
-
4Point the bubble wand at your paper and blow. The bubble will float towards the paper, then pop when it hits it. It will create a ring with a splatter effect around it. If the bubble does not pop, you can poke it with your finger to make it pop.
-
5Blow more bubbles at different distances. If you blow the bubbles closer to the paper, you will get a bigger “splatter” effect. If you blow the bubbles from further away, the splatter effect will be smaller.
-
6Repeat the process with more colors, if you want to. Mix up a new bubble solution with a different color of food coloring. Use a new bubble wand, or rinse the one you just finished using with water. Blow more bubbles onto the paper to create a more colorful piece of art.
-
7Wait at least 10 minutes for the painting to dry. Once you are happy with the painting, let it sit flat on the table until it dries. How long this takes depends on how warm or cold the weather is. It will take at least 10 minutes for the paper to dry.[3]

Creating Foaming Bubble Art
-
1Set up a crafting station that can get messy. Outside would be the best. If you can't go outside, cover your floor and table with lots of newspaper. It would be a good idea to wear a smock or old t-shirt so that your clothes don't get stained.
-
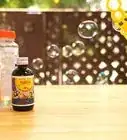
2Make a bubble solution with water, dish soap, corn syrup, and food coloring. You can use a store-bought bubble solution, but this homemade recipe will give you stronger bubbles. To make this solution, mix together 1 cup (240 milliliters) of water, 1/2 cup (120 milliliters) of clear dish soap, 3 tablespoons (45 milliliters) of white corn syrup, and 1 to 3 drops of food coloring.[4]
- Make the bubble solution in a wide, shallow bowl.
- You can also use 1/2 cup (120 milliliters) of store-bought bubble solution and 1 teaspoon paint, but the bubbles may not be as strong.[5] Acrylic, poster, and tempera paint all work great for this.
-
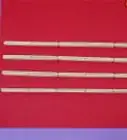
3Tape 4 to 6 drinking straws together to create a bubble blower. If you don't have that many drinking straws, you can cut 2 to 3 straws in half, and tape those together instead. Your bubble blower will be shorter but still just as effective.[6]
- If you don't have any tape, hold the straws together with a piece of string or tape.
- You can also use just 1 straw if you prefer, but it may take longer to get a good amount of bubbles.[7]
-
4Dip the bubble blower into the bowl and exhale. Take a deep breath, then put your mouth over the straws and blow. Keep inhaling and exhaling until the bubbles fill the bowl and start to climb up over the edge. You need a small mound of bubbles peeping over the rim of the bowl.
- Remember to pull your mouth away from the straws each time before you inhale.
- This is just like blowing bubbles through a straw into a glass of milk.
-
5Place a sheet of paper over the bubbles. Lower it just enough so that the bubbles touch the paper and stick. Don't smoosh the bubbles, or you may not get the effect you want.[8] If you used the corn syrup recipe, the bubbles should hold their shape.
- You can use any type of paper you want, including printer paper. Thick paper, such as watercolor paper or cardstock, will work better, however.
-
6Lift the paper away, then flip it over. Once the bubbles touch the paper, pull the paper straight up. Flip the paper over to reveal your colorful artwork. Be careful not to slide or drag the paper across the bubbles.[9]
-
7Repeat the process with a different color, if desired. Mix up another bubble solution but with a different color. Blow into the bubble solution using a new bubble blower. Lower the paper back onto the bubbles, then pull it away to reveal your new design.[10]
- If you don't have enough materials to make a second bubble blower, rinse your first one with water.
-
8Let the paper dry before displaying it. Set the paper down on a flat surface and wait for it to dry. If there are any bubbles stuck to the paper, you can pop them with your finger or wait for them to pop on their own. The paper should be dry after about 10 minutes, but it could take longer if you used lots of bubbles or if it is cold outside.

Using a Bubble Snake
-
1Find a place that can get messy. Outside would be a great idea. If you can't play outside, find a spot inside and cover the floor with newspaper. Keep your clothes clean by putting on an old shirt or an art smock.
-
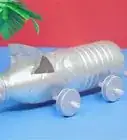
2Cut a water bottle in half and keep the top part with the cap. Punch a hole in the middle of a plastic water bottle with a craft blade. Use the knife to saw around it the bottle to cut it in half. Throw away or recycle the bottom half and keep the top half with the cap.[11]
- You do not need to remove the label.
- If the water bottle has grooves on it, use those as a cutting guide.
- Adult supervision is required for this step.
-
3Pull a sock over the cut end of the bottle and secure it with a rubber band. Scrunch a sock over the cut end of the bottle so that it is taut, like a drum. Slip a rubber band over the sock to hold it in place.[12]
- If you don't have any rubber bands, you can twist a pipe cleaner around the sock and bottle instead. You can also wrap it with duct tape.
-
4Place 1 to 2 drops of food coloring onto the drum part of the sock. You can use the same color for both drops, or you can use different colors. If you decide to use different colors, think about how they will mix. For example, purple and orange will make brown, but blue and pink will make purple![13]
- If you use 2 different colors, you may get a tie dye effect or a solid color. This depends on how the bubbles come out of the bubble blower.
-
5Dip the sock-covered end into a bowl of plain bubble solution. You can use a homemade bubble solution, or you can use a store-bought one. Make sure that the bubble solution is plain and clear; you already added color to the sock.[14]
-
6Remove the bottle cap and blow into it to produce a long, bubble snake. Unscrew the bottle cap first. Take a deep breath and exhale into the bubble blower like into a trumpet. When you blow, a long "snake" made from foamy bubbles will come out of the sock end of the bubble blower.[15]
-
7Drape your snake onto a sheet of paper. The snake should stick to the bubble blower until you knock it off onto the paper. If it starts to fall off before that, just catch it with the paper instead.[16]
- You can use any type of paper for this, but thicker paper, such as cardstock or watercolor paper, will work the best.
-
8Scrape or blow the bubble snake off, then let the bubble art dry. You can scrape the snake off with a thin piece of cardboard, or you can just blow on it until it falls off. You can also leave the snake on the paper until the bubbles pop or evaporate on their own.[17]
- Don't scrape it off with your hand, however, or you may ruin your print!
- How long it takes for the bubble art to dry depends on how warm and sunny it is. Bubble art will take longer to dry in cold weather.

Warnings
- Remind young children to exhale into the straw, not inhale.⧼thumbs_response⧽
Things You'll Need
Making Popped Bubble Art
- Bubble solution
- Liquid food coloring
- Bowl
- Thick paper
- Bubble wands
Creating Foaming Bubble Art
- Water
- Liquid dish soap
- White corn syrup
- Liquid food coloring
- Bowl
- 4 to 6 straws
- Rubber band
- Thick paper
Using a Bubble Snake
- Bubble solution
- Liquid food coloring
- Bowl
- Plastic water bottle
- Craft blade
- Sock
- Rubber band
- Thick paper
References
- ↑ http://www.momtastic.com/diy/694263-diy-bubble-art-for-kids/
- ↑ https://www.education.com/activity/article/soap_bubble_prints/
- ↑ http://www.momtastic.com/diy/694263-diy-bubble-art-for-kids/
- ↑ https://teaching2and3yearolds.com/bubble-mix-recipe-for-art/
- ↑ https://www.education.com/activity/article/soap_bubble_prints/
- ↑ https://teaching2and3yearolds.com/bubble-mix-recipe-for-art/
- ↑ https://www.education.com/activity/article/soap_bubble_prints/
- ↑ https://www.education.com/activity/article/soap_bubble_prints/
- ↑ https://www.education.com/activity/article/soap_bubble_prints/
- ↑ https://www.education.com/activity/article/soap_bubble_prints/
- ↑ http://www.housingaforest.com/rainbow-bubble-snakes/
- ↑ http://www.housingaforest.com/rainbow-bubble-snakes/
- ↑ https://artfulparent.com/2017/07/bubble-printing-bubble-snakes.html
- ↑ https://artfulparent.com/2017/07/bubble-printing-bubble-snakes.html
- ↑ https://artfulparent.com/2017/07/bubble-printing-bubble-snakes.html
- ↑ https://artfulparent.com/2017/07/bubble-printing-bubble-snakes.html
- ↑ https://artfulparent.com/2017/07/bubble-printing-bubble-snakes.html
About This Article