This article was co-authored by wikiHow Staff. Our trained team of editors and researchers validate articles for accuracy and comprehensiveness. wikiHow's Content Management Team carefully monitors the work from our editorial staff to ensure that each article is backed by trusted research and meets our high quality standards.
This article has been viewed 48,834 times.
Learn more...
Dorset buttons started in Dorset, England in the 18th century and they were originally made from part of a Dorset sheep’s horn.[1] Now, Dorset buttons are a popular button craft that you can make using a plastic or metal ring, some thread, and a needle. These buttons make beautiful embellishments for clothing, purses, and even furniture. It’s easy to learn how to make a Dorset button, so try making one and use it to embellish a garment or other item.
Steps
Covering the Ring
-
1Gather your materials. Dorset buttons only require a few items to make. Before you get started, you will need:[2]
- Plastic or metal rings. You can find these rings in craft stores. Choose a ring that is 1.5 inches (3.8 cm) in diameter to make your first Dorset button.[3] Make sure that your rings are solid and do not have a slit in them, or your thread may slip through the slit.[4]
- Tapestry needle.
- Embroidery floss, light or medium worsted weight yarn, or cotton crochet thread.
- Scissors.
-
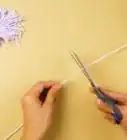
2Thread your needle. You will need a lot of thread to create your Dorset button. Measure out about four arm’s lengths worth of thread or yarn, which is roughly 100 inches (254 cm). Insert your thread or yarn through the eye of your tapestry needle.[5]Advertisement
-
3Use the blanket stitch to cover the ring. Start by holding the end of your thread against the edge of the ring. Then, wrap the thread over and around the outside of the ring and insert your needle up through the center of the ring. As you do this, bring the needle through the loop that the thread has created around the ring. Pull the thread to secure the stitch. This completes one blanket stitch.[6]
-
4Continue making blanket stitches to cover the ring. Keep making blanket stitches around the edge of your ring while still holding the beginning thread in place with your finger. Go all the way around the ring until it is covered with blanket stitches. When you are close to the thread that you have been holding in place, stitch around this thread to secure and hide it.[7]
- Do not cut the thread after you finish wrapping the ring.
-
5Rotate the seam inwards. Your blanket stitches will leave a seam on the outside of the ring. You will need to work this seam in towards the center of the ring to hide it. Do this by pressing on the seam with your fingers going all the way around the ring. Keep the seam on the backside of the button, but move the seam inwards so that it will not be visible from the front of the button.[8]


Making the Spokes
-
1Wrap the yarn around the ring four times at different angles. The goal is to create eight spokes extending from the center of the ring. To do this, wrap the thread around the outside of the ring four times so that the threads cross each other at the center of the ring.[9]
-
2Weave the thread between the spokes. Next, you will need to work stitches around the spokes to separate them and fill in the area in the center of the button. To weave between the spokes, bring the needle up between two spokes, and then bring the needle down between the next two spokes. Bring the needle back up through the area between the first two spokes, and then down through the space between the spokes next to it.[10]
- Continue working around the spokes in this fashion going in a circle around the center of the button. Keep going until you have wrapped all of the spokes all the way to the outer edge of the ring.
-
3Insert the needle through the threads on the back side of the spoke. To secure the tail thread, you will need to weave it in through the back of the button. Insert the needle in through and under the threads moving towards the center. Bring the needle all the way through and pull on the thread to bring all of the excess thread through.[11]
-
4Leave the tail if you want to attach the button to a garment. If you do not plan to attach the button to anything, or if you do not need the tail to attach it, then you can snip the excess thread. However, if you want to sew the button onto a garment, then it is a good idea to leave the tail. This will allow you to thread the tail through the eye of a needle and sew the button onto a garment with ease.


Customizing Your Dorset Buttons
-
1Use different colors. Alternating colors is one of the easiest ways to customize your Dorset button. Choose colors that complement or contrast with each other. For example, you could use two different shades of pink, or purple and yellow together.[12]
- Try changing colors when you have gotten halfway through weaving around the spokes.
- You may also consider using a multi-color thread to ensure that you get a colorful Dorset button as your finished project.
-
2Add more spokes. Adding extra spokes is another great way to customize your Dorset buttons. You can make a Dorset button with 10, 12, or even 20 spokes by wrapping your thread around the center more than four times. Remember that you need to wrap the thread around the ring half the number of times as the spokes you want to create.[13]
- For example, if you want to create 12 spokes, then you would wrap the thread around the outside of the ring six times. If you want to create 20 spokes, then you would wrap the thread around the outside of the ring 10 times.
-
3Include beads in your weaving. Incorporating beads into your weaving is another way to customize your Dorset button.[14] To add beads, place a bead on your needle as you bring the needle up through the center of two spokes. Slide the bead down the thread and then complete the stitch to secure it.
- Repeat this as many times as you like to incorporate beads into your Dorset button design.
-
4Finished.


Things You’ll Need
- Plastic or metal rings
- Tapestry needle.
- Embroidery floss, light or medium worsted weight yarn, or cotton crochet thread.
- Scissors
- Beads (optional)

References
- ↑ https://www.craftstylish.com/item/42688/how-to-make-dorset-buttons/page/all
- ↑ https://www.craftstylish.com/item/42688/how-to-make-dorset-buttons/page/all
- ↑ https://www.craftstylish.com/item/42688/how-to-make-dorset-buttons/page/all
- ↑ http://www.threadsmagazine.com/item/32711/get-creative-with-heirloom-buttons/page/all
- ↑ https://www.craftstylish.com/item/42688/how-to-make-dorset-buttons/page/all
- ↑ https://www.craftstylish.com/item/42688/how-to-make-dorset-buttons/page/all
- ↑ https://www.craftstylish.com/item/42688/how-to-make-dorset-buttons/page/all
- ↑ http://henrysbuttons.co.uk/worksheets-and-tutorials.html
- ↑ https://www.craftstylish.com/item/42688/how-to-make-dorset-buttons/page/all
- ↑ http://www.threadsmagazine.com/item/32711/get-creative-with-heirloom-buttons/page/all
- ↑ https://www.craftstylish.com/item/42688/how-to-make-dorset-buttons/page/all
- ↑ https://www.craftstylish.com/item/42688/how-to-make-dorset-buttons/page/all
- ↑ http://henrysbuttons.co.uk/worksheets-and-tutorials.html
- ↑ https://www.craftstylish.com/item/42688/how-to-make-dorset-buttons/page/all
About This Article