This article was co-authored by wikiHow Staff. Our trained team of editors and researchers validate articles for accuracy and comprehensiveness. wikiHow's Content Management Team carefully monitors the work from our editorial staff to ensure that each article is backed by trusted research and meets our high quality standards.
The wikiHow Video Team also followed the article's instructions and verified that they work.
This article has been viewed 718,324 times.
Learn more...
Feta cheese is delicious crumbled over traditional Mediterranean salads or in Mediterranean-style sandwiches like gyros and donairs. It might seem like a daunting task to make cheese yourself, but it is actually a relatively simple process to make feta at home. With a few ingredients and sterile equipment, you will be making feta all by yourself in no time!
Ingredients
- 1 gallon (3.8 L) of fresh goat’s milk, cow’s milk, or sheep’s milk
- 1 tbsp (15 ml) of fresh plain yogurt
- 1/2 tablet of rennet
- 1/4 cup (60 ml) of non-chlorinated water
- Table salt
Steps
Starting the Cheese Curds
-
1Warm 1 gallon (3.8 L) of fresh goat’s milk to 86°F (30°C) in a stainless steel pot. Stir it regularly so that it does not burn on the bottom. Check the temperature with a kitchen thermometer and remove it from the heat when you reach the target temperature.[1]
- Feta is traditionally made with goat’s milk but you can use cow’s or sheep’s milk as well.
- Try to not let the temperature go more than 1-2 degrees above the target temperature.
- It’s important to use a stainless steel pot because it is a non-reactive metal, which means that it will not interact with the milk.
-
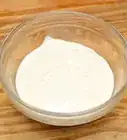
2Mix 1 tbsp (15 ml) of plain yogurt with an equal amount of goat’s milk. Stir the blended yogurt and milk into the warmed milk and mix it thoroughly with a kitchen spoon or ladle. Cover the pot and allow the inoculated milk to sit for 1 hour at room temperature.[2]
- The live yogurt cultures will help the milk to curdle.
Advertisement -
3Dissolve 1/2 tablet of rennet in 1/4 cup (60 ml) of cool non-chlorinated water. Boil water for 15-20 minutes to dechlorinate it. Let it cool in the fridge before you dissolve the rennet in it.[3]
- You can order rennet online or visit a specialty shop that carries cheesemaking supplies.
-
4Add the dissolved rennet to the milk after it has sat for 1 hour. Stir the mixture with a kitchen spoon or ladle vigorously for 15-20 seconds to mix it thoroughly. The milk will begin to thicken after 10 minutes.[4]
-
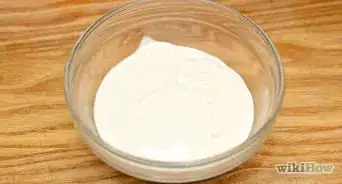
5Let the milk mixture sit covered overnight at room temperature. This will allow the milk to coagulate and the curds to develop. Put the pot somewhere out of the way and make sure it is securely covered with the lid so that no contaminants can get in.[5]
-
6Check the break between the curd and the whey the next morning. The milk will look gelled and some of the whey, or liquid, will have separated. Insert a clean finger or knife into the curd and slowly pull it out to see how the curd breaks.[6]
- The curd should split neatly and the whey should look opaque.


Draining and Molding the Cheese Curds
-
1Cut the curd into roughly 1⁄2 inch (1.3 cm) cubes. Start at one side and cut straight down to the bottom with a long-bladed knife. Make a rough grid pattern of cubes in the curd.[7]
- The cheese curds will move around as you cut them, so don’t worry about making each one a perfect cube.
-
2Reach to the bottom with a clean hand and gently lift the curds to stir. Cut the large pieces that appear with a knife so that they are roughly 1⁄2 inch (1.3 cm) cubes. Any pieces you miss will break up later in the process so don’t worry too much about getting every piece perfect.[8]
-
3Let the cut curds sit for 10-15 minutes then pour them into cheesecloth. Line a strainer with cheesecloth or a sterile handkerchief. Place it above a bowl or container and let all the whey strain out for 2-4 hours.[9]
- You can let the whey strain out either at room temperature or in the fridge.
- Save the drained whey in the bowl or container.
-
4Place the drained curds into a bowl and mix in 1/2 tsp (2 g) of salt. Break up the cheese curds as you mix in the salt. Mix it thoroughly with clean hands until all of the curds are broken up and the salt is evenly distributed.[10]
-
5Press the cheese into a mold lined with cheesecloth. Place the curds inside, fold over the ends of the cloth, place the end on top, and place a weight on top of that. Let it sit overnight.[11]
- To make a homemade cheese mold, cut the ends out of a smooth-sided 4 x 5 inch tin and save one of the cut ends.
- You can use a sterile handkerchief instead of cheesecloth in the mold.
Brining and Storing the Feta
-
1Prepare pickling whey brine and let it sit for 12-24 hours. Mix 20 oz (591 ml) of the whey that you saved with 5 tablespoons (73.9 ml) of salt and stir to dissolve. Let the whey brine sit out at room temperature, covered, for 12-24 hours to make it acidic.[12]
- The brine must be acidic or else the cheese will melt on the surface.
-
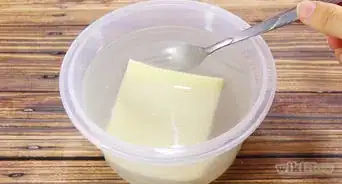
2Cut the cheese into 1.5 inch (3.8 cm) cubes and put them in a wide jar. Place the cheese on cutting board and use a sharp knife to cut it evenly. Leave a bit of space at the top of the jar because you will cover the cheese with brine.[13]
- A mason jar is a good option for storing your homemade feta.
-
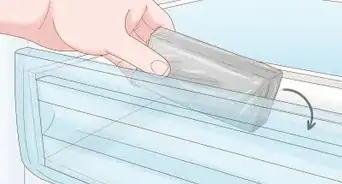
3Pour brine into the jar with the cheese to cover it. Let the cheese age for 2 weeks in the refrigerator. Always store the cheese in the refrigerator and keep it submerged in brine.[14]
- The feta will stay good for up to 1 year as long as you keep it in the fridge and in brine.
- The cheese will become drier and more easy to crumble with time.


Community Q&A
-
QuestionCan the brine from feta cheese be reused to cook say rice?
 Community AnswerYes, you can use the whey for various things. You could use it when making bread, simply replace water with whey. You can also use it for starting new cheese cultures, always save some whey in refrigerator. Excess whey can be used for tomatoes and potato bushes -- simply poor it on the soil.
 -
QuestionCan whole milk be used in place of goat milk while making feta cheese?Community AnswerYou can use cow's milk, but it won't taste the same or be nearly as rich.
-
QuestionCan citric acid be used instead of rennet? If answer is yes, in what quantity?
 Community AnswerYes. Try 6 teaspoons to 3L of milk. Citric acid is much less effective than milk, thus the larger quantity.
Warnings
- Do not use city tap water to dissolve rennet as it most likely contains chlorine that will make the rennet fail.⧼thumbs_response⧽
- If the culture becomes contaminated at any point, the likelihood of contracting food poisoning from the cheese is greatly increased.⧼thumbs_response⧽
Things You'll Need
- Long-bladed knife
- Kitchen spoon or ladle
- 2 clean sterile handkerchiefs or cheesecloths
- Strainer
- Bowls
- Cheese mold
- Kitchen thermometer
- 1 gallon (3.8 L) stainless steel pot with lid


References
- ↑ https://www.foodiewithfamily.com/homemade-feta-cheese-make-ahead-mondays/
- ↑ https://www.foodiewithfamily.com/homemade-feta-cheese-make-ahead-mondays/
- ↑ https://cheesemaking.com/products/feta-cheese-making-recipe
- ↑ https://www.foodiewithfamily.com/homemade-feta-cheese-make-ahead-mondays/
- ↑ https://fankhauserblog.wordpress.com/2007/07/14/feta-cheese/
- ↑ https://cheesemaking.com/products/feta-cheese-making-recipe
- ↑ https://www.foodiewithfamily.com/homemade-feta-cheese-make-ahead-mondays/
- ↑ https://www.foodiewithfamily.com/homemade-feta-cheese-make-ahead-mondays/
- ↑ https://fankhauserblog.wordpress.com/2007/07/14/feta-cheese/
- ↑ https://fankhauserblog.wordpress.com/2007/07/14/feta-cheese/
- ↑ https://fankhauserblog.wordpress.com/2007/07/14/feta-cheese/
- ↑ https://fankhauserblog.wordpress.com/2007/07/14/feta-cheese/
- ↑ https://fankhauserblog.wordpress.com/2007/07/14/feta-cheese/
- ↑ https://www.foodiewithfamily.com/homemade-feta-cheese-make-ahead-mondays/
About This Article

To make feta cheese, start by warming some fresh goat's milk to 86 degrees Fahrenheit in a large, stainless steel pot. Then, mix together equal parts plain yogurt and goat's milk and add it to the pot, letting everything sit, covered, for 1 hour at room temperature. Next, dissolve some rennet in cool, non-chlorinated water and stir it into the milk mixture. Once you've done that, let the mixture sit overnight at room temperature. The next day, cut up the curds that formed and strain them through a cheesecloth. Finally, cut the cheese into cubes and age them in a jar with pickling whey brine for 2 weeks. To learn how to make pickling whey brine, scroll down!