This article was co-authored by Jerran Boyer. Chef Jerran Boyer is a Nutrition-Focused Professional Chef and the CEO of Health Nut Chefs. Chef Jerran has over 20 years of experience as a private chef. She and her team specialize in providing healthy, fresh-prepared meals designed with each client’s taste and dietary needs in mind. She and her team offer both personal, part-time chef services and private, full-time chef services in New York, New Jersey, and the Los Angeles area. Chef Jerran received her BS in Business Administration from the University of South Florida, a degree in Culinary Arts from Florida Culinary Institute, and a Plant-Based Nutrition Certificate through Cornell University.
There are 18 references cited in this article, which can be found at the bottom of the page.
This article has been viewed 411,503 times.
French fries are one of those foods that everyone can agree on, no matter how picky an eater they are. Most people get their fries at restaurants or in the frozen section at the grocery store, but the best way to enjoy them is to prepare them yourself at home. All you need is a deep fryer, lots of clean oil, and enough potatoes to satisfy your hunger. Be sure to make enough to share, ‘cause these puppies are guaranteed to go fast!
Ingredients
- 5-6 large Russet or Kennebec potatoes
- Oil for frying (peanut, canola, vegetable, sunflower, etc.)
- Sea salt
- Ketchup
- Additional spices and seasonings (optional)
- Miscellaneous condiments (optional)
Makes 4-6 servings
Steps
Cleaning and Slicing the Potatoes
-
1Wash your potatoes with cool, clean water. Place your potatoes in a colander or wire strainer and give them a good dousing, or hold them under the faucet and rinse them off one-by-one. Use the pads of your fingers or a stiff-bristled brush to scrub away clinging dirt and debris. When you’re done, shake off the excess water.[1]
- If you’re a stickler for food safety, you can also soak your potatoes for 2-5 minutes in your own all-natural vegetable wash made from water, white vinegar, and lemon juice.[2]
- Remember, potatoes grow in the ground, so it’s always a good idea to make sure they’re nice and clean before cooking with them.
-
2Cut the potatoes in half down the middle. Lay out your potatoes on a cutting board or scratch-resistant surface and run a sharp knife through the center of each. Be sure to cut them lengthwise rather than widthwise to ensure that your fries don’t come out short and stubby.[3]
- There’s no need to peel your potatoes unless they’re particularly dirty, or you prefer them without the skins. If you do decide to peel them, use a veggie peeler with a wide blade to save time.[4]
- Longer potatoes tend to make for better French fries.
Advertisement -
3Cut the halves into 1⁄2 in (1.3 cm) slices. Rest each bisected potato against your cutting board flat-side-down and slice it longways 3-4 times. Doing so will reduce it to more manageable sections that you can then easily cut into individual fries of your preferred thickness.[5]
- For especially large potatoes, you may need to make 1 or 2 extra cuts to simplify the task of slicing.
-
4Slice the sections into 1⁄4–1⁄2 in (0.64–1.27 cm) strips. Work your way down the line turning each piece into 6-8 fries. Try to keep your cuts as consistent as you can. Once you’ve sliced your last potato, gather up the fries and transfer them to an empty, spacious serving or mixing bowl.[6]
- You can also cut your fries smaller, if you like. This will require making finer, more precise cuts, though, so watch your fingers.
- It’s okay if not all of your fries are exactly the same thickness. Just make sure there’s not such a size difference that they cook unevenly.[7]
Tip: Investing in a vegetable slicer with interchangeable blades will allow you to make your own fun and tasty shoestring, curly, or waffle fries.[8]
-
5Soak your sliced potatoes in cold water for 30 minutes to an hour. Fill the bowl with fresh water until the potatoes are completely immersed. Keep an eye on the clock as they soak. Once they’ve sat for half an hour or so, it will be time to drain them and get cooking.[9]
- Alternatively, you can soak your potatoes for 2-3 hours or even overnight the day before you fry them, though this isn’t a necessity.
- Giving your potatoes a good soak is optional, but it will reduce the amount of starch in the potatoes, preventing them from browning prematurely in the deep fryer.[10]


Frying Initially to Cook the Fries Through
-
1Fill your deep fryer up about 1/3 of the way with your preferred frying oil. Pour in the oil until it reaches the indicated fill line. Deep fryers are designed to get real hot real fast, so it’s important to use an oil with a high smoke point. Peanut, canola, vegetable, and sunflower oil are all good choices.[11]
- If you use an oil with a low smoke point, such as extra virgin olive or avocado, there’s a chance that it could burn before you cook time is up, ruining your fries in the process.
-
2Heat your oil to 275–300 °F (135–149 °C). Turn on your deep fryer and let it begin warming up. If your machine has a lid, make sure it’s on and secure at this point to help lock in heat. Most electric deep fryers will get to their target temperature within 10-20 minutes.[12]
- Different deep fryers have different designs, settings, and functions. Follow the instructions in the owner’s manual that came with your fryer to make sure you’re using the device safely and correctly.[13]
Tip: Be sure to grab a deep fry thermometer if your machine doesn’t feature a built-in temperature gauge. Finding and maintaining the right temperature is crucial for successful frying.
-
3Dry your potatoes thoroughly. While you’re waiting for your oil to heat up, drain the water from your sliced potatoes and dump them out onto a layer of folded paper towels. Use a separate towel to pat them dry on all sides, making sure that there’s as little lingering moisture left behind as possible.[14]
- It’s a well-known fact that oil and water don’t mix. For this reason, adding wet food to hot frying oil a recipe for disaster.[15]
-
4Place your potatoes in a fry basket, if your fryer came with one. Arrange the potatoes so that they're sitting level inside the basket. This will help ensure that they cook more evenly. Avoid filling the basket more than 2/3 of the way full, as this is likely to result in inconsistent heating and could even be a potential fire hazard.[16]
- If you plan on preparing a large quantity of French fries, you may may need to do it in multiple batches, depending on the size of your deep fryer or fry basket.
- If you don't have a fry basket, you have the option of either buying one (it's sure to come in handy if you do a lot of deep frying) or using a metal skimmer or pair of metal tongs to move them in and out of the oil.[17]
-
5Blanch the potatoes for 4-5 minutes at 275–300 °F (135–149 °C). If you're using a fry basket, attach it to the edge of the fryer so that the potatoes are completely immersed in the oil. Otherwise, use your skimmer or tongs to lower the potatoes in carefully and avoid splashing.[18]
- Remember to set a timer so you’ll know exactly how long your fries have been cooking.
- In order to achieve the optimum flavor and texture, you’ll be cooking your French fries twice. The point of this first round is just to heat them through.
- Your fries should still be relatively soft by the time you take them out. If they begin to brown or crisp during the initial phase of frying, either your oil is too hot or you’ve left them in for too long.[19]
-
6Take the fries out and increase the heat of the oil to 400 °F (204 °C). Once the first 5 minutes are up, remove the basket by taking hold of the insulated handle or carefully retrieve the loose fries using your skimmer or tongs. Set the partially cooked fries on a large plate or baking sheet lined with paper towels and allow them to cool off slightly as your oil climbs to its new target temperature.[20]
- Cooling your potatoes briefly will prevent them from becoming overdone. Some chefs even chill par-cooked French fries before frying them a second time.[21]


Frying a Second Time for the Perfect Finish
-
1Cook your fries for 3-6 more minutes, or until crisp and golden. Put your fries back into the fryer for their second and final round of frying. Monitor them closely this time so you can pull them as soon as they’re done. You’ll know they’re ready to come out when they just start to brown around the edges.[22]
- Plan on removing your fries out shortly before they reach the desired doneness. They’ll continue to cook for a few moments after you take them out of the fryer.
Tip: Feel free to leave your fries in for an additional 1-2 minutes if you like them extra crispy. Just be careful not to accidentally burn them!
-
2Remove the fries and allow them to cool to a safe temperature. Let your fries rest on a fresh layer of paper towels to absorb the excess oil on the outside. Needless to say, they’ll be blistering hot when they first come out of the deep fryer, so hold off on eating them for at least 5 minutes while they cool off.[23]
- If you’re too eager to get a nibble, you could end up burning your fingers, your mouth, or both, which would certainly make the whole experience less enjoyable.
- Consider keeping some absorbent fiber food trays on hand if you’re trying to cut down on your paper towel consumption.
-
3Season your fries to taste. Keep things simple by sprinkling a generous amount of sea salt over your freshly-cooked fries and calling it a day. You can also dress them up a bit by hitting them with a dash of cracked black pepper or other choice spices, such as seasoned salt, ground garlic, or onion powder.[24]
- For new take on classic French fries, try combining 1/2-1 teaspoon each of black pepper, garlic powder, onion salt, paprika, and dried parsley, oregano, thyme, and basil and shaking it onto your fries.[25]
-
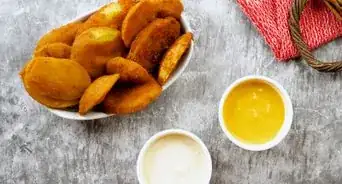
4Serve your fries with your favorite condiments and enjoy. Ketchup is a traditional crowd-pleaser, but you could also use mayo, ranch dressing, honey mustard, malt vinegar, sriracha, chili, queso, brown gravy, or whatever tickles your fancy. Dip, dab, slather, or cover them and savor every bite![26]


Community Q&A
-
QuestionI just opened a new diner and I make fresh-cut fries, put them in water, then fry them. Can you tell me how to freeze fresh-cut fries, and how long to cook them?
 Community AnswerYou need what is called a flash freezer. It will almost instantly freeze them. As for the perfect fry, you should blanch the fresh-cut fries first, then flash freeze them. When you pull them out to re-fry them, they should come out restaurant quality.
 -
QuestionHow do I blanch fresh cut fries?
 Community AnswerWhen the fries have been cut, leave them soaking in cold water to avoid them turning brown. Boil water and immerse the raw fries for approximately 1 minute, no longer than 2 minutes if you are making large quantities. Lift the fries out of the water with a spoon that has drain holes, and immerse the fries in ice water. Drain the fries dry on a flat tea towel and cook in hot oil or bag and freeze for later use.
 -
QuestionShould I use seasoned or coated fry recipes for the deep fryer?Community AnswerCoated would be best. If you season fries before putting them into the deep fryer, all of the seasoning will just fall off and you would have to season them again.
Things You’ll Need
Cleaning and Slicing the Potatoes
- Water
- Sharp knife
- Cutting board
- Large mixing or serving bowl
- Vegetable slicer (optional)
Frying Initially to Cook the Fries Through
- Deep fryer
- Skimmer spoon or metal tongs
- Large plate or baking sheet
- Paper towels
- Deep fry thermometer
Frying a Second Time for the Perfect Finish
- Deep fryer
- Skimmer spoon or metal tongs
- Large serving dish
- Paper towels
- Absorbent fiber food trays (optional)


References
- ↑ https://idahopotato.com/dr-potato/properly-washing-potatoes
- ↑ https://www.epicurious.com/archive/blogs/editor/2014/09/diy-fruit-vegetable-washes-store-bought.html
- ↑ https://www.foodnetwork.com/recipes/food-network-kitchen/bistro-style-fries-recipe/how-to-cut-fries
- ↑ https://www.reviewed.com/cooking/best-right-now/the-best-vegetable-peelers
- ↑ https://www.foodnetwork.com/recipes/food-network-kitchen/bistro-style-fries-recipe/how-to-cut-fries
- ↑ https://www.finecooking.com/article/how-to-make-french-fries
- ↑ https://www.allrecipes.com/video/4044/how-to-make-french-fries/
- ↑ https://www.youtube.com/watch?v=4RFy3grxV7E&feature=youtu.be&t=18
- ↑ https://www.foodnetwork.com/recipes/ree-drummond/perfect-french-fries-recipe-2119907
- ↑ https://www.finecooking.com/article/how-to-make-french-fries
- ↑ https://www.tasteofhome.com/article/best-oils-frying/
- ↑ https://www.splendidtable.org/recipes/american-french-fries
- ↑ https://thedeepestfry.com/are-at-home-deep-fryers-safe/
- ↑ https://www.foodnetwork.com/recipes/ree-drummond/perfect-french-fries-recipe-2119907
- ↑ https://www.bonappetit.com/story/frying-mistakes-and-how-to-avoid-them
- ↑ https://www.youtube.com/watch?v=5ben5lx7vvg&feature=youtu.be&t=117
- ↑ https://www.cooksillustrated.com/equipment_reviews/1692-spider-skimmers
- ↑ https://www.allrecipes.com/video/4044/how-to-make-french-fries/
- ↑ https://www.foodnetwork.com/recipes/ree-drummond/perfect-french-fries-recipe-2119907
- ↑ https://www.splendidtable.org/recipes/american-french-fries
- ↑ https://www.allrecipes.com/video/4044/how-to-make-french-fries/
- ↑ https://www.allrecipes.com/video/4044/how-to-make-french-fries/
- ↑ https://www.foodnetwork.com/recipes/ree-drummond/perfect-french-fries-recipe-2119907
- ↑ https://www.foodandwine.com/slideshows/how-make-french-fries?slide=222562#222562
- ↑ https://brownthumbmama.com/amazing-french-fry-seasoning/
- ↑ https://www.foodandwine.com/blogs/2014/7/15/8-dipping-sauces-for-fries-that-are-better-than-ketchup
- ↑ https://makethebestofeverything.com/2013/03/15-alternatives-to-potato-fries/
About This Article