wikiHow is a “wiki,” similar to Wikipedia, which means that many of our articles are co-written by multiple authors. To create this article, 21 people, some anonymous, worked to edit and improve it over time.
This article has been viewed 325,706 times.
Learn more...
Mums are decorative pins worn for high school homecoming events that are generally pinned at a girl's chest and hang down to any length typically ranging from the waist to knee. These elaborate creations are surprisingly easy and extremely fun to make. Gather whatever decorative trinkets and sparkly embellishments you want and learn to make your own personalized mums with these easy to follow steps.
Steps
Getting Started
-
1Choose your colors. Use your school colors as a guide to help you pick out the colors of the ribbons and flowers
- Incorporate neutral colors and lighter shades of your school colors to compliment your two main colors.
- High school seniors usually use silver, gold, and white ribbon in their mums to signify their status as seniors.
-
2Find decorative ribbons. Most art and crafts stores have a huge selection of decorative ribbon. Pick varied styles that compliment each other like ribbons with ruffles, lacy ribbons, and patterned ribbons.Advertisement
-
3Pick out personalized embellishments to decorate your mum. A few ideas would be to use bells, stick-on letters, football-related accessories, charms, tassels, feathers, and glitter.
- Be creative! Almost any little trinket or decoration you can find will add some flair to your mum.


Making a Single Homecoming Mum
-
1Cut some 4-inch lengths from #3 and #5 ribbon until you have enough to create cones around the entire edge of one cardboard backer. Start with about 5 cuts of each color and cut more as needed.
-
2Overlap the pieces and twist both ends in the same direction to form a cone shape. Make sure that every cone has the shiny side of the ribbon facing outward. Staple the ribbon on it's fold to hold the cone shape.
-
3Staple the completed cone-shaped ribbon to the back edges of the cardboard backer. Position the cones so that the points are pointing away from the backer, staple base of the cone. For the first layer, use the same color cones and leave about a quarter to a half inch of space between each cone.
- Continue to staple the cones until the entire edge of the backer is filled with cones. It should look like a drawing of a sun or a flower.
-
4Fill in the spaces between the cones with a second row of cones using the second color of ribbon. Remember to staple the base of the cone on the backside of the backer.
-
5Remove the stem from the mum flower. The flower can be either real or fake, but most used are generally fake to prevent wilting.
-
6Take the backer of the pointed ribbons and glue the mum to the front middle of the backer using a hot glue gun. Set the mum aside and allow the glue to dry for several minutes.
- If you want to make a double mum, simply use a double backer with two holes instead of one and attach two flowers using a glue gun.
-
7Pick up #5 and #9 ribbon in the color of your choice and cut several 48-inch-long strips. Again, start with about 5 strips of each and then cut as many as needed to create a full-looking mum.
-
8Take your 48-inch pieces and fold them in half to create 24-inch streamers.
-
9Overlap the folded ends of the 24-inch streamers on the bottom of your second backer. Staple them together, making sure to alternate the colors and ribbon width/style as desired.
-
10Embellish the lengths of the ribbons with any sort of decorations you desire once your backer looks full of ribbons Some ideas includes writing words out in glitter glue, fastening beads, rhinestones, or small plush figurines, and even putting photographs on the ribbons. Be sure to use a hot glue gun to fasten charms and other heavier objects to the ribbons.
-
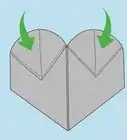
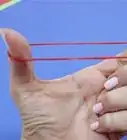
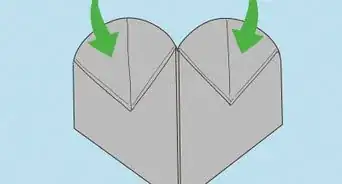
11Make a military braid from your ribbons if desired. To make a military braid, begin by stapling the ends of two different colored ribbons together at a right angle.
- Next, fold a colored ribbon towards you, forming a loop as long as the ribbon is wide and staple the ribbons together where they intersect.
- Take a loop of your second ribbon and bring it through the original loop of the first ribbon.
- Continue to bring a loop of the first ribbon through the second ribbon and pull the second ribbon tight around the first ribbon. Remember to alternate ribbon colors as you continue to do this until you reach the end of the ribbons.
-
12Tie on bells using curling ribbon if desired. You will use your middle backer with the streamers for this step.
- Cut several pieces of curling ribbon each 36 inches (91.4 cm) long and tie a small bell to the end of each piece.
- Attach to the middle backer using hot glue.
-
13Take two 5-inch pieces of #5 and #9 ribbon and overlap them several times to form a loop. Staple the loop to the top center of the third, unused backer. This will serve as the base for your safety pin.
-
14Complete embellishments to your satisfaction. Glue the third backer with the safety pin loop onto the back of middle backer to cover staple edges and protect clothing from staple snags.
-
15Glue the middle backer containing the ribbons to the to the back of front backer containing the mum and the points.
-
16Glue any central charms on the mum and add any final touches to the piece. Allow the glue to dry.
-
17To wear your mum, take your large safety pin and thread it through the loop you created on the back backer with the two 5-inch pieces of ribbon. Then simply attach the pin to your clothing.
-
18Finished!


Community Q&A
-
QuestionHow do I attach a mum to someone?
 T. ChinsenTop AnswererStep 17 of the instructions describes how to attach the homecoming mum to a safety pin. An option to make it wearable is to attach to a sash. A lot depends on the size of the the mum. A smaller mum can be attached to ribbon with a fabric glue to wear as a wrist corsage; fabric glue is designed to be flexible and to hold well.
Warnings
- Be careful not to make your mum so heavy that it cannot be supported by a safety pin.⧼thumbs_response⧽
- Be sure to let all of the hot glue dry before wearing the mum.⧼thumbs_response⧽
- Do not burn yourself on the hot glue gun. Wear safety protection if possible.⧼thumbs_response⧽
Things You'll Need
- Ribbons (#3, #5, and #9) in at least two different colors and several different styles.
- Curling ribbon
- 3 round cardboard backing circles
- Any embellishments you desire (bells, glitter, etc.)
- Mum flower (fake or fresh)
- Small plush trinkets such as a teddy bear
- One large safety pin
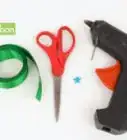
- Scissors
- Hot glue gun
- Stapler

About This Article
To make homecoming mums, purchase decorative ribbons and embellishments like bells, stick-on letters, charms, and tassels in your school's colors. Next, overlap pieces of 4-inch ribbons, twisting both ends in the same direction to form cones, and staple the cones to the edges of a cardboard backer. Then, hot glue the mum flower to the front middle of the backer. Finally, attach the ribbons, streamers, and embellishments so that they hang down from the cardboard backer. For tips on specific ribbon lengths you can use, read on!