wikiHow is a “wiki,” similar to Wikipedia, which means that many of our articles are co-written by multiple authors. To create this article, 38 people, some anonymous, worked to edit and improve it over time.
wikiHow marks an article as reader-approved once it receives enough positive feedback. This article received 24 testimonials and 82% of readers who voted found it helpful, earning it our reader-approved status.
This article has been viewed 749,271 times.
Learn more...
Writing all 26 letters of the English alphabet can seem like a challenge. But if you are going to master the English language on the page, you will need to be able to use the alphabet to form words and sentences. Whether you are teaching yourself, or your child, how to write the letters of the English alphabet, it's important to start slow and practice each letter until they are easy to write. Please note: do not include the periods or commas after each step when writing each letter.
Steps
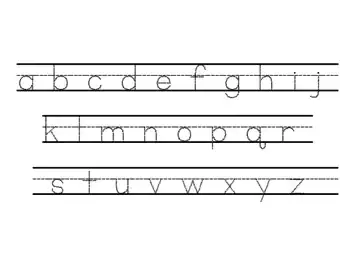
Sample Alphabets and Practice Page
Uppercase Letters
-
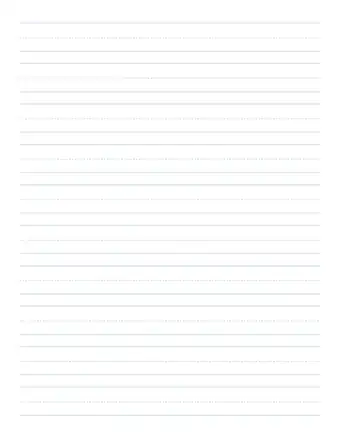
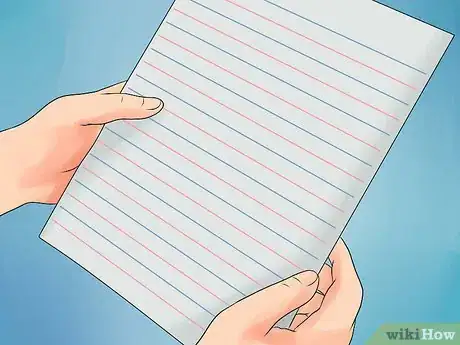
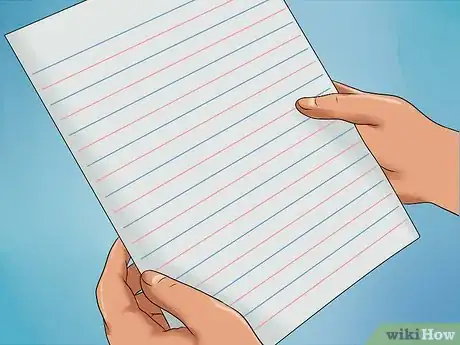
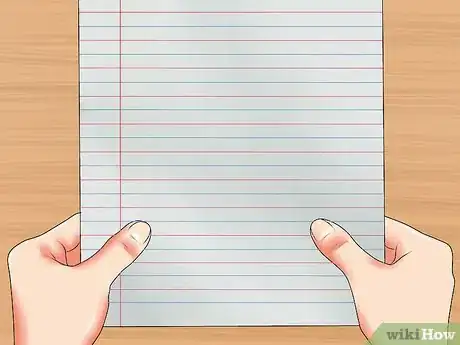
1Take out a piece of lined paper. Lined paper will help you write each letter evenly and uniformly. It will also help to distinguish the difference in size of the upper case and the lower case letters.
- If you are teaching your child how to write the alphabet, interact with them as they write each letter. Once they finish writing the letter “A” and the letter “B”, for example, ask them about the differences between each letter. This will help your child remember each letter and start to get a sense of the different shapes of each letter.[1]
-
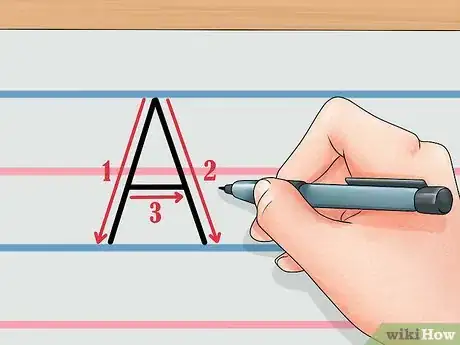
2Make the letter A. Draw one angled vertical line facing right: /. Draw another angled vertical line facing left: \, ensuring both lines touch each other at the top upper tips: /\. Draw a horizontal line in the middle of the two lines: A. This is A.[2]Advertisement
-
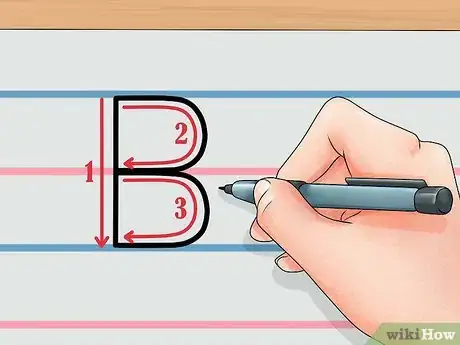
3Practice the letter B. Draw one vertical line: | . On its right side, draw two half-bubbles, going down the line: B. This is B.
-
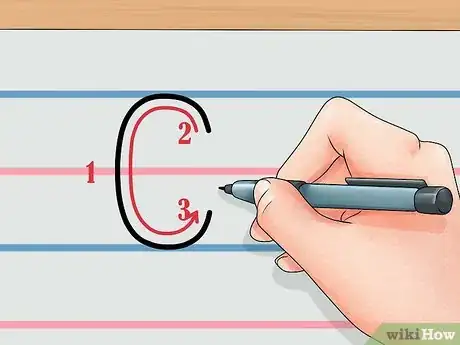
4Try the letter C. Draw a half-moon, with an opening on the right: C. This is C.
-
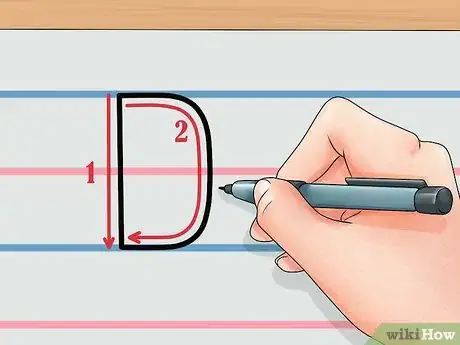
5Make the letter D. Draw a vertical line: |. Then, starting at its top right, draw a backwards C (step 3): D. This is D.
-
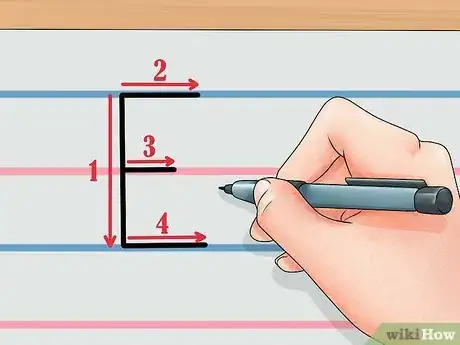
6Practice the letter E. Draw one vertical line: |. Draw three horizontal lines, all on the right side of this, each 1/3rd shorter than the original (if you want, make the middle line shorter than the lines on the top and bottom). One goes on top, one in the middle, one on bottom: E. This is E.
-
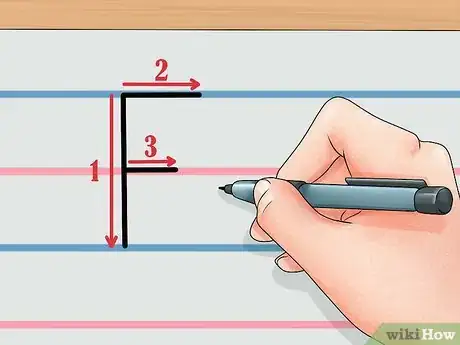
7Try the letter F. Draw an E (step 5), but omit the bottom horizontal line: F. This is F.
-
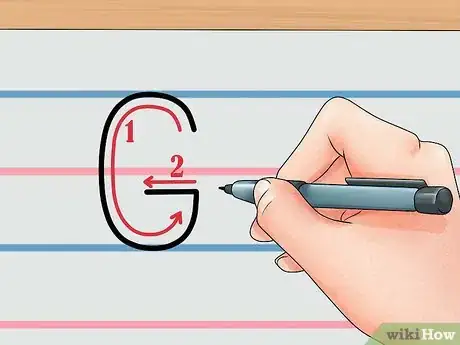
8Make the letter G. Draw a C (step 3). Then, draw a horizontal line, beginning at the base of the bottom tip, half-way through the C: G. This is G.
-
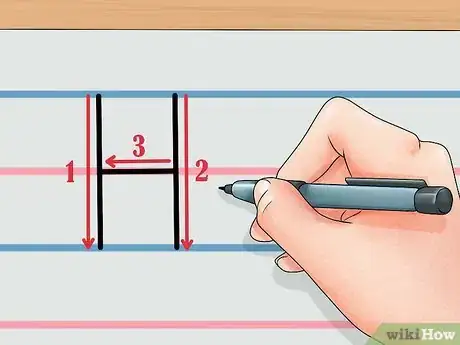
9Do the letter H. Draw two vertical lines next to each other: | |. Then, draw a horizontal line in the middle, connecting them: H. This is H.
-
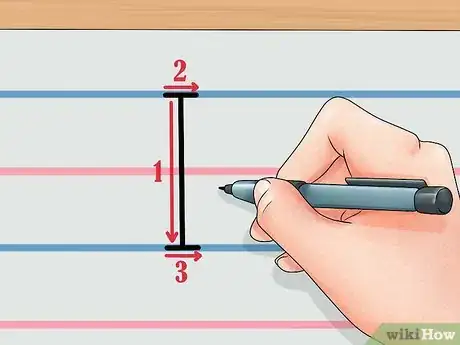
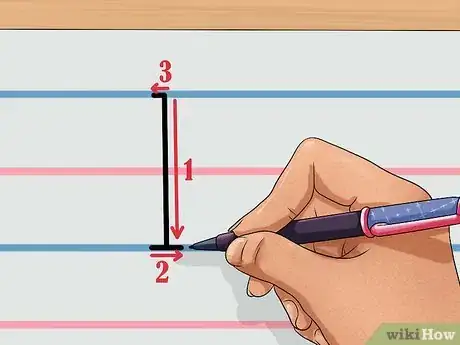
10Try the letter I. Draw one vertical line: |. If desired, put two short horizontal lines at the top and bottom of the vertical, placing them so the vertical connects them in the middle of the horizontal lines. This is I.
-
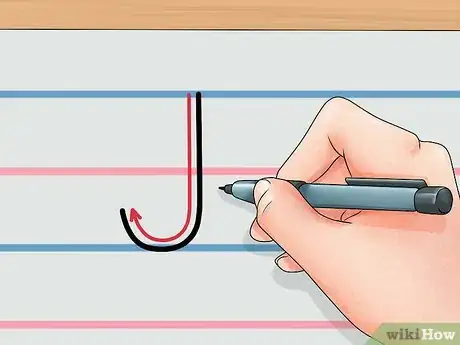
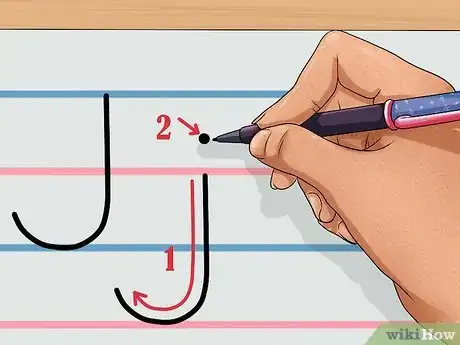
11Practice the letter J. Draw a backward-facing fish hook: J. This is J.
-
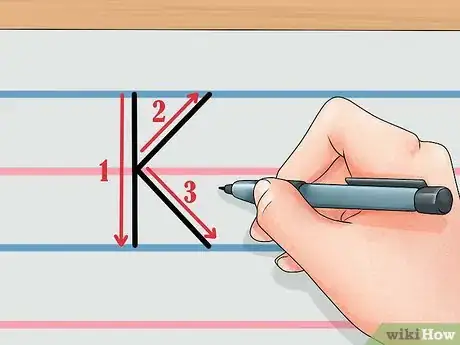
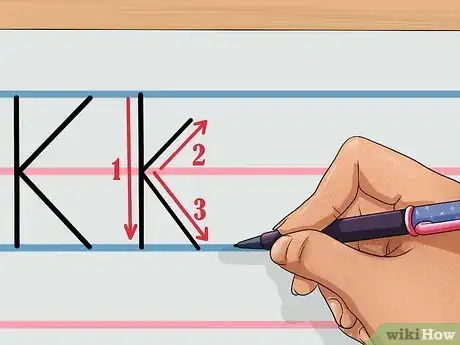
12Make the letter K. Draw a vertical line: |. Then, draw two lines, starting from the right hand side, each emanates from the middle. One angles up, the other down: K. This is K.
-
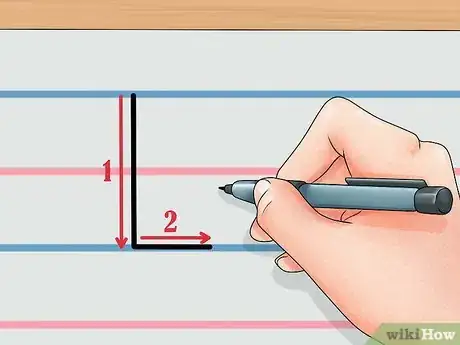
13Make the letter L. Draw a vertical line: |. Then, draw a shorter, horizontal line on the bottom right: L. This is L.
-
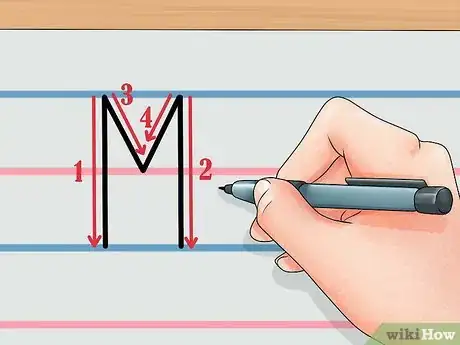
14Try the letter M. Draw two vertical lines next to each other: | |. Then, starting from the inner, top tips, draw two shorter angled lines that touch 1/2 way in the middle: M. This is M.
-
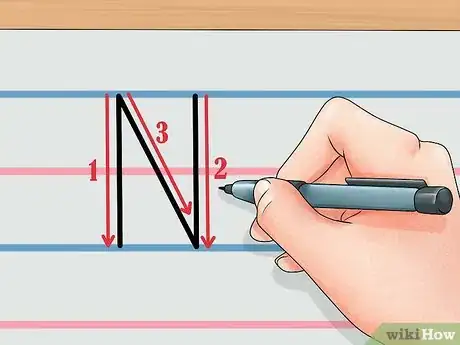
15Practice the letter N. Draw two vertical lines next to each other: | |. Then, draw a line that starts from the inner top tip of the left line, and angle it so it touches the other line, on the inner bottom tip: N. This is N.
-
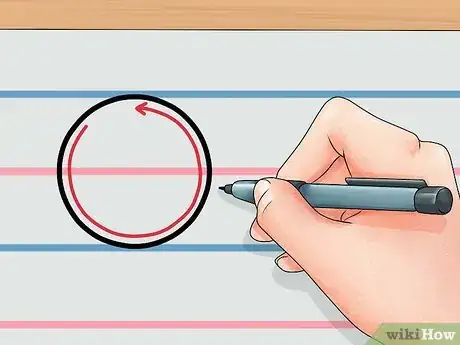
16Make the letter O. Draw a full moon: O. This is O.
-
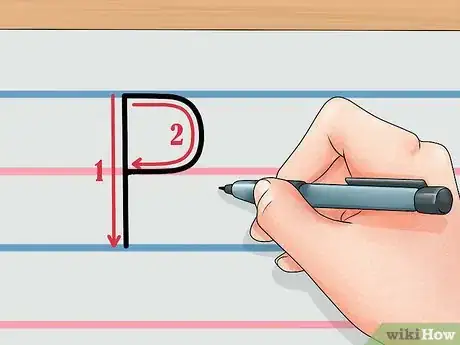
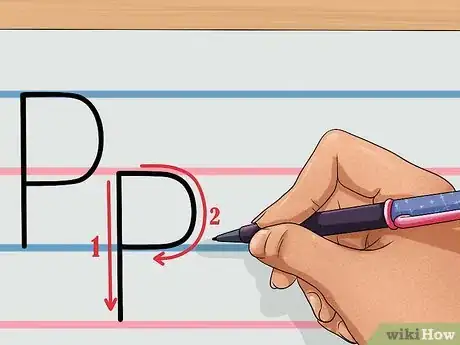
17Try the letter P. Draw a vertical line: |. Then, draw a 1/2 bubble on the right side upper tip, and touching the middle of the vertical line: P. This is P.
-
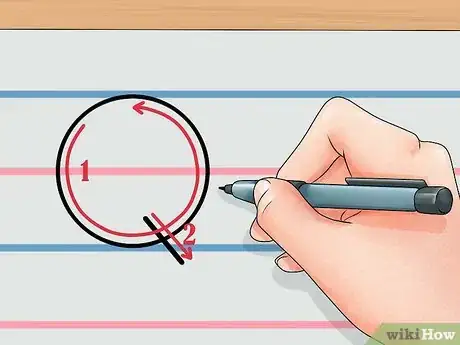
18Do the letter Q. Draw a full moon: O. Then, on the near-bottom right, draw a vertical line angling right, part-way in the O, and part-way out: Q. This is Q.
-
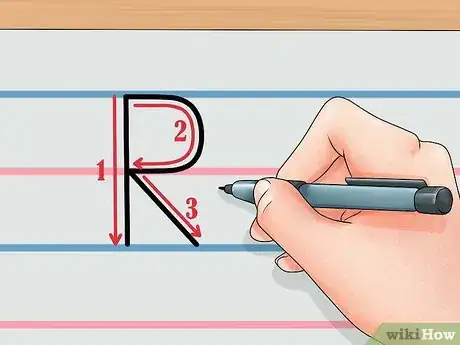
19Practice the Letter R. Draw a P (step 16). Then, starting from where the bottom 1/2 bubble touches the vertical line, draw a small line angling right and down: R. This is R.
-
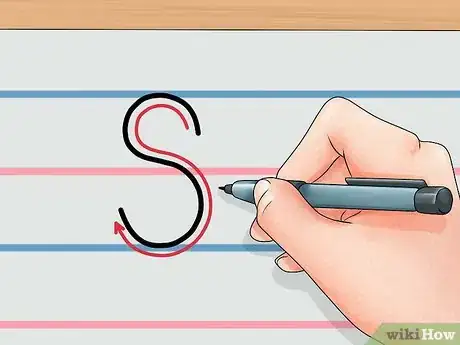
20Make the letter S. In one stroke, draw a squiggly line headed left, then right, then left (like drawing 1/2 of an 8): S. This is S.
-
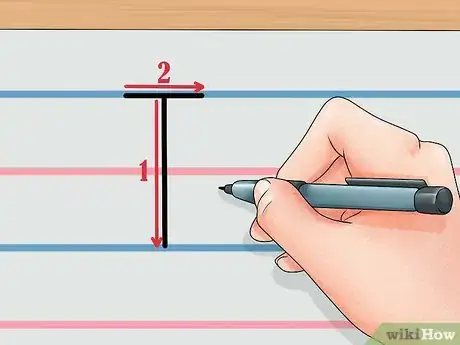
21Do the letter T. Draw a vertical line: |. Then, draw a shorter, horizontal line on top: T. This is T.
-
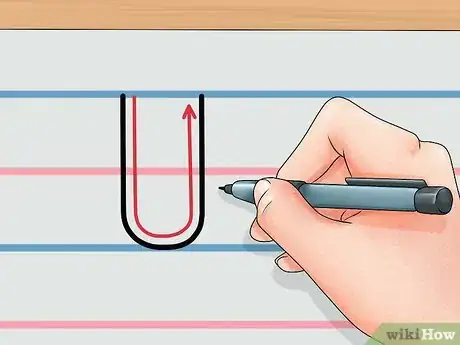
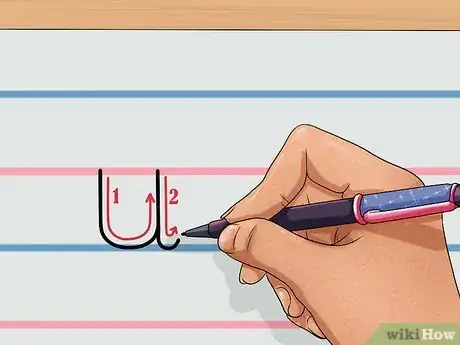
22Make the letter U. Draw the shape of a horseshoe, with the open side facing up: U. This is U.
-
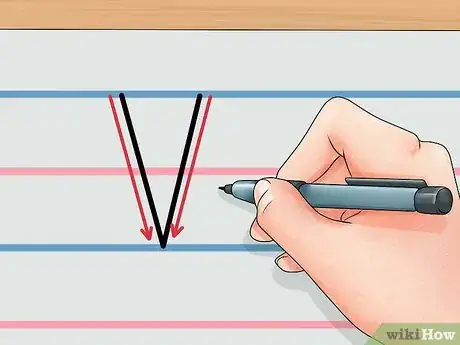
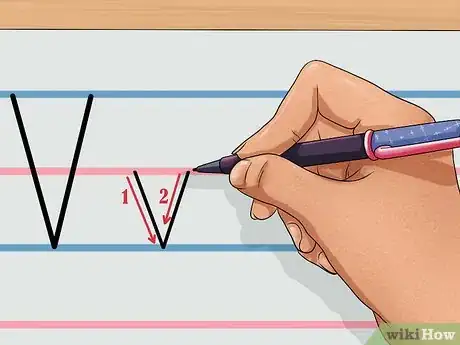
23Try the letter V. Draw two vertical lines next to each other, but, angle the left one to the right and down, and the right one to the left and down: V. This is V.
-
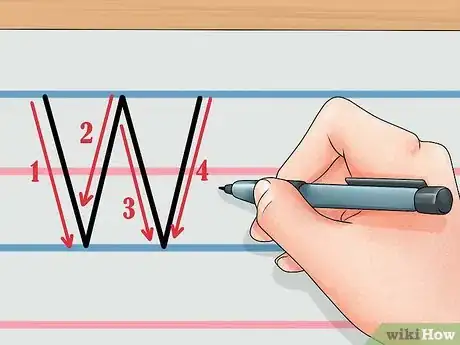
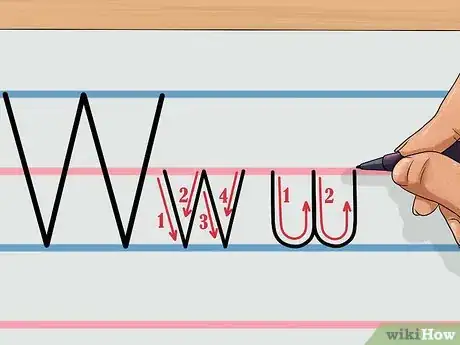
24Practice the letter W. Draw two V's (step 22) next to each other: W. This is W.
-
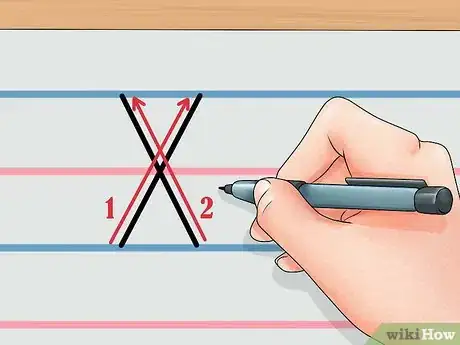
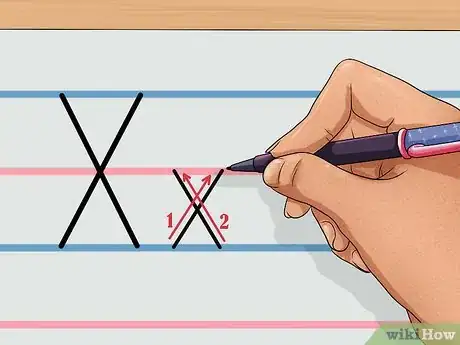
25Do the letter X. Draw one vertical line headed up and right. Draw another vertical line up and leaning left: X. This is X.
-
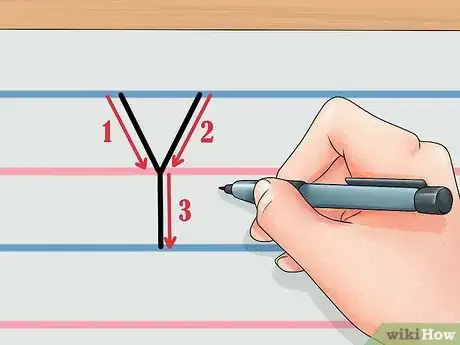
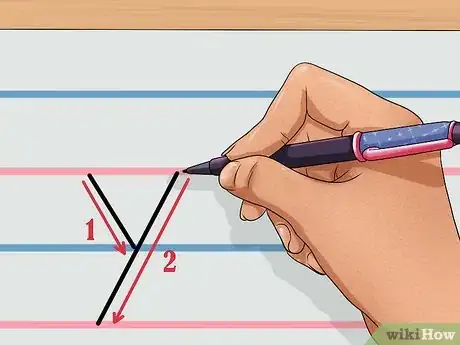
26Try the letter Y. Draw a V (step 22). Then, where the two lines meet, draw a vertical line: Y. This is Y.
-
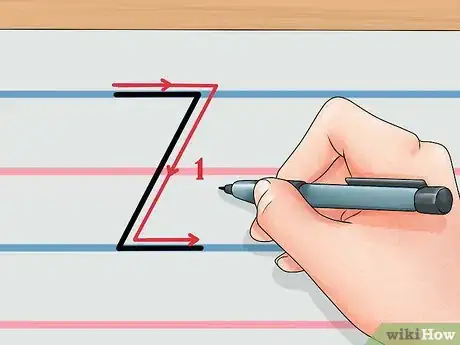
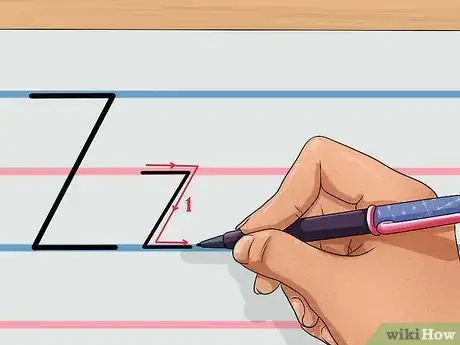
27Make the letter Z. In one stroke, draw a horizontal line, then a vertical line that angles downward left, then a horizontal line to the right: Z. This is Z.
Lowercase Letters
-
1Use a piece of lined paper. Lined paper will help you write each letter evenly and uniformly. It will also help to distinguish the difference in size of the upper case and the lower case letters.
- If you are teaching your child how to write the alphabet, ask them questions as they write each letter. Once they finish writing the letter “A” and the letter “B”, for example, have a chat about the differences between each letter. Ask your child, “what differences do you see between each letter?” This will help your child remember each letter and start to get a sense of the different shapes of each letter.[3]
-
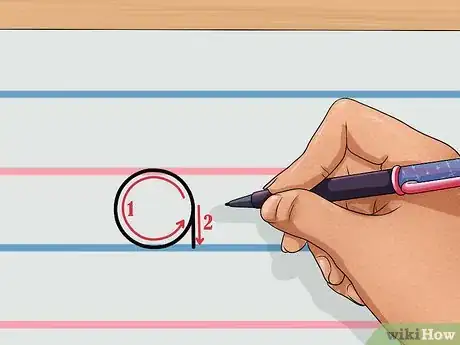
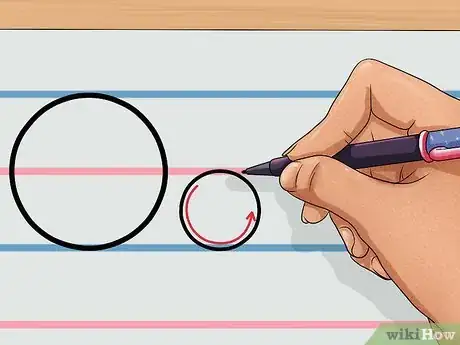
2Practice the letter a. First draw a circle. When you get to the spot where you started the circle, make one vertical line: |This is a.[4]
-
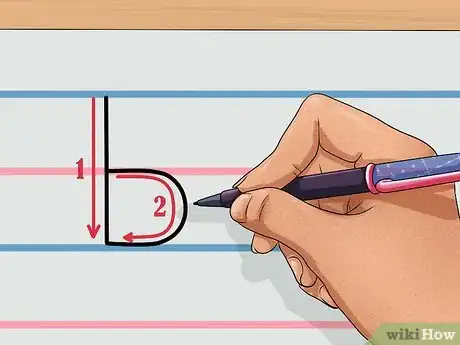
3Make the letter b. Draw a vertical line: | , and then a lowercase, backwards c that joins the vertical line. This is b.
-
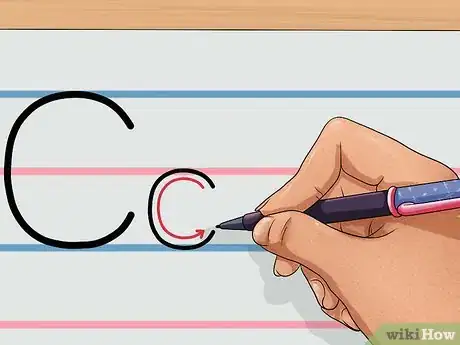
4Try the letter c. You write c the same way whether it is in uppercase or lowercase, but if you are writing lowercase, make your c smaller than an uppercase C, so it's the same size as the other lowercase letters. This is c.
-
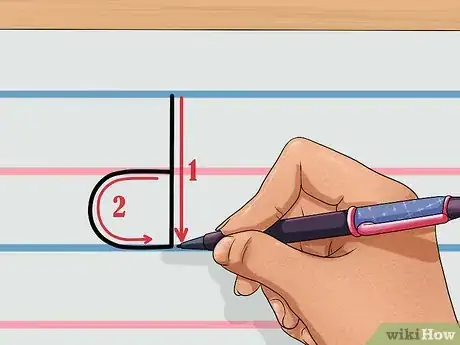
5Make the letter d. Lowercase d is written like a backwards b (step 2 under lowercase). Draw a vertical line, and then to the left of it, draw a lowercase, backwards c. This is d.
-
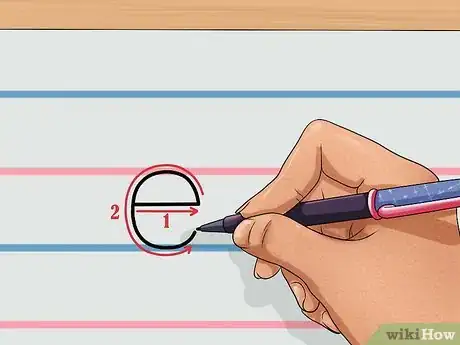
6Try the letter e. You draw lowercase e with quite a few curves. First, draw a short, horizontal line. Curve it round to make a c shape, with a line in the middle. This is e.
-
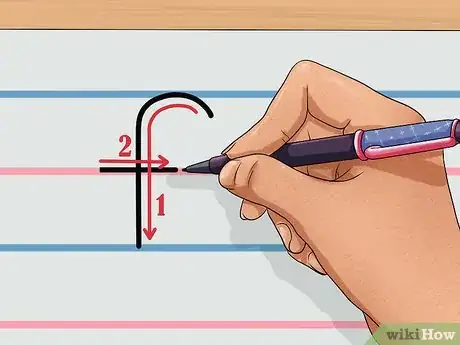
7Make the letter f. Draw a curve, and bring it down in a vertical line. Just above the middle of the letter, draw a short horizontal line across the vertical one. This is f.
-
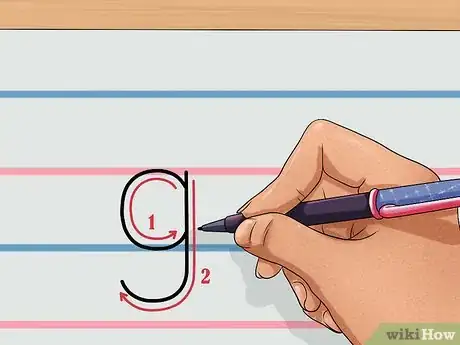
8Practice the letter g. Draw a c, and then an upside down, lowercase f (step 6 under lowercase, without the horizontal line in the middle) below it. This is g.
-
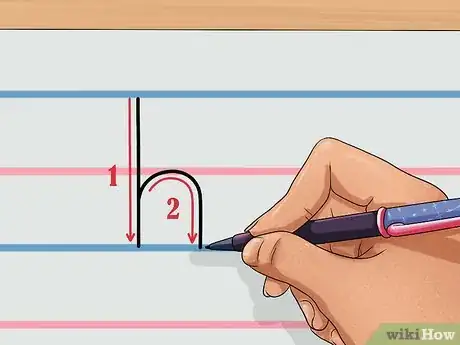
9Try the letter h. Draw a vertical line, then about halfway down the line, curve into another vertical line, swooping upwards. This is h.
-
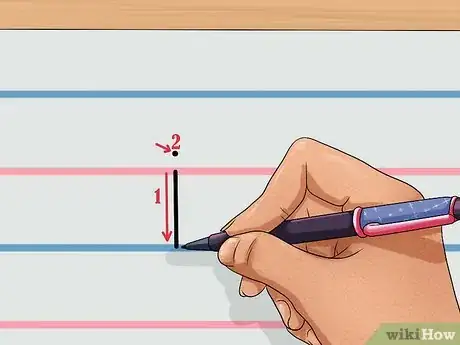
10Make the letter i. Draw a vertical line, then put a dot on top of it. This is i.
-
11Practice the letter j. Same as uppercase J, but make it lower down in the line of writing and put a dot on top of it. This is j.
-
12Try the letter k. Same as uppercase K, except the lines angling up and down do not quite reach the top. This is k.
-
13Practice the letter l. Draw one vertical line. You can stop here or draw a short horizontal line under the vertical line (the vertical must be in the center of that horizontal line) and a shorter horizontal line above the vertical line from the left side. This is l.
-
14Make the letter m. Draw a straight line. Starting from a little under the top, on the right, make a hump that goes to the top, curves downward ("spills water", not "holds water"), and goes back down in a straight line. Then retrace the straight line and make another hump in the same way. This is m.
-
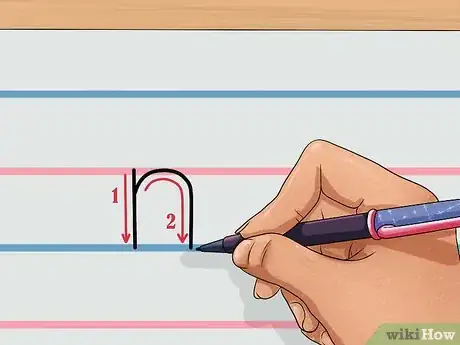
15Do the letter n. Same as lowercase m (step 13 under lowercase), but make only one hump. This is n.
-
16Make the letter o. Same as uppercase O, except it is the size of the other lowercase letters. This is o.
-
17Try the letter p. Same as uppercase P, but lower on the line of writing. This is p.
-
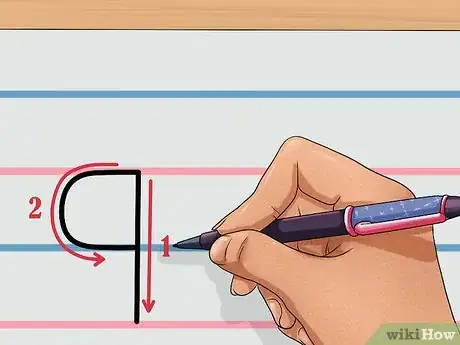
18Make the letter q. Like a backward lowercase p (see step 16 under lowercase). This is q.
-
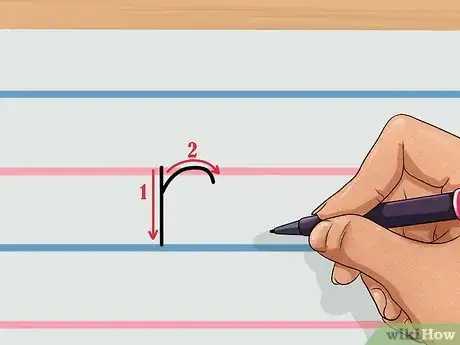
19Practice the letter r. Draw a straight line. Starting from a little under the top, make a small curved line heading to the right and curving down ("spills water"). This is r.
-
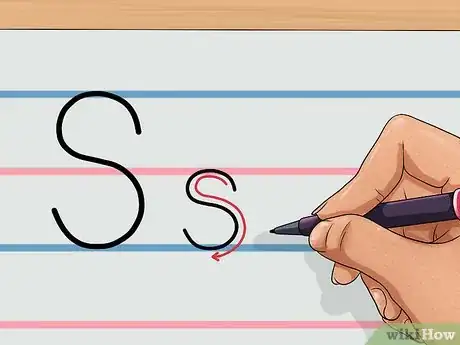
20Make the letter s. Same as uppercase S, except it is the size of the other lowercase letters. This is s.
-
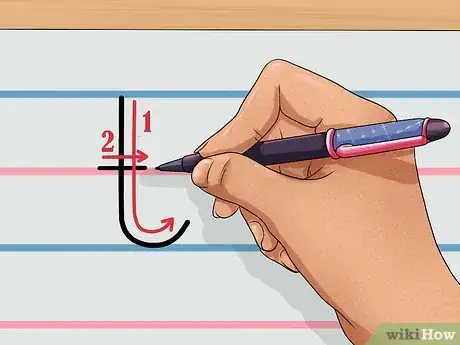
21Try the letter t. Same as uppercase T, except here the horizontal line is a little under the top, instead of at the very top. Also, if you want, you can curve the vertical line upward at the very bottom ("holds water") on the right. This is t.
-
22Make the letter u. Make an uppercase U the size of the other lowercase letters, but add a straight line on the right and put a small "tail" at the bottom of that line. This is u.
-
23Try the letter v. Same as uppercase V, except it is the size of the other lowercase letters. This is v.
-
24Practice the letter w. There are two ways to do this one. Either write an uppercase W the size of the other lowercase letters, or write two uppercase U's next to each other, making them the size of the other lowercase letters. In fact, this letter's name is pronounced "double u". This is w.
-
25Try the letter x. Same as uppercase X, except it is the size of the other lowercase letters. This is x.
-
26Make the letter y. Draw a lowercase v (see step 22 under lowercase), but at the point where the lines meet, draw a line that continues the right line of the v. This is y.
-
27Try the letter z. Same as uppercase Z, except it is the size of the other lowercase letters. This is z.
Cursive Letters
-
1Use a piece of lined paper. Lined paper will help you write each letter evenly and uniformly. It will also help to distinguish the difference in size of the upper case and the lower case letters.[5]
- Lined paper is especially useful when learning how to write the alphabet in cursive, as the loops and dashes of cursive can be difficult to complete without the use of lines as a guide.
- When learning how to write cursive letters, start with lowercase letters first, followed by uppercase letters. Lowercase letters are more accessible and will give you a beginner’s sense of how to write cursive letters.
-
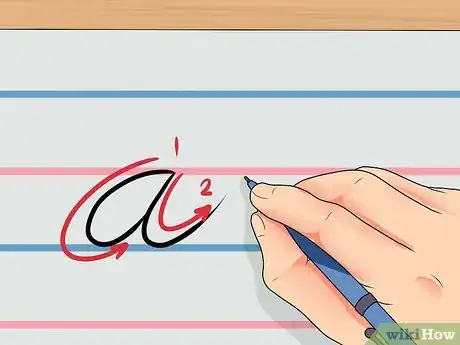
2Draw the letter a. Start with downward slope, making a lowercase O shape. At the top left side of the O, draw a line sloping downward and curving out at the end. This is a.
-
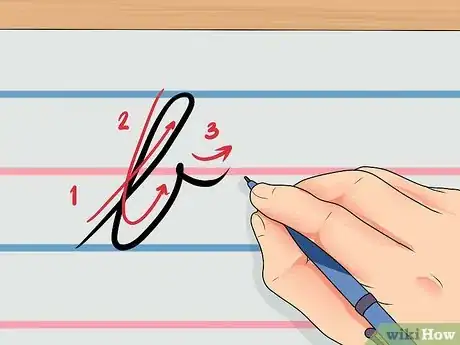
3Make the letter b. Make an upward slope and then loop it around as you make a downward slope. Continue the downward slope to make a lowercase U shape. End the U with a small curve to the right side. This is b.
-
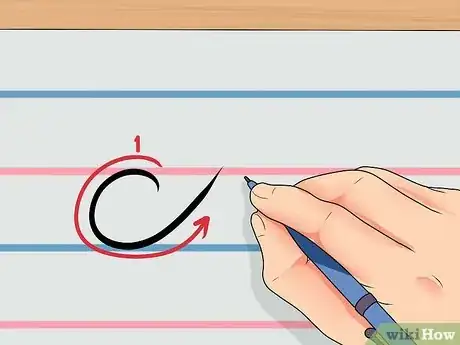
4Practice the letter c. Start with a curve in the center of the page. Slope downward in a circle and then end the slope with a long slope towards the right side of the paper. The slope can move upward at the end of the letter. This is c.
-
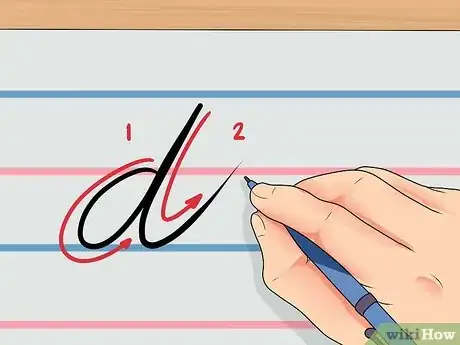
5Try the letter d. Make a round, lowercase O shape. Then, draw a vertical line from the top of the page down the meet the right ride of the O. Curve the slope out at the bottom towards the right side of the paper. This is d.
-
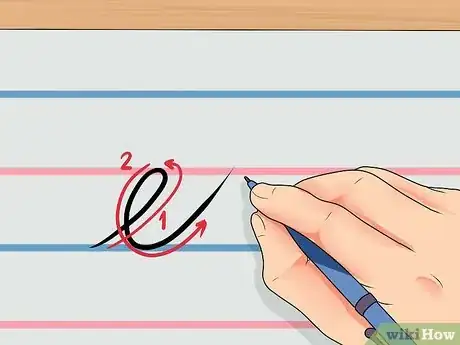
6Make the letter e. Start with a slope upward to the middle line of the paper. Make a loop and then end the letter with a long slope towards the right of the paper. This is e.
-
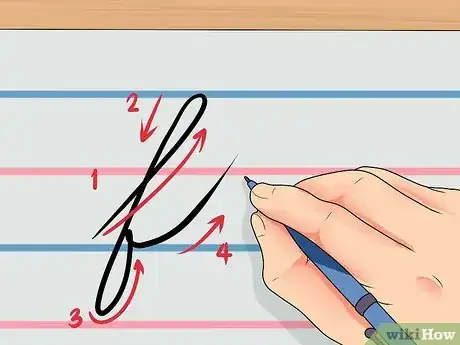
7Do the letter f. This is one of the more challenging letters, so don’t be afraid to practice it several times. Start with a long slope upward, forming the beginning of a lowercase b. Bring the bottom of the loop downward to form another loop underneath the lowest line on the paper. Draw the end of the loop towards the right side of the paper in an upward curve. This is f.
-
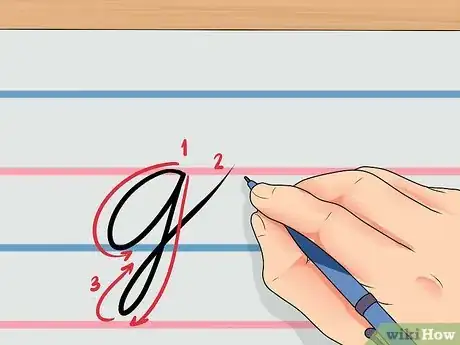
8Practice the letter g. Start with a round O shape. At the bottom right side of the O, add a slope that moves downward, underneath the last line of the paper and then curves back upward. This is g.
-
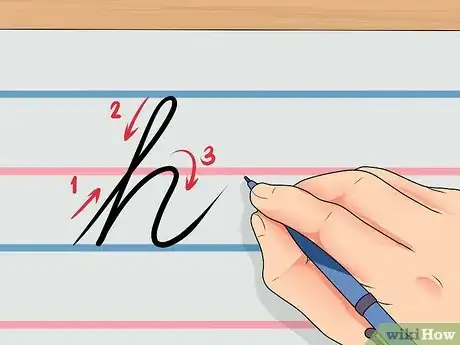
9Do the letter h. Make an upward slope to form the beginning of a lowercase b, with a long slope that loops and then draws downward. At the end of the downward vertical line, add an upside down lowercase u shape. This is h.
-
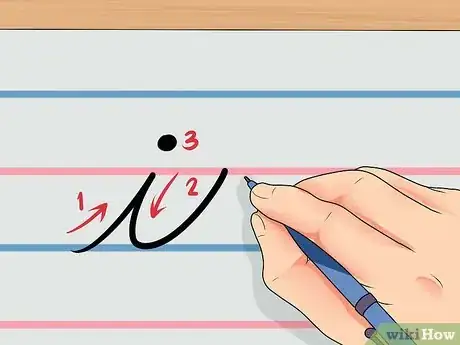
10Try the letter i. Make an upward slope to the middle line in the paper, then bring the slope downward from the center to the bottom right of the paper. Place a dot over the middle point, where the two lines meet. This is i.
-
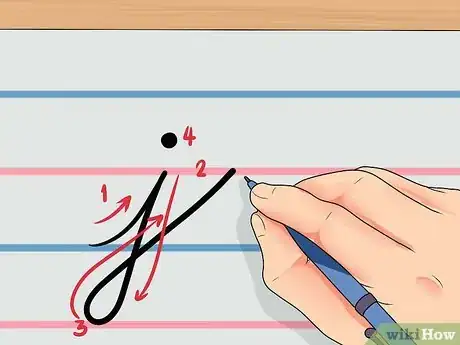
11Make the letter j. Draw an upward slope to the middle line of the paper. Then, bring the slope downward, past the last line of the paper. Loop the bottom of the slope and bring it upwards, towards the right of the paper. This is j.
-
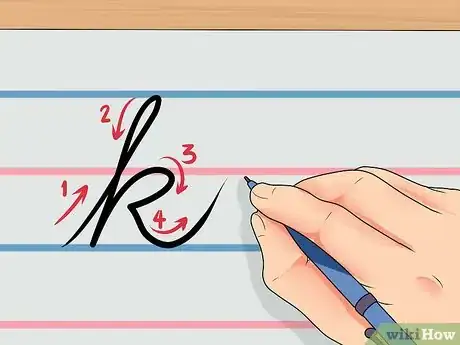
12Do the letter k. Do an upward slope to form the beginning of a lowercase b, with a long slope that loops and then draws downward. At the end of the downward vertical line, slope back up to form a lowercase O shape. Draw a line from the bottom of the O shape downward to the right of the paper. This is k.
-
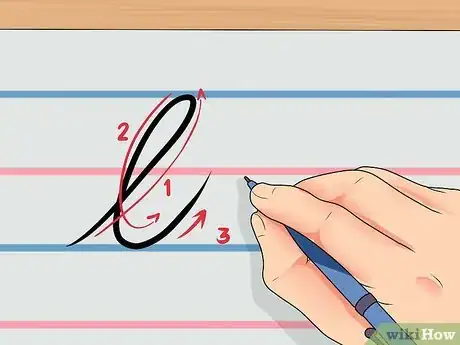
13Draw the letter l. Draw a slanted upward line and then loop down to create a downward line that curves to the right of the paper. This is l.
-
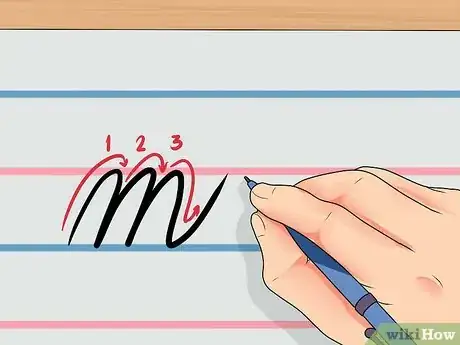
14Do the letter m. Make a small, narrow, upside down lowercase u. At the end of the upside down u, slope back up to create another upside down u. End with one more upside down u. This is m.
-
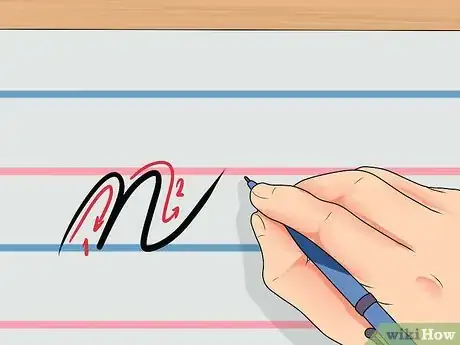
15Practice the letter n. Create a small, narrow upside down lowercase u. At the end of the upside down u, slope back up to create another upside down u. This is n.
-
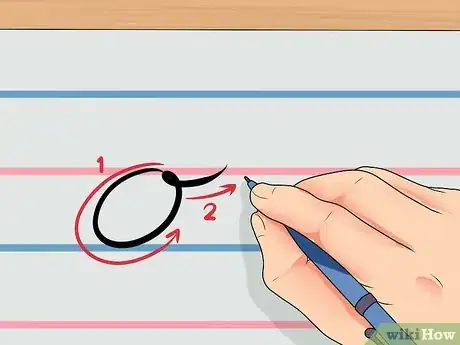
16Make the letter o. Make a round, sloped circle. At the top of the circle, draw a curve upward to the right of the paper. This is o.
-
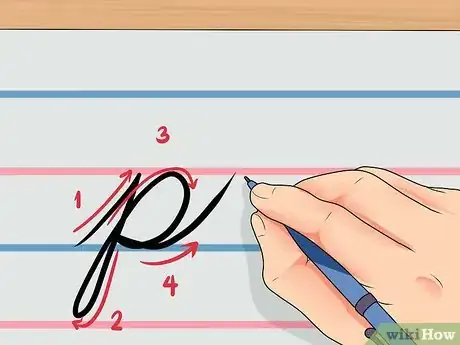
17Try the letter p. Start from the bottom line of the page. Make a small slope upward and then slope downward to make a loop underneath the bottom line of the page. Draw a slope upward to form a lowercase O shape. End with a slope from the bottom of the O shape that curves upward to the right side of the page. This is p.
-
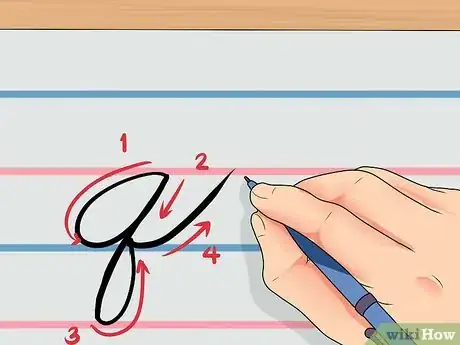
18Do the letter q. Make a round O shape, similar to how you drew the lowercase letter a in cursive. On the right side of the O shape, draw a line downward and form a loop underneath the last line on the page. Then, draw a line from the top of the loop to the middle line of the page. This is q.
-
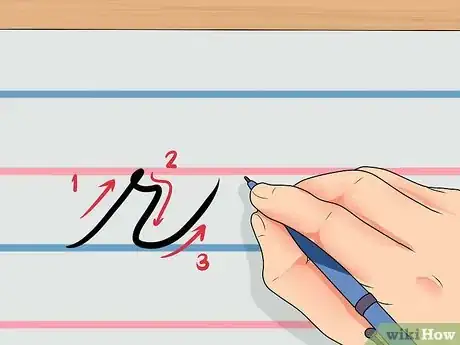
19Make the letter r. Start with an upward slope to the middle line of the page. Make a small vertical line to the right from the top of the upward slope. Curve down from the end of the slope to the bottom line. This is r.
-
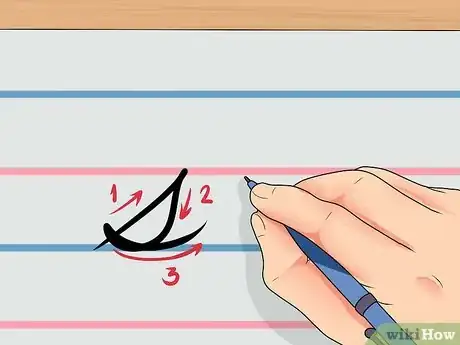
20Try the letter s. Make a curved line upwards to the middle of the paper. At the top of the curved line, make a rounded line downwards until it meets the bottom of the first line. End with a curved line upwards. This is s.
-
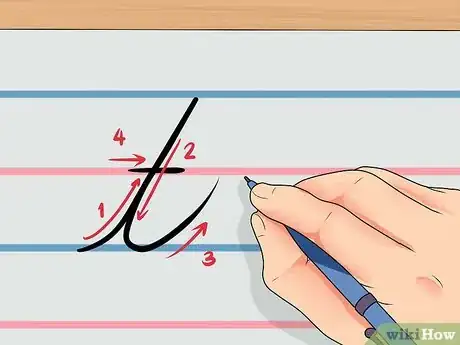
21Do the letter t. Make a vertical line upward and then draw downward over the same vertical line. End the downward vertical line by curving upward to the right of the page. Draw a small horizontal line in the middle of the vertical line. This is t.
-
22Practice the letter u. Start with an upward slope from the bottom line to the middle line. Make a curve downward and then make another curve upward. This is u.
-
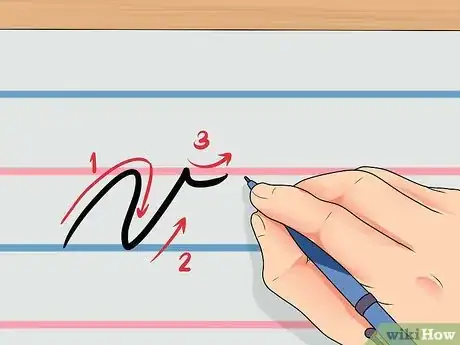
23Make the letter v. Start with a slope upward from the bottom line to the middle line and then make a curve downward to form a narrow u shape. Finish with a small curve to the right of the page. This is v.
-
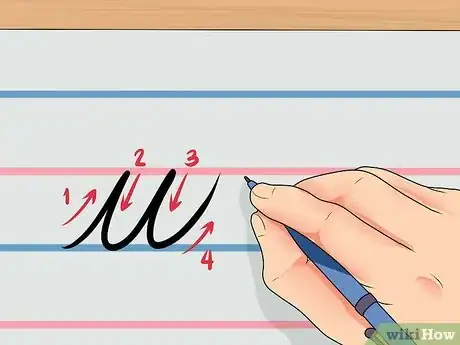
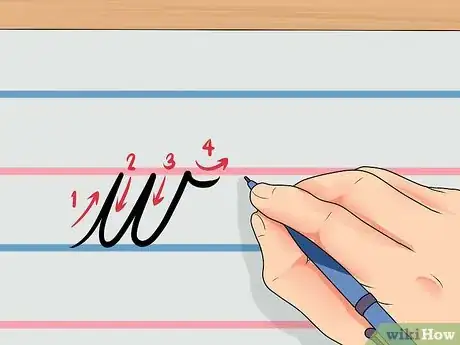
24Try the letter w. Create two u’s, joined together. Make an upward slope from the bottom line to the middle line. Then, make a curve downward and then another curve upward. Repeat this again and end with a vertical curve to the right of the page. This is w.
-
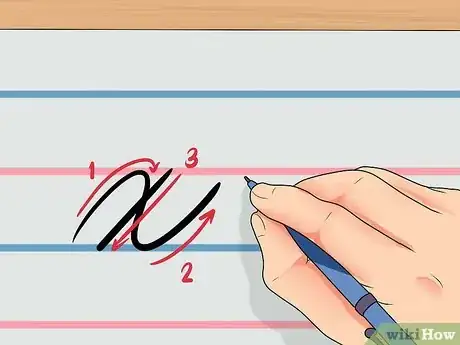
25Do the letter x. Create a loose n shape. Draw a curve from the bottom line to the middle line and then up again to the middle line. Finish with a slanted vertical line from the right side of the page to the left side of the page, across the middle of the n shape. This is x.
-
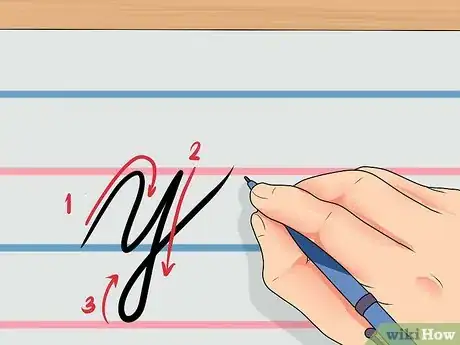
26Make the letter y. Start with a slope upward from the bottom line to the middle line. Then, curve back downward to create a loose n shape. At the end of the n, make a slope that curves downward and loops underneath the bottom line of the page. Finish by drawing the slope at the end of the loop upward to the right of the page. This is y.
-
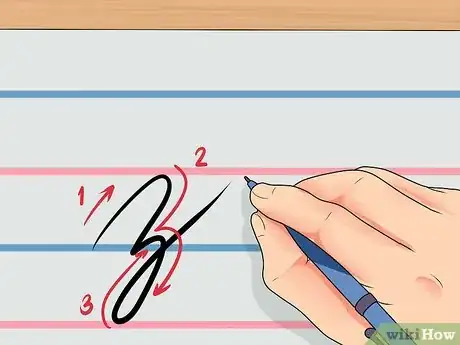
27Practice the letter z. A cursive z does not look like a printed z. Start with a slope from the bottom line to the middle line that forms a curve that is leaning to the right. At the end of the curve, make a curve that rises up and then slants downward, underneath the bottom line of the page. Make a loop underneath the bottom line and then finish with a curve upward towards the right of the page. This is z.
Community Q&A
-
QuestionHow do I make sentences in 3 lines?
 Community AnswerWith the collection of few words, your sentence will be formed. If you are writing cursive don't forget to join letters while making words, and after completing a word, leave some space too. It will help your writing look good and clean.
 -
QuestionHow can I improve my writing?
 Community AnswerPractice it. You can also have someone read your writing to you. The ear is usually better at catching mistakes than your eyes are.
 -
QuestionWhy do so many people want to learn cursive when it's completely useless in the real world?
 Community AnswerIt is not completely useless; lots of people use it at work. Others just want to have nice handwriting.
References
About This Article
To practice making the letters of the English alphabet, take out a piece of lined paper and a pencil so you can easily erase mistakes. Get a chart of both uppercase and lowercase letters, then practice writing each one. For instance, to make an uppercase letter A, you would draw 2 diagonal lines meeting at a point on top, then a horizontal line between the diagonals about halfway down. A lowercase letter a is a circle with a straight vertical line down the right side. For pictures of all of the letters in the English alphabet, keep reading!




-Step-11-Version-3.webp)
