This article was co-authored by Daniel Siriban. Daniel Siriban is a Japanese Personal Chef and the Owner of Roshi Experience. With over 18 years of culinary experience, he specializes in sushi, teppanyaki, and traditional Japanese dining. Daniel holds an AA in Restaurant, Culinary, and Catering Management from The Art Institute of California, Orange County.
There are 13 references cited in this article, which can be found at the bottom of the page.
wikiHow marks an article as reader-approved once it receives enough positive feedback. In this case, 100% of readers who voted found the article helpful, earning it our reader-approved status.
This article has been viewed 856,125 times.
Onigiri is a common treat in bento boxes and at picnics. Also called musubi, onigiri is a rice ball made by cooking and filling sushi rice. You can eat the rice ball plain or with any filling you can imagine. Onigiri is traditionally shaped by hand and wrapped with a strip of seaweed to turn it into a portable snack.
Ingredients
Makes 12 onigiri
- 2 cups (400 g) of sushi rice
- 2.5 cups (590 mL) of water
- 1 teaspoon (11.38 g) of salt
- 4 sheets of nori
Salmon Filling
Makes 4 onigiri
- 1 salmon fillet
- 2 teaspoons (5.69 g) of salt
Umeboshi Filling
Makes 4 onigiri
- 3 deseeded pickled plums, chopped
Okaka Filling
Makes 4 onigiri
- 2 packs of bonito (katsuobushi) flakes
- 2 US tbsp (30 mL) of soy sauce
Tuna-Mayonnaise Filling
Makes 4 onigiri
- 1 can of tuna
- 1 tablespoon (14.6 g) of Japanese mayonnaise
Steps
Cooking Sushi Rice
-
1Wash 2 cups (400 g) of sushi rice in a large bowl. Pour the rice into a mixing bowl and set it in the sink under lukewarm water. Gently swirl the rice around the bowl a few times to eliminate the dirt. Carefully pour out the water when you’re done.[1]
- The kind of rice you need is short-grain Japanese sushi rice. It may be sold as “sushi rice” or under a similar label. Some Italian medium-grain rices like arborio can be used as a substitute.
- If you have a strainer, you can use it to wash the rice. Put the rice in and stir it while the water flows over it.
-
2Soak the rice under water for 30 minutes, then drain it and let it rest. Submerge the rice in lukewarm water again. After it is done soaking, use a strainer to drain the rice. Then, set the rice aside for about 15 minutes to dry out any remaining moisture.[2]
- Washing and drying the rice not only cleans it but improves its flavor. It won’t make the rice less sticky.
Advertisement -
3Combine rice and water in a covered cooking pot. Pour the soaked rice into the pot, then add 2.5 cups (590 mL) of lukewarm water. Make sure all of the rice is submerged in the water, and remember to cover the pot when you’re done. Add a proportionate amount of water for larger batches of rice.[3]
- You can always use a rice cooker to prepare perfect sushi rice.
-
4Bring the pot to a boil over medium heat, then simmer it for 15 minutes. When the water begins bubbling rapidly, turn the heat down a low setting. The rice will absorb the water in the pot as it cooks. When it is done, it will look white and tender.
- If you still see a little bit of water in the pot, cook the rice for another minute.
-
5Steam the rice for 10 minutes, then fluff it with a fork. Move the pot off the heat and remove the lid. After the rice finishes cooking, stir it in the pot to fluff it. You can also use a rice scoop or spatula to do this. Wait for the rice to cool enough so you are able to touch it without burning your hands.[4]
- Avoid letting the rice cool completely. It needs to be warm in order to stick together.
- You can put salmon shavings or ikura with salmon eggs.
- Put plum inside onigiri.
- Or do furikake seaweed seasoning.


Mixing Fillings
-
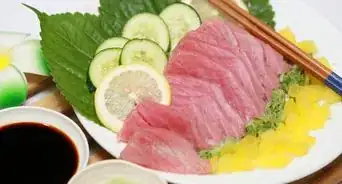
1Cook and crumble a salmon fillet for a classic fish filling. Preheat an oven to 400 °F (204 °C). Sprinkle about 1 teaspoon (5.69 g) of salt on each side of the piece of salmon, then bake it in the oven for 25 minutes. When it is done, use chopsticks or another hard tool to remove the skin and break the flesh down into smaller pieces.[5]
- The best time to cook the fillings is while the rice soaks.
- Another way to make a salmon filling is to use canned salmon. Canned salmon is already cooked, so you can add it directly to the rice. You can also mix it with mayonnaise, similar to a tuna filling.
-
2Squeeze the seeds out of pickled plums if you like a sour filling. Umeboshi is another traditional onigiri filling. It is made by placing 3 plums on a piece of plastic wrap. Fold the plastic wrap in half, pressing down on each plum until the seeds come out. Chop up the plums and add them to the rice balls.[6]
- If you live near an Asian market, you can buy umeboshi. You may also be able to order it online.
- Umeboshi tends to taste only slightly sour. The blandness of the rice balances it out.
-
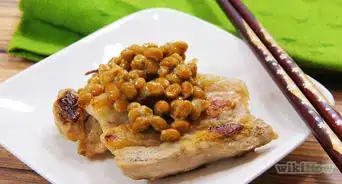
3Mix bonito flakes with soy sauce if you want a salty filling. Bonito flakes are basically dried, shredded fish. To make the filling, pour 2 pouches of flakes into a bowl. Then, add 2 US tbsp (30 mL) of soy sauce, stirring the ingredients so the bonito flakes absorb the soy sauce.[7]
- This filling is called okaka. Bonito flakes may be sold as katsuobushi.
- The trick with okaka is to avoid adding too much soy sauce. Moisten the bonito flakes, but make sure soy doesn’t accumulate at the bottom of the bowl. Pour the soy in a drop at a time if you need to.
-
4Mix tuna and mayonnaise for a simple fish filling. Open a can of tuna and drain it. In a bowl, combine the tuna with 1 tablespoon (14.6 g) of Japanese mayonnaise. Also, mix in 0.5 US tbsp (7.4 mL) of soy sauce.[8]
- Japanese mayonnaise works best for this recipe. It is made with egg yolks and rice vinegar, so it tastes creamier and sweeter than standard mayonnaise.
-
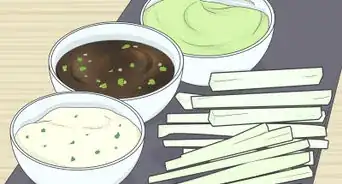
5Get creative to make your own fillings. Onigiri is very customizable, so you are only limited by your imagination. For example, konbu seaweed is another traditional filling used in Japan. You can also try teriyaki chicken, pickled greens, or shrimp.
- Many people even use leftover meat from dinner in their onigiri!
- Drain the liquid out of any filling you use so the onigiri doesn’t get soggy.
- Avoid using fillings with ingredients that spoil if you’re planning on leaving your onigiri out of the refrigerator for a while.
Shaping the Onigiri
-
1Cut nori sheets into strips about 0.5 in (1.3 cm) thick. Nori, or seaweed, comes in dried mats. You can cut the mats with a sharp pair of scissors. Smaller strips are perfect if you wish to get to the rice and filling right away when biting into the onigiri.[9]
- The seaweed strips are used to give you a way to pick up the onigiri without touching the sticky rice. You can make yours without seaweed if you don’t mind this.
- You can also use bigger nori strips. Cut the seaweed sheets into thirds. These larger strips are often wrapped all the way around the onigiri.
-
2Wet your hands in salt water to prevent the rice from sticking to you. Dissolve 1 teaspoon (5.69 g) of salt in 1 cup (240 mL) of water. Keep the bowl near you as you work. When your hands start to get dry, dip them into the water again.[10]
- Using the water makes creating the onigiri much easier. The salt is traditionally used to keep the rice fresher for longer.
- Kosher salt works best, but you can use table salt. Table salt has a stronger taste, so be careful to avoid adding too much.
-
3Scoop about 5.3 tablespoons (65 g) of rice into your hand. Use a spoon or rice scooper to pick up the rice. Get no less than 4 tablespoons (50 g) of rice at a time. Creating an onigiri is traditionally done by hand, so you do not need to have any other tools.[11]
- You can set the rice down on a cutting board or piece of plastic wrap. In fact, you can use plastic wrap to mold onigiri without touching it. Closing up the plastic wrap forces the onigiri into a ball.[12]
- Another way to shape the onigiri is with an onigiri mold. Set the mold on a cutting board, then stuff it with rice. You can purchase both triangular and circular molds.
-
4Use your thumb to make a crater in the center of the rice. Press down on the rice with your palm to create a ball with a flat top. Then, push your finger down into the center to create the well. Make the well deep enough to hold the filling.[13]
- Avoid pushing your finger all the way through the rice. Widen the well as needed to keep the filling in place.
-
5Insert up to 2 tablespoons (28.6 g) of filling into the hole. Use a spoon or chopsticks to move the filling into the rice ball. Depending on the size of your onigiri, you can use as little as 1 tablespoon (14.3 g) of your chosen filling. The important part is to avoid overfilling it. Using too much means the onigi gets messy, falling apart when you shape it.[14]
- Err on the side of caution when adding filling. You need just enough to fill the center of the rice ball.
-
6Squeeze the rice together to mold it into onigiri. There are a few ways of doing this. The easiest way is to use your free hand to lift up the sides of the rice mound. Fold the rice over on top of the filling, then finish rolling the rice into a ball shape. Keep firm pressure on the rice at all times.
- Using the proper amount of pressure is important. Squeezing too lightly or too hard causes the rice to fall apart.
- Some people find triangular onigiri to be easier to make. Hold the thumb, forefinger, and middle finger of your free hand in an L-shape. After folding the ends of the rice mound over the filling, use your fingers to mold the onigiri into a triangle.
-
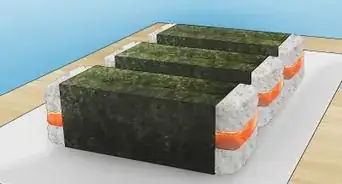
7Wrap the onigiri with a piece of seaweed. Finish your onigiri with the easiest topper ever. Take a single strip of nori and wrap it over the center of the rice. This works for both round and triangular onigiri. The nori holds the rice ball in its shape while keeping your hands rice-free when you eat.[15]
- Larger strips of nori work particularly well with triangular onigiri. For instance, wrap the nori around the top sides of the triangle so the ends meet on the front surface. The nori forms a little coat.
- You do not have to use nori if you don’t want it. You can also top your onigiri with extras, including more filling, roe, or sesame seeds.
-
8Store onigiri individually for up to 3 days. Cover each ball tightly in plastic wrap to preserve it. Store the nori separately in a resealable container. Onigiri are meant to be portable snacks like sandwiches, so they can last a while, but the length of time depends on the filling you use.[16]
- Salty fillings like umeboshi last the longest, even when left outside of the refrigerator. Onigiri with perishable ingredients like fish and mayonnaise spoil faster.
- You can also freeze the onigiri. Store them in a labeled freezer bag after wrapping them individually. They will last about 3 months and can be reheated in the microwave.


Community Q&A
-
QuestionDo I still need to wrap it with Nori?
 Community AnswerNo, you don't. However, this can stop it falling apart when you eat it, depending on how you wrap it.
 -
QuestionDo I have to wait until the rice cools or can I start rolling while its warm/hot?
 Community AnswerIt's actually preferable to start when it's warm because rice that is too cold can lose some of its stickiness.
 -
QuestionI am a vegetarian, is there a type of onigiri for me?
 Community AnswerYes. Cooked vegetables, preferably ones which go well over rice, will certainly work as a substitute for a filling. It is also possible to not have a filling and eat it plain, which still makes for a nice meal or snack.
Things You'll Need
- Stove
- Pot or rice cooker
- Measuring cup
- Measuring spoons
- Fork or rice scoop
- Spoon
- Strainer
- Mixing bowls
- Scissors


References
- ↑ https://www.youtube.com/watch?v=LCqeO9m7mbw&feature=youtu.be&t=33
- ↑ https://www.youtube.com/watch?v=LCqeO9m7mbw&feature=youtu.be&t=172
- ↑ https://www.youtube.com/watch?v=LCqeO9m7mbw&feature=youtu.be&t=183
- ↑ https://www.youtube.com/watch?v=rFyfPvo97XQ&feature=youtu.be&t=33
- ↑ https://www.youtube.com/watch?v=LCqeO9m7mbw&feature=youtu.be&t=65
- ↑ https://www.youtube.com/watch?v=LCqeO9m7mbw&feature=youtu.be&t=75
- ↑ https://www.youtube.com/watch?v=liYwZsb4cVk&feature=youtu.be&t=90
- ↑ https://www.youtube.com/watch?v=liYwZsb4cVk&feature=youtu.be&t=115
- ↑ https://www.allrecipes.com/recipe/140422/onigiri-japanese-rice-balls/
- ↑ https://www.epicurious.com/expert-advice/how-to-make-onigiri-japanese-rice-balls-article
- ↑ https://www.epicurious.com/recipes/food/views/rice-balls-with-salmon-filling-onigiri
- ↑ https://www.youtube.com/watch?v=LCqeO9m7mbw&feature=youtu.be&t=289
- ↑ https://www.epicurious.com/expert-advice/how-to-make-onigiri-japanese-rice-balls-article
- ↑ https://www.epicurious.com/expert-advice/how-to-make-onigiri-japanese-rice-balls-article
- ↑ https://www.youtube.com/watch?v=liYwZsb4cVk&feature=youtu.be&t=267
- ↑ https://www.epicurious.com/expert-advice/how-to-make-onigiri-japanese-rice-balls-article
About This Article

To make onigiri, start by bringing 2 cups of rice and 2.5 cups of water to a boil over medium heat. Once the water starts boiling, lower the heat and simmer the rice for 15 minutes. Then, take the rice off the heat and steam it for 10 minutes before fluffing it with a fork. When the rice is done, use your hands to shape it into small balls, using your thumb to make a crater in the center of each rice ball. Finally, stuff the rice balls with your filling of choice, like salmon filling or umeboshi filling, and wrap them in seaweed. To learn how to make fillings for onigiri, scroll down!