This article was co-authored by wikiHow Staff. Our trained team of editors and researchers validate articles for accuracy and comprehensiveness. wikiHow's Content Management Team carefully monitors the work from our editorial staff to ensure that each article is backed by trusted research and meets our high quality standards.
The wikiHow Video Team also followed the article's instructions and verified that they work.
This article has been viewed 197,625 times.
Learn more...
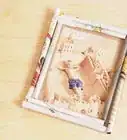
Popsicle stick frames are both fun and easy to make. They make great crafts for children to make, and to give away as gifts to friends, family members, and teachers. With a little bit of time and creativity, you can have your very own popsicle stick picture frame too.
Steps
Making a Basic Frame
-
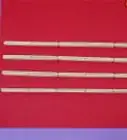
1Find 4 popsicle sticks. You will need 1 stick for each side of the frame. If you'd like a thicker frame, glue 2 sticks together to make a wide popsicle stick.[1]
-
2Glue 4 popsicle sticks together to make a square and wait until the glue dries. Place 2 popsicle sticks down in front of you, vertically. Place a drop of glue onto the top and bottom of each stick. Lay 2 sticks across horizontally the vertical sticks to form a square.
- The best glue to use is hot glue, because it dries fast. You can also use school glue or wood glue instead, but it will take a few hours to dry.
Advertisement -
3Paint and decorate your frame. Paint your frame using markers or acrylic paint. Let the frame dry, then decorate it further. You can write something on it, such as "Daddy and Me" or "I Love You Mommy." You can also glue things onto it, such as glitter, gemstones, or buttons. For more decorating ideas, click here.
-
4Trace your frame onto your photo using a pen. Photos can be precious, so it is best to use a photocopy instead of an original photo.
-
5Cut the photo out. Try to just a little bit inside the lines you drew. This way, your photo won't stick out from behind your frame.
-
6Glue or tape your photo to the back of the frame. Gluing the photo will make it permanent. If you only tape the photo, however, you can take it out again later and change it out for another photo.
-
7Add a ribbon to the back of your frame if you want to hang it. Cut a piece of ribbon, about 12 inches (30.48 centimeters) long. Flip your frame over and place a drop of glue in the upper left and right corner. Press each end of the ribbon into each drop of glue. Let the glue dry, then hang your frame.[2]
-
8Consider gluing 2 magnets to the back of your frame so that you can put it on the fridge instead. Flip your frame over, and place a drop of glue on the top and bottom of your frame. Press a magnet into the glue, and wait for the glue to dry. Place the frame onto your fridge.[3]
-
9Finished.

Making a Reusable Frame
-
1Line up 8 popsicle sticks side-by-side. Orient them horizontally. This will make the base of your frame. You do not nee to glue them together.
-
2Hot glue 3 popsicle sticks down on top of the 8 popsicle sticks. Orient these sticks vertically. Glue one stick in the middle of the frame base. Glue the other two sticks to the left and right of the frame base. These three sticks will hold the frame base together
-
3Flip your frame over and place a 4 by 6 inch (10.16 by 15.24 centimeters) photo on top. Position the photo in the center of the base, but do not glue it down. You will be using the photo as your template.
- At this point, the top and bottom of your frame should have straight edges. The sides of your frame will have the wavy edges created by the curved ends of the sticks.
-
4Draw a vertical line of hot glue to either side of the photo. Make sure that the line of glue goes from the bottom of the frame base to the top. Be sure to leave a small gap between the glue and the edge of the photo. This way, the glue won't accidentally bleed onto the photo.
-
5Press a stick down onto each line of glue. Keep the sticks vertical. Make sure that the inner edge of each stick overlaps the photo. This will help hold the photo inside the frame. If you don't overlap the photo, the photo will fall out.
- At this point, you can remove the photo.
-
6Glue a stick down across the top and bottom of your frame base. Place a drop of glue onto the top of each vertical stick. Lay a stick down horizontally across the two vertical sticks, pressing the ends into the glue. Repeat this for the bottom.
-
7Stack three sticks, one of top of the other, and secure them with glue. Make another stack just like this one. These stacks will make the bottom of your frame so that it can stand up.
-
8Glue each stack to the bottom of your frame base. One stack will go on the front of your frame, which will hold the picture in place. The other stack will go on the back, so that the frame stand up straight.
-
9Paint or decorate your frame. Paint your frame and let it dry before using it or decorating it further. You can write something on it, such as your name or a short message. You can also glue items onto it, such as glitter, gemstones, or buttons. For more decorating ideas, click here.
- Make sure you take the picture out before decorating the frame.
-
10Slide a photo down through the top of the frame. If you want to change the picture out, simply pull the photo out, and replace it with a new one.
Decorating Your Frame
-
1Paint your frame a solid color, let the paint dry, then paint smaller designs onto it. Use contrasting colors so that the designs stand out. For example, you could paint your frame red, and then add green stripes to it. You could also paint it white, and then add black spots into it.
-
2Draw some designs with puffy paint or glitter glue for something quick and easy. This can be done onto a painted frame or an unpainted frame. If you are adding designs onto a painted frame, make sure that the paint is completely dry first.
- Try some fun, simple designs, such as hearts, starts, spirals, and squiggles.
-
3Use a rubber stamp and an ink pad to stamp small designs onto the frame. Make sure that the stamp is narrow enough to fit on your frame. Small, simple designs, such as stars or chevron patterns, will work best.[4]
- Do this on an unpainted frame. Stamp ink does not show up well on paint.
-
4Glue various items onto the frame using hot glue or school glue. Consider tying the theme of the items into the theme of the photo. For example, if the photo in your frame was taken at a beach, consider gluing down some tiny shells onto the frame. Here are some more ideas to get you started:[5] [6]
- Buttons or pompoms
- Natural items, such as twigs or shells
- Sand or glitter
- Sequins or gemstones
- Small ribbon bows or silk flowers
-
5Glue ribbon onto the edges of the frame. You can glue the ribbon right onto the sides of the frame, or wrap it around the sticks, like a candy cane. Consider painting the frame a solid color first, and then gluing the ribbon on.[7]
- To continue the "sewing" theme, glue a large button in each corner of the frame.
-
6Make a puzzle frame. Glue tiny/mini puzzle pieces onto your frame. Wait for the glue to dry, then paint the entire frame a solid color. Make sure that you get the paint into the cracks between the puzzle pieces. Wait for the paint to dry, then attach a ribbon on the back so that you can hang it.[8]
- Consider gluing mini foam letters to the front of the frame to spell a message. The letters should not stick out beyond the edges of the frame.
-
7Make a princess frame. Paint the entire frame your favorite color. Great princess colors include pink, purple, white, and light blue. Wait for the paint to dry, then glue some glitter onto it. Great colors include silver, gold, and iridescent. When the glitter dries, glue a sparkly gemstone in each corner of the frame. Silver gemstones will match most frames, but you can also use colors like pink and purple.[9]
- Consider painting the glitter on instead. Mix some white glue with a few drops of water. Stir some glitter into the glue, then paint it on with a paintbrush.
- Most gemstones will be round or oval. You can use those, or a special shape instead, such as a star, heart, or crown.
Community Q&A
-
QuestionWhere do I get magnets?
 Community AnswerOnline or in local craft or hardware stores.
 -
QuestionHow can I decorate ice cream sticks?
 Community AnswerYou can use glitter, draw patterns, paint them, or write something special on them. You can't exactly go wrong.
 -
QuestionWhich glue should I use when making photo frames from ice cream sticks?
 Community AnswerAny glue will do. It is best not to use glue sticks as that glue isn't very sticky. PVA glue, craft glue, super glue or hot glue would work well. The best way would be to use PVA or hot glue.
Warnings
- Be careful when using hot glue. Consider using a low-temp one instead of a high-temp one. It will work well enough for the project, but will be less likely to give you blisters.⧼thumbs_response⧽
- If you are using school glue and paint, plan ahead. These may take a while to dry.⧼thumbs_response⧽
Things You'll Need
Making a Basic Frame
- 4 to 8 popsicle sticks
- Hot glue
- Picture
- Paint or markers (optional)
- Ribbon (optional)
- Decorations, (glitter, gems, buttons, etc)
Making a Reusable Frame
- 21 popsicle sticks
- Hot glue
- 4 by 6 inch (10.16 by 15.24 centimeters) photo
- Paint or markers (optional)
- Ribbon (optional)
- Decorations, (glitter, gems, buttons, etc)
References
- ↑ http://www.firstpalette.com/Craft_themes/People/craftstickphotoframe/craftstickphotoframe.html
- ↑ http://www.firstpalette.com/Craft_themes/People/craftstickphotoframe/craftstickphotoframe.html
- ↑ http://www.firstpalette.com/Craft_themes/People/craftstickphotoframe/craftstickphotoframe.html
- ↑ http://www.craftysticks.com/Popsicle-Stick-Crafts-Photo-Inspiration_b_8.html
- ↑ http://www.firstpalette.com/Craft_themes/People/craftstickphotoframe/craftstickphotoframe.html
- ↑ http://www.craftysticks.com/Popsicle-Stick-Crafts-Photo-Inspiration_b_8.html
- ↑ http://www.craftysticks.com/Popsicle-Stick-Crafts-Photo-Inspiration_b_8.html
- ↑ http://buggyandbuddy.com/puzzle-piece-frame-homemade-christmas-ornament-kids/
- ↑ http://www.thesuburbanmom.com/2013/05/20/popsicle-stick-picture-frame-kids-craft/
About This Article

To make a photo frame from ice cream sticks, you’ll need 4 sticks, glue, and materials to decorate it. Start by laying 2 sticks vertically on a surface. Lay the other 2 on top to form a square. Then, glue the corners of the sticks together. Once you’ve stuck your frame together, you’re free to decorate it however you want. Try coloring it with acrylic paint or marker pens. You can also stick on some glitter, sequins, or gemstones to make it look pretty. To stick your frame to your photo, use a photocopy so you can cut the picture to size. Place your frame on top of the photo and draw around it with a pen. Then, cut the photo out, put some glue on the back of the frame, and stick it to the photo. For more tips, including how to make a reusable photo frame, read on!