This article was co-authored by wikiHow Staff. Our trained team of editors and researchers validate articles for accuracy and comprehensiveness. wikiHow's Content Management Team carefully monitors the work from our editorial staff to ensure that each article is backed by trusted research and meets our high quality standards.
There are 8 references cited in this article, which can be found at the bottom of the page.
The wikiHow Culinary Team also followed the article's instructions and verified that they work.
This article has been viewed 158,683 times.
Learn more...
Pickled ginger is a condiment that’s often served with sushi, but you can also add it to stir fries, top salads with it, or even use it as a garnish for cocktails and meat dishes. Pickling ginger at home is an easy and fun project that you can do in less than an hour, and with just a few ingredients. Although pickled ginger will last in the refrigerator for several months, you can also process the jar in boiling water to increase its shelf-life.
Ingredients
- 12 ounces (340 g) fresh ginger
- 1½ tablespoons (27 g) kosher salt
- ½ cup (118 ml) rice vinegar
- 1 cup (235 ml) water
- 1½ tablespoons (21 g) granulated sugar
Steps
Peeling and Slicing the Ginger
-
1Sterilize the jar and lid. Fill a sink with hot water, and add about a teaspoon (5 ml) of liquid dish soap. Wash the jar and the lid in the soapy water to remove any dirt or pathogens. Rinse the jar and lid with hot water, and towel dry with a clean dish towel. Set the jar and lid aside.[1]
- You can also wash and sterilize the jar and lid in a dishwasher. When the cycle is over, leave the door closed until you're ready to pack the ginger.[2]
- The best type of jar for this recipe is a 1-pint (473-ml) mason jar with a new lid and ring. This type of setup is ideal for processing the jar in boiling water to help preserve the ginger for longer.
-
2Peel the ginger. The easiest way to remove the skin from ginger is to scrape it off with a spoon. Press the side of the spoon against the ginger, apply gentle pressure, and scrape the skin to remove it. Just make sure you get into all the crevices and nooks as well.
- Young ginger is the best type of ginger for this recipe, because it has tender flesh and thin skin. Young ginger has smooth and tight skin, and the skin will peel away easily if you scrape it with a fingernail.[3]
- The pink tips of young ginger are what give some pickled ginger varieties a pinkish color.
Advertisement -
3Slice the ginger. Set a mandolin to its thinnest setting. Use the mandolin to slice the ginger into pieces that are about one-sixteenth inch (1.6 mm) thick.[4] Slice the ginger widthwise rather than lengthwise, as this will produce slices that are less stringy and tough.
- If you don’t have a mandolin, you can slice the ginger with a knife, or peel off slices with a vegetable peeler.[5]
-
4Slice a radish to obtain pink ginger. Even if you don’t have ginger that’s young enough to have the pink tips that give some pickled ginger its distinctive pink color, you can still achieve this color with radish. Wash a large radish and chop off the tip and tail. Cut the radish into slices that are about one-eighth inch (3 mm) thick.[6]

Making the Brine
-
1Cover the ginger with the salt. Transfer the ginger to a small glass bowl. Sprinkle the salt over the ginger and let it sit for 30 minutes. This will help to tenderize the flesh, and remove a bit of the spiciness from the root.[7]
- If you're adding radish for the color, combine the radish and ginger in the bowl and sprinkle them both with the salt.
-
2Heat the vinegar, water, and sugar. Combine the ingredients in a small saucepan. Bring the mixture to a boil over medium-high heat, stirring regularly as it cooks. Continue simmering the mixture for a minute or two, until the sugar is fully dissolved.[8]
-
3Combine the ginger and brine in the mason jar. Pack the ginger slices into your clean mason jar. Pour the hot brine into the jar to cover the ginger. Leave a half-inch (13 mm) of head space at the top of the jar. This is especially important if you want to process the ginger for longer storage.[9]
- Leaving head space is important when you're canning, because it leaves room for the liquids to expand when they heat up.
-
4Tap the jar to remove air bubbles. Protect your hand with an oven mitt or towel and pick up the jar. Gently tap the bottom of the jar against the counter to release air bubbles that may be trapped in the brine. Add more brine if necessary, leaving the same half-inch (13 mm) of head space.[10]
-
5Clean the rim and secure the lid. Dampen a clean lint-free cloth with water. Wring out the excess, and clean the sides and rim of the mason jar to remove any food residue. This will prevent bacteria from growing in and around the jar. Place the lid on the jar and screw on the ring to secure the lid in place.[11]
-
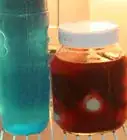
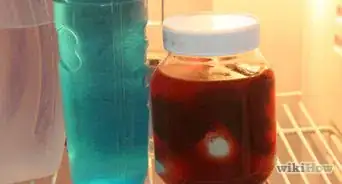
6Transfer the ginger to the refrigerator for short-term storage. Pickled ginger that isn't processed in a water bath can be stored in the refrigerator for up to two months. Let the mixture cure in the brine for at least 48 hours before opening the jar and enjoying the ginger.[12]
- For longer storage, process the ginger in a boiling water bath.
- If you added radish to the jar as well, the ginger will gradually take on the pinkish color from the radish skin.


Canning the Pickled Ginger
-
1Place a cooling rack in the bottom of a large pot. You don’t need a special canning pot to process foods for preservation, but you do need a pot large enough that a wire cooling rack will fit in the bottom. Place the rack in the bottom of the pot to keep the glass from touching the hot metal.[13]
- If you have a special pot for canning, outfit the pot with the rack that came with it.
-
2Fill the pot with water and bring it to a boil. Add enough water so that the mason jar will be completely covered when you add it to the water. Put on a lid and heat the pot over medium-high heat until it’s boiling.
-
3Process the jar in the boiling water for 15 minutes. When the water is boiling, use a pair of tongs to carefully lower the mason jar of ginger into the water. Put the lid back on, wait for the water to return to a boil, and then start the timer for 15 minutes.[14]
- At elevations above 1,000 feet (300 m), water boils at a lower temperature, so you have to process the jar for longer.
- For elevations up to 3,000 feet (910 m), process the ginger for 20 minutes. Up to 6,000 feet (1,800 m), process the ginger for 25 minutes.[15]
-
4Turn off the heat. When the jar has boiled for 15 minutes, cut the heat but leave the pot where it is. Remove the lid from the pot and leave the jar to stand for an additional five minutes in the water.
- Leaving the jar in the water as it cools will reduce the temperature shock between the boiling water bath and the outside air.[16]
-
5Leave the jar to cool out of the water overnight. After five minutes, use a pair of tongs to carefully remove the jar from the water. Place the jar onto a heat-proof surface that’s covered with a clean towel. Let the jar cool overnight, or for about 12 hours.[17]
-
6Check that the lid is sealed. The next day, remove the ring from the mason jar. Press down on the lid with your finger and try to move the lid back and forth. If it doesn’t move, gently try to lift the lid off with your finger. As long as the lid doesn’t move or come off, you can store the ginger in a cool, dry place for up to a year.
- If the lid does move or lift off, you can either process the jar in a water bath again, or transfer it to the refrigerator for immediate use.[18]
-
7Finished!


Community Q&A
-
QuestionIs it possible to make pickled ginger without the sugar?
 Community AnswerThe sugar in pickled ginger isn't strictly necessary. To accommodate low-sugar diets, you can leave the sugar out, or replace it with a sugar-free substitute. Many commercial pickled ginger varieties contain aspartame instead of sugar.
 -
QuestionHow does pickled ginger turn pink?
 Community AnswerIt will turn pink with high quality rice vinegar, or some companies use food coloring.
 -
QuestionWhat is a mandoline?
 CaeiiaTop AnswererIt's a cooking instrument that when you slide a compartment, a blade slices through a vegetable, forming evenly thin pieces of vegetable.
References
- ↑ https://www.thekitchn.com/how-to-pickle-ginger-234166
- ↑ http://www.freshpreserving.com/waterbath-canning.html
- ↑ https://www.foodiewithfamily.com/pickled-ginger-gari/
- ↑ http://www.finecooking.com/recipe/homemade-pickled-ginger
- ↑ https://www.foodiewithfamily.com/pickled-ginger-gari/
- ↑ https://www.thekitchn.com/how-to-pickle-ginger-234166
- ↑ https://www.thekitchn.com/how-to-pickle-ginger-234166
- ↑ https://food52.com/blog/10267-how-to-make-your-own-pickled-ginger-from-scratch
- ↑ http://www.sbcanning.com/2012/05/canning-pickled-ginger.html
- ↑ https://www.thekitchn.com/how-to-pickle-ginger-234166
- ↑ http://www.freshpreserving.com/waterbath-canning.html
- ↑ https://www.thekitchn.com/how-to-pickle-ginger-234166
- ↑ http://www.freshpreserving.com/waterbath-canning.html
- ↑ http://www.sbcanning.com/2012/05/canning-pickled-ginger.html
- ↑ https://www.thespruce.com/high-altitude-canning-1327430
- ↑ http://www.freshpreserving.com/waterbath-canning.html
- ↑ http://www.foodpreserving.org/2013/05/pickled-ginger.html
- ↑ http://www.freshpreserving.com/waterbath-canning.html
About This Article

To make pickled ginger, first peel 12 ounces (340 g) of fresh ginger with the edge of a spoon. Then, slice the ginger into 1/8-inch (3-mm) thick strips with a knife. If you want your pickled ginger to have a bright pink color, you'll need to use a radish. Chop off the tip and tail of the radish. Then, cut the radish into 1/8-inch (3-mm) thick slices. Set the ginger and radish inside a glass bowl and add 1½ tablespoons (27 g) of kosher salt. Let the bowl sit for 30 minutes to tenderize the ginger and sweeten the flavor. Now, pour ½ cup (118 ml) of rice vinegar into a saucepan. Add 1 cup (235 mL) of water and 1½ tablespoons (21 g) of granulated sugar to the saucepan and mix the ingredients together. Bring the mixture to a boil over medium-high heat while stirring it every couple of minutes. Stuff your ginger and radish slices into a small glass jar. Put a funnel over the jar and pour the hot vinegar and sugar into it until there’s ½ inch (1 cm) of space remaining at the top of the jar. Tap the sides of the jar a few times to remove any air bubbles and put the lid on. Finally, set your pickled ginger inside of the refrigerator and wait at least 48 hours for the ginger to cure before using it. You can store your pickled ginger in the refrigerator for up to 2 months. If you want to learn how to seal the jars with your pickled ginger, keep reading the article!