This article was co-authored by wikiHow staff writer, Aly Rusciano. Aly Rusciano is a Creative Writer based outside of Nashville, Tennessee. She has over ten years of experience in creative, academic, and professional writing. Aly’s writing has been nationally recognized in the Sigma Tau Delta Rectangle and featured in Blue Marble Review, The Sunshine Review, PopMatters, and Cathartic Literary Magazine. She graduated from The University of Tennessee at Martin with a BA in English, focusing in Creative Writing and minoring in Theatre.
There are 11 references cited in this article, which can be found at the bottom of the page.
This article has been viewed 59,644 times.
Learn more...
Have you ever been to the beach and seen a frosty, opaque-colored stone? Chances are, that was sea glass! But did you know that you don’t have to travel to the beach to see it? Sea glass is a rare mineral created when beach sand becomes weathered by salty waves and wind. It takes many years for a single piece of sea glass to be made in the wild, but only 4 to 5 days to make at home. In this article, we’ll teach you how to make sea glass with a rock tumbler. Weathering pieces of scrap glass at home is easy, and only a few minutes of work will make it look like you’ve scoured the shore for hours.
Steps
Loading the Rock Tumbler
-
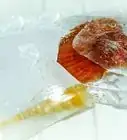
1Select a handful of raw glass pieces to tumble. Raw glass is known as “rough,” and will go on to assume the cloudy, weathered finish characteristic of sea glass. Pick out pieces that are at least 1⁄4 inch (0.64 cm) thick and about as big around as a quarter (or slightly larger). Glass that’s too thin will be worn away until there’s virtually nothing left.
- Landscaping glass or “cullet” (recycled industrial glass) is perfect for making sea glass.
- Sea glass is mostly known for its blue, turquoise, and green shades, but you can tumble any color of glass you’d like.
- It’s not recommended to break glass yourself for tumbling. Not only is this dangerous, but it’ll produce small shards of uneven sea glass.
-
2Fill the barrel of the rock tumbler ⅔ of the way full with glass pieces. Remove the lid from the barrel and add the glass directly to the bottom. For the best results, it should be mostly full but still have enough room inside for the rough to shift around.
- If you have a large quantity of rough you want to transform into sea glass, it may be necessary to tumble it in multiple batches.
- Always start with a clean tumbler, making sure all traces of grit or leftover fragments from the previous batch are gone before you add new materials.[1]
Advertisement -
3Pour in 2 level tablespoons (25 g) of coarse grit. To tumble glass, use silicon carbide grit or ceramic pellets as a filler. The coarse grit will spread through the empty space around the rough to weather it in all directions.[2]
- Without filler, the raw glass pieces would smash into one another inside the tumbler barrel and become shattered or scratched.
- Avoid filling the barrel more than ⅔ of the way. If it’s too full, the materials inside won't have anywhere to go, which means any time you spend tumbling will be wasted.
-
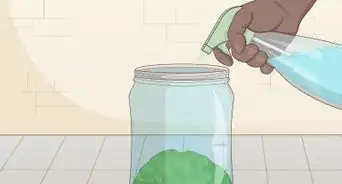
4Add water to the top of the rough. Run cool water into the barrel until it just begins to filter up through the glass pieces underneath the coarse grit. A little moisture is needed to smooth the glass as it tumbles. This process is similar to the one that causes sea glass to form naturally, as the moisture from the water helps smooth the glass.[3]
- Be careful not to overfill the barrel, or you could end up with a big mess on your hands.


Tumbling the Glass
-
1Seal the tumbler tightly. Once all the individual components are inside the barrel, put the lid in place and twist it until it’s secure. If your tumbler barrel features any additional seals, clamps, or clasps, double-check that these are fastened as well.
- Turn the barrel over to inspect for leaks before you begin tumbling.
-
2Set the barrel in the electric tumbler base. Turn the barrel sideways and fit it into the open slot in the unit's center. Make sure the knobs on either end are lined up with the vertical supports on the base. Once the barrel is oriented correctly, press it until it sits flush against the belt or rollers.
- Most rock tumblers feature a horizontal construction, but some revolve in a more upright position. These types of tumblers may need to be inserted onto a separate spoke to secure them.
- When you activate the tumbler, the mechanism beneath the barrel will create continuous traction, causing the barrel to spin.
-
3Let the tumbler run for 4 to 5 days. Switch on the tumbler unit. The barrel will begin revolving at a slow speed. Inside, you’ll be able to hear the various materials colliding with one another over and over again. Keep the tumbler running like this for at least 4 days.[4]
- Record the exact time and date you begin running the tumbler, so you’ll know when you need to stop it.[5]
- The constant movement inside the barrel will be a little loud. Try placing the tumbler in a basement, garage, or somewhere else where noise won’t be an issue.
-
4Add ¼ tablespoon (3.6 g) of baking soda if gas builds inside the barrel. Some types of glass release gaseous byproducts when they’re ground up. After a few hours or days, it’s possible for these gases to build up inside the barrel, which could cause glass particles to spray out when you remove the lid later. Wear safety glasses to protect your eyes, and add baking soda to absorb the gases and limit the pressure inside the tumbler.[6]
- Keep an eye on your rock tumbler as it turns. If the barrel looks like it’s bulging, remove the lid momentarily to let the excess gas escape.
- Baking soda isn’t essential for making sea glass; however, it’s good to have on hand as it could help prevent an inconvenient mishap.
-
5Check the progress of the glass after at least 4 days. Turn off the tumbler and remove the lid. Select a couple of pieces of tumbled glass and hold them up to the light to evaluate their new physical characteristics. They should be much smoother and have a soft, cloudy quality to them.[7]
- The longer you weather the glass, the smoother it will become. As a result, overly refined sea glass won’t look as authentic.
-
6Rinse off the tumbled glass. The combination of moisture and grinding minerals will produce a watery mud inside the tumbler barrel that can alter the appearance of the glass. Transfer the glass pieces to a colander or mesh strainer and wash them over a bucket so you can inspect them properly.[8]
- Do not pour the muddy water down the drain. It will quickly re-solidify inside the pipes, clogging them and wreaking havoc on your plumbing.[9]
- To dispose of the liquid grit leftover from tumbling, take the bucket outside and dump it in the grass.
-
7Continue tumbling the glass until it achieves the desired appearance. If you’re satisfied with the look of your artificial sea glass, dry off the pieces and put them on display. If you’d prefer your glass to have a clearer, more polished look, load it back into the tumbler and run it for an additional day.[10]
- Natural sea glass is somewhat rough and murky, with a sort of “frosting” along the outer surface.
- Adding ½ a tablespoon (7.2 g) of TXP aluminum oxide to your final load can lend your tumbled glass a more brilliant, polished finish.[11]


Decorating with Sea Glass
-
1Make mesmerizing jewelry with large or small sea glass pieces. With its frosty color and unique shape, sea glass is the perfect “jewel” for a necklace, bracelet, earring, or ring. Drill holes in smaller pieces of glass to string together to make a bracelet, or use a larger glass piece as the focal point of a long necklace.
- If jewelry’s not your thing, try stringing pieces of sea glass together to make a keychain.
-
2Embellish a picture frame with sea glass. Your colorful tumbled glass can add a bit of beach pizazz to an ordinary picture frame. All you have to do is line a frame with craft glue, arrange the sea glass on the edge of the frame, and let it dry. Now you can display your beach vacation pictures in a beachy frame![12]
- No piece of sea glass is the same, meaning no crafted sea glass piece is the same.
- Embrace the odd angles and shapes of the sea glass by arranging them randomly on the frame—just make sure you leave enough window space to see the picture.
-
3Create a beachy centerpiece with your sea glass. Fill a glass container, bowl, or vase with sea glass, sea shells, and sea stars to add some beach decor to your living space. This is a beautiful centerpiece for a coffee or dining table and lets you display the treasures you’ve made and/or found.[13]
- Put pieces of sea glass of all shapes, sizes, and colors in the jar or container to add depth to your centerpiece.
-
4Place sea glass at the bottom of a vase of flowers. Cleaned sea glass can be the perfect addition to a flower bouquet. Simply set a handful of glass at the bottom of a glass vase, fill the vase with water, and then add your flowers. The sea glass works similarly to pebbles and gives your flower arrangement a bit of whimsy.
- Try matching the sea glass color to your flowers to tie everything together.
-
5Build a sea glass mosaic. Each piece of sea glass is unique, like a puzzle piece. Creating mosaics is a great way to use and display sea glass, as all you’ll need is a little imagination and glue. Arrange your sea glass in a shape, picture, or scene. Then, glue each piece in its corresponding place on a piece of paper, wood, or glass.[14]
- Try drawing or outlining your image first. This way, you can arrange the sea glass inside the picture before gluing.


Community Q&A
-
QuestionCan you use salt to make sea glass?
 wikiHow Staff EditorThis answer was written by one of our trained team of researchers who validated it for accuracy and comprehensiveness.
Staff AnswerwikiHow Staff EditorStaff AnswerNo, it's recommended to use a medium grit or ceramic pellets to tumble sea glass, as they will give the glass the polished, frosty appearance of natural sea glass. -
QuestionI would like my tumbled sea glass to be as close to the real thing as possible. Could I use coarse sand from the ocean floor and water from the ocean?wikiHow Staff EditorThis answer was written by one of our trained team of researchers who validated it for accuracy and comprehensiveness.
Staff AnswerwikiHow Staff EditorStaff AnswerCoarse sand from the ocean floor can be used in a rock tumbler, but it's not recommended as a grit substitute. The sand particles may not produce enough abrasion to smooth the glass, which can lead to inadequate results. -
QuestionWhat would be the average price of this not including the tumbler?wikiHow Staff EditorThis answer was written by one of our trained team of researchers who validated it for accuracy and comprehensiveness.
Staff AnswerwikiHow Staff EditorStaff AnswerDepending on the types of materials you buy for this project, making sea glass can cost anywhere between $50 and $100.
Warnings
- Occasionally, the tumbling process will produce glass pieces with sharp, jagged edges. Always be careful when unloading and rinsing the rough.⧼thumbs_response⧽
Things You'll Need
- Raw or landscaping glass
- Rock tumbler
- Coarse grit, silicone carbide grit, or ceramic media pellets
- Water
- Baking soda (optional)
- Colander or mesh strainer
- Large bucket
-Step-11.webp)


References
- ↑ https://rocktumbler.com/tips/rock-tumbler-instructions/
- ↑ https://rocktumbler.com/tips/rock-tumbler-instructions/
- ↑ https://www.youtube.com/watch?v=d7maNGrofFg&feature=youtu.be&t=68
- ↑ https://www.youtube.com/watch?v=d7maNGrofFg&feature=youtu.be&t=87
- ↑ https://www.youtube.com/watch?v=uPG7sH14IUs&feature=youtu.be&t=343
- ↑ https://rocktumbler.com/tips/tumbled-glass/
- ↑ https://rocktumbler.com/tips/tumbled-glass/
- ↑ https://www.youtube.com/watch?v=uPG7sH14IUs&feature=youtu.be&t=425
- ↑ https://rocktumbler.com/tips/rock-tumbler-instructions/
About This Article

To make sea glass, start by filling a rock tumbler two thirds of the way with raw glass pieces. Next, add 2 tablespoons of coarse grit, like silicon carbide or ceramic pellets, and fill the tumbler with cool water. Then, set the barrel in the electric tumbler base and let it run for 4-5 days. If the glass hasn't achieved the look you want after 4-5 days, let it run for another day in the tumbler. For tips on creating an ultra polished finish with TXP aluminum oxide, read on!


-Step-11.webp)