This article was co-authored by Christine George. Christine George is a Master Hairstylist, Colorist, and Owner of Luxe Parlour, a premier boutique salon based in the Los Angeles, California area. Christine has over 23 years of hair styling and coloring experience. She specializes in customized haircuts, premium color services, balayage expertise, classic highlights, and color correction. She received her cosmetology degree from the Newberry School of Beauty.
wikiHow marks an article as reader-approved once it receives enough positive feedback. This article received 12 testimonials and 100% of readers who voted found it helpful, earning it our reader-approved status.
This article has been viewed 737,529 times.
Making a strong, durable ballet bun is very easy, but it may take a little practice if you're unfamiliar with it. Go over these steps and try making a bun at home before you use it for class or a performance. Every ballerina will find this necessary.
Steps
Making Your Basic Ballet Bun
-
1Brush your hair free of tangles. Get your hair straight and even, brushing it straight back as if you were putting it into a ponytail. A little water can help smooth things out and make your hair more manageable, when the need arises.
-
2Pull your hair back into a ponytail, using a comb or brush to remove the bumps.[1] If necessary, spray the hair with a quick-drying hairspray. The best height is right on the crown of your head, so that you could just see the top of the ponytail poking up if you look in the mirror.[2]
- A tight ponytail ensures you have fewer wisps of hair coming free and keeps you from having to re-do your bun later. The ponytail should be tight, but not so tight that it causes tension and breakage.
Advertisement -
3Secure the ponytail with an elastic. It is important to have a strong foundation for your bun so it doesn't fall down. A small elastic will hold the hair in place while you craft your bun.[3] You can then spray a little hairspray onto the ponytail to give it a little extra hold.
-
4Twist the ponytail into a tight rope. A tight rope will lead to a more secure bun, but don’t make it so tight that it breaks your hair or hurts.
- Some ballerinas like to create their bun in 2 parts by splitting their hair in half to make twisting easier. If you do this, simply repeat the following steps for both halves.[4]
-
5Start to tightly wind the strand of hair around the ponytail holder. Follow the direction you twisted in for a neat, tight bun. If you twisted clockwise, wrap clockwise. You want to keep the rope of hair close to the ponytail holder. Use bobby pins to start securing everything down.
-
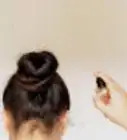
6Fasten the hair with bobby pins that match your hair color. Place pins at 12 o'clock, 3 o'clock, 6 o'clock, and 9 o'clock, if your bun was a clock face. Place extra pins in between these sections as well, especially if your hair is thick. If the first half of your bun feels a little shaky, put more bobby pins in if desired.
- Many ballerinas prefer the U-shaped pins, as they capture more hair and hold longer.
- Repeat these same steps for the second half of your ponytail, if necessary. If you do, make sure your twist and turn the second half the opposite way as the first.[5]
-
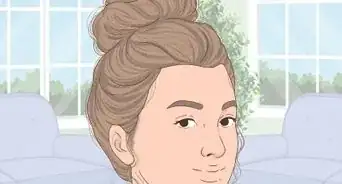
7Spray with hairspray if there are any wisps or frizzy hair. This also helps secure the bun, though it is not strictly necessary.
Improving the Fit and Hold
-
1Spritz your hair with some water before beginning. This can make the hair a bit easier to manage, and keep loose strands from flying off. Use water and a comb to really straighten out your hair, combing out any bumps or fly-away hairs causing problems. If you have thicker or unruly hair, a little gel may be helpful, too.[6]
-
2Add a little texturizing spray before "bunning" for a better hold. If you've recently washed your hair, and everything is silky smooth, you might try a texturizing spray to give the strands some hold. Like most up-dos, this look is a bit easier to pull off with "day old" hair. But, if you're fresh and clean, some texturizer should do the trick.[7]
-
3Use your other hand to curl the hair around your ponytail. With one hand around your tight coil of hair, use the other hand to keep to press and hold the bun around your ponytail as you wrap it. The curl between your thumb and first finger, for example, is a great tool to help mold a perfectly rounded bun.[8]
-
4Split the ponytail down the middle and build the bun in 2 parts. For girls with thinner hair, or for a more "classic" look, you just twist the entire ponytail. But for girls with thick or uneven length hair, or for a slightly more secure hold, you can go with the "2-part" method. Simply pull the ponytail in half, then twist and wrap both halves around the base of the ponytail for a "figure 8" bun.
- If you're doing the bun in 2 parts, simply repeat the exact same process for both parts. However, when you get to the wrapping and pinning, just make sure the 2 strands are wrapped in opposite directions (1 clockwise, 1 counter-clockwise).
-
5Cover your bun with a hair net that matches your hair color for extra security. If you have blonde hair, don't use the gray hair net because then your bun looks purple. If you're a brunette, don't use the blonde hair net because then you have a lighter bun than the rest of your hair.
Expert Q&A
Did you know you can get expert answers for this article?
Unlock expert answers by supporting wikiHow
-
QuestionHow do I put pins in the bun?
 Ashley AdamsAshley Adams is a Licensed Cosmetologist and Hair Stylist in Illinois. She completed her Cosmetology education at John Amico School of Hair Design in 2016.
Professional Hair StylistThe bobby pins shouldn't go in the bun. They should be placed at the bottom near the base of the ponytail. Simply insert the open part of the bobby pin through the section of the bun's base that you want to secure, and push it all the way through so that it isn't visible.
Support wikiHow by unlocking this expert answer.
-
QuestionI have a fringe. How can I secure it without clips or bobby pins?Ashley AdamsAshley Adams is a Licensed Cosmetologist and Hair Stylist in Illinois. She completed her Cosmetology education at John Amico School of Hair Design in 2016.
Professional Hair StylistA ballet bun can be worn with or without a fringe. The fringe can be worn freely without the use of bobby pins or hair clips. If you don't want to wear your fringe, you can slick it into your ponytail using water, hairspray, or gel, and then continue forming your bun.Support wikiHow by unlocking this expert answer.
-
QuestionWhy is a ballet bun important?
 Community AnswerTo keep the hair out of a dancer's face when they are dancing, and to make them look presentable.
Things You'll Need
- Heavy duty bobby pins or hairpins that match your hair
- Hair net that matches your hair color
- Regular bobby pins that match your hair color
- Hair spray
- Ponytail holders
- Hairbrush
- A mirror or some sort of reflective device
References
- ↑ Christine George. Master Hair Stylist & Colorist. Expert Interview. 10 January 2020.
- ↑ https://intothegloss.com/2015/09/how-to-do-a-ballet-bun/
- ↑ Christine George. Master Hair Stylist & Colorist. Expert Interview. 10 January 2020.
- ↑ http://www.bloch.com.au/blog/35-how-to-make-a-perfect-bun
- ↑ https://intothegloss.com/2015/09/how-to-do-a-ballet-bun/
- ↑ http://www.bloch.com.au/blog/35-how-to-make-a-perfect-bun
- ↑ https://intothegloss.com/2015/09/how-to-do-a-ballet-bun/
- ↑ http://www.bloch.com.au/blog/35-how-to-make-a-perfect-bun
About This Article

To make a ballet bun, start by brushing your hair and pulling it back into a smooth ponytail at the crown of your head. Then, secure the ponytail with an elastic and spray a little hairspray on it for extra hold. Next, twist your ponytail clockwise into a tight rope, then wind the rope clockwise around the ponytail holder. After that, put bobby pins that match the color of your hair all around the bun to keep it in place. For more tips from our Beauty reviewer, like how to make your ballet bun using the "2 part" method, read on!