wikiHow is a “wiki,” similar to Wikipedia, which means that many of our articles are co-written by multiple authors. To create this article, 25 people, some anonymous, worked to edit and improve it over time.
This article has been viewed 130,283 times.
Learn more...
Deadmau5 fans - can you not stand the fact that you don't have a Mau5head? You don't have to be a globe-trotting, Grammy-nominated sensation to look like everyone's favorite house artist! See Step 1 below to get started making your very own awesome Mau5head.
Steps
Making a Mau5head from Papier Mâché
-
1Inflate a beach ball. In this method, we'll use a beach ball as a sort of "mold" for our papier mâché Mau5head. If following the dimensions above, you will want a ball that's 14" in diameter when inflated. Inflate your ball so that it's nice and firm and make sure it's securely plugged - you don't want your ball to lose any air during the lengthy drying process.
- Note that a beach ball isn't absolutely necessary - any spherical object will work as long as it's rigid and about the right size.
-
2Coat the ball with papier mâché. Next, we'll create a rigid "shell" from papier mâché that will form the central spherical portion of our Mau5head. There are several different ways to make papier mâché. Any method that works for you is fine, though we are partial to wikiHow's own papier mâché recipe. Once you've made your liquid mixture, soak thin strips of torn newspaper in it, then lay them flat on the beach ball. Continue until your ball is completely coated (leaving a clear area around the air nozzle) and you cannot see its design through the paper. Let dry overnight.
- You will want a strong, rigid Mau5head, so it's generally a good idea to plan on laying down several layers of papier mâché. Some online methods recommend as many as nine layers.
Advertisement -
3Add more papier mâché as needed, then remove the beach ball. The initial papier mâché layers may not be as thick or rigid as you desire. If not, add more as you see fit. Each time you add additional layers, you'll want to let your Mau5head sit for another night. Finally, when your Mau5head is just how you want it, undo the beach ball's plug and allow it to deflate. Once it is deflated enough to fit through the hole, pull it out.
- Be careful when you pull the beach ball out, as it's likely that it's stuck to the inside of the mask. Be gentle to avoid tearing.
-
4Cut a hole for your head. Next, you'll want to enlarge the hole that you left for the beach ball's plug so that you can get your head into the mask. As you work, make small, conservative cuts and test the size of the opening frequently - it's always possible to cut more, but not to undo cuts you've already made.
- Obviously, everyone's head is a different size. While a circular hole of about 7-8" (17.78-20.32 cm) in diameter will fit most people, you may find that your hole needs to be bigger or smaller.
-
5Cut a mouth hole. What good is a Mau5head without an enormous, creepy grin? Use a pen or pencil to draw an outline for your Deadmau5 - you'll want your mouth to be about 50 degrees wide with the top edge roughly horizontal and the corners of the mouth reaching to the sides of the mask. In other words, the corners of the mouth should align on a 180 degree angle. Use a knife to start a cut in the middle of the area of where your mouth will be. Then, use scissors to carefully cut along your lines until your mouth is completely cut out.
-
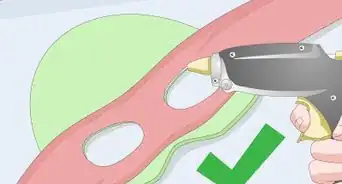
6Cut two cardboard circles (with tabs) for your ears. Deadmau5 has big, circular ears - about 13" (33.02 cm) in diameter. To replicate these, cut two equally-sized circles from a cardboard box, leaving a small "tab" of material on each ear to fit into slots you'll cut to hold the ears in place. Your ears don't have to be exactly the same size as the ones on the real Mau5head - anything from 12-15" (30.48-38.1 cm) should be fine.
-
7Fit the ears into slits on the head. Next, use a knife to cut small, thin slits in the top of your mask's head. These slits should be just wide enough to accommodate the "tabs" on your cardboard ears. Your slits should be angled toward the back of the head at an angle of about 15 degrees and the tops of the slits should be about 3.5" (8.89 cm) apart. Insert the ears' tabs into these slits and secure with plenty of tape and/or glue.
-
8Finally, papier mâché the ears to the head. Add thin layers of papier mâché to cover the ears, taking special care to add plenty around the ears' tabs to secure them in place. You may even want to add papier mâché around the tab inside the mask as well. Allow to dry overnight.
-
9Cut a Styrofoam ball in half. Small styrofoam balls, which can be found at most craft stores, are a perfect low-cost solution for making Deadmau5's eyes. You'll want a styrofoam ball about 4.5" (11.43 cm) in diameter. Cut your sphere in half as precisely as possible. Use a knife, rather than scissors.
-
10Optionally, tape colored lights to the back of your styrofoam eyes. If you're feeling really artsy, you can tape electric lights to the rear "flat" portion of each eye for an awesome effect in low-light conditions. You may even want to carve a notch in each eye so that your lights can be embedded within the eyes themselves. When done, your light it should shine through the styrofoam, making the whole eye appear to light up.
-
11Glue your eyes to the head. The bulging eyes on the Mau5head should sit about 2" (5.08 cm) above mouth and 5" (12.7 cm) apart from each other. If you're not using colored lights for the eyes, you can attach your eyes directly onto the head. If you are using colored lights, you may need to make small holes in the head to accommodate the lights' wires. Tape or glue your eyes in place.
- If using colored lights, feed any wire(s) through two small holes beneath the eyes. If your lights are switch-activated, make sure you have easy access to the switch. For instance, when you wear the Mau5head, you may want to snake the wire down the back of your shirt and into your pocket so you can activate the switch inconspicuously.
-
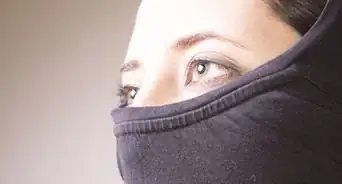
12Use a thin mesh to cover the inside of the mouth opening. Stretch a thin fabric mesh (think panty hose material) across the inside of the mouth to form the Mau5head's "teeth". Either hot glue or tape it from the inside to secure it in place. If the mesh you use isn't already white, paint it a whitish color.
- You want as thin and tight of mesh as possible, as you'll look through the mesh to see where you're going when you wear the mask!
-
13Trial-fit the mask. Once every part of your mask is in place, put on your mask to make sure it's comfy. Now is your chance to make any last-minute adjustments to make your mask look or feel better.
- You may want to ask someone if s/he can see your face. If you get a "not really", "kinda", or "no", then you're probably fine. If not, you may want to paint your mesh more thickly or get another layer of see-through fabric to place behind it. Use caution, however - it's more important that you're able to see than it is that your face is hidden
-
14Paint and decorate your mask to your liking. Congratulations, you Mau5head is done! All that's left now is to decorate the outside exactly how you want to. You may want to look up some of the different masks Deadmau5 has actually used over the years for inspiration. When all else fails, a single, bright color (like candy apple red) always looks great.


Making Use of Alternate Materials
-
1Use fabric, rather than paint. If you're a decent tailor, fabric may be a better choice for the outside of your Mau5head than paint. Fabric is strong, durable, and looks great. Even better, though, is the fact that fabric coverings are interchangeable, allowing you to rock several different Deadmau5 looks without having to re-paint your mask!
-
2Use a lamp globe, rather than a papier mâché sphere. If you're pressed for time, waiting several days for a papier mâché mask to dry can be a non-starter. If you can get your hands on one, you may want to instead use a thin yet sturdy plastic lamp globe as the central "head" portion of your mask. Acrylic plastic lamp globes work well. Obviously, you'll want one roughly the same size as the mask above (14" (35.56 cm) in diameter)). Lamp globes are often available from specialty home furnishers and at some department stores.
- Bonus points if it already includes a hole at the bottom that's big enough for your head!
-
3Mount a bike helmet or hard hat inside the mask for added comfort. Finally, you may find that your Mau5head is more comfortable if you secure a sturdy piece of headgear to the inside of the mask so that you can comfortably "wear" the mask on your head. You can do this with superglue (or, if you're worried about damage to your headgear, lots of tape).
- Heavy pieces of headgear, like hard hats, can put stress on the mask when you're not wearing it. Make sure your mask is strong and rigid enough to support the weight of any headgear you install inside it to keep your mask from imploding!


Warnings
- Don't glue your fingers together⧼thumbs_response⧽
- Hot glue hurts.⧼thumbs_response⧽
- Scissors hurt⧼thumbs_response⧽
- Knives hurt.⧼thumbs_response⧽
Things You'll Need
- Cardboard box - needs at least one face of approximately 15" x 15" or bigger.
- Beach Ball
- LOTS of old newspaper
- Styrofoam sphere - 5 inches diameter
- Colored party lights - ideally, battery-powered ones that can be turned on via switch
- Scissors and a sharp knife
- Glue, flour, or corn starch for papier mâché
- Paint (colors of your choosing)
- Fabric (material and colors of your choosing)
- Mesh (white mesh or a different-colored mesh with painted white)
-
Dimensions for the head. Approximate measurements for each part of the head are below.[1]
[2]
Obviously, feel free to make adjustments as necessary based on the size of your own head!
- Central sphere: 14" (35.56 cm) in diameter. Two slots cut for ears.
- Eyes: Halves of 4.5" (11.43 cm) diameter sphere. Spaced 5" (12.7 cm) apart and 2" (5.08 cm) above mouth.
- Ears: Flat, round, rigid, slightly oblong. About 13" (33.02 cm) across and 13" from bases to tips when seated in head slots. Spaced 3.5" (8.89 cm) apart. Stand about 15 degrees back from the vertical.
- Mouth: 50 degree "wedge" cut into central sphere. Top edge of mouth aligned with horizontal. Edges of mouth touch center of sphere when viewed from side.
References
About This Article
To make a Deadmau5 head, start by buying a plastic lamp globe from a department store with a hole in the bottom for your head. Then, cut 2 circular ears out of cardboard and glue them pointing slightly backwards onto your globe. For the eyes, cut a styrofoam ball in half and glue both halves to the front of the lamp globe. Additionally, decorate your head by painting it an apple red color, or look up previous Deadmau5 designs online for inspiration. To find out how to make a Deadmau5 head out of paper mache, read on!