This article was co-authored by wikiHow Staff. Our trained team of editors and researchers validate articles for accuracy and comprehensiveness. wikiHow's Content Management Team carefully monitors the work from our editorial staff to ensure that each article is backed by trusted research and meets our high quality standards.
This article has been viewed 215,227 times.
Learn more...
Belly dancing looks enchanting enough on its own, but if you want to make your performance look even more magical, consider making a full belly dance skirt instead. The process is easy, and once you get the hang of it, you can modify the pattern to create additional seams or slits. You can even make multiple skirts to layer over one another!
Steps
Drafting the Pattern
-
1Divide your hip measurement by 6.28 to get measurement A. Your skirt panel template will look like a quarter circle with an arc cut from the tip. To get the size of this arc, you need to measure the fullest part of your hips, then divide that by 6.28. For example:
- Hips = 36 inches (91 cm)
- 36 / 6.26 = 5.73
- Measurement A = 5.73 inches (14.6 cm)
-
2Add your desired skirt length to measurement A to get measurement B. This will give you the total length of the quarter circle, including the cut-out arc. Find the fullest part of your hips, then measure down to wherever you want the skirt to end. Add that to measurement A. For example:
- Measurement A = 5.73 inches (14.6 cm)
- Desired skirt length = 35 inches (89 cm)
- 5.73 + 35 = 40.73
- Measurement B = 40.73 inches (103.5 cm)
Advertisement -
3Construct a set of string-and-pencil compasses based on these lengths. Tie a piece of string to a pencil, then cut it to match measurement A (i.e.:5.73 inches (14.6 cm)). Tie another piece of string to another pencil, and cut that to match measurement B (i.e.: 40.73 inches (103.5 cm)).
- You can also use a pen instead of a pencil.
-
4Use the compasses to draw a quarter circle on a large piece of paper. Take your measurement A compass and hold the end of the string against the bottom-left corner of the paper. Pull the string taut, then use the pencil to draw an arc, from the left side edge down to the bottom. Repeat this process with the measurement B compass.
- For the second compass, make sure that you hold the end of the string against the bottom-left corner as well. The arc will end up close to the top-right corner.
- Any type of paper will work for this. Newspaper is a great option because it comes in large sheets.
-
5Cut the template out. You will eventually be placing this template against a folded sheet of fabric, then cutting the fabric to create a semi-circle. Don't worry about seam allowances just yet, however.


Cutting the Fabric
-
1Buy a lightweight material that has a nice flow. One of the most enchanting parts of belly dancing is how fluid-like the costumes are. Using the right sort of fabric is a must. Chiffon is a great choice here, but you can also use lightweight cotton, tissue lamé, or charmeuse. Don't use heavy satin, velvet, or brocade, however; they won't flow when you dance.[1]
- Plan on buying between 3.3 and 5 yards (3.0 and 4.6 m) of 60 in (150 cm) wide fabric.
-
2Fold the fabric in half and align the template with the folded edge. One of the straight edges on your template should be touching the folded edge of the fabric. The other straight edge be touching the fabric's side edge (selvage).
- Secure the template to the fabric with sewing pins.
- If you want to, you can trace around the template, then set the template aside.
-
3Cut the fabric out adding 1⁄2 in (1.3 cm) seam allowances to all edges. This includes the straight edge touching the selvage as well as both curved edges. You will eventually create a 1⁄4 in (0.64 cm) bottom hem. If you aren't comfortable working that small, use a 1 in (2.5 cm) seam allowance for the longer, outside curved edge and both of the straight edges.
-
4Repeat the process to cut a second panel. Instead of pinning and cutting the template again, you can use the fabric you already cut out as a new template. This way, you won't have to add new seam allowances; you can rest assured that they are consistent.
- If you use the template again, there's a small chance that the seam allowances on the second piece won't be the same.
-
5Add 4 inches (10 cm) to your hip measurement for the casing's length. This will give the casing enough room to stretch with the elastic as you pull it on and off. It also includes seam allowances. For example, if your hips are 36 inches (91 cm):
- 36 + 4 = 40
- 40 inches (100 cm) = strip length
-
6Double the width of your elastic, then add 1 inch (2.5 cm) for the width. This will give you enough material to fold the casing in half and sew it to the skirt. Choose a non-roll elastic that's between 3⁄4 and 1 inch (1.9 and 2.5 cm), then multiply it by 2. Add 1 inch (2.5 cm) for seam allowances. For example, if your elastic is 1 inch (2.5 cm) wide:
- 1 inch (2.5 cm) x 2 = 2 inches (5.1 cm)
- 2 + 1 = 3
- 3 inches (7.6 cm) = strip width
-
7Cut a strip out of matching fabric according to your measurements. It would be easier if you just cut this out of a single layer of fabric. If you folded the fabric in half, then you'll have to halve one of your measurements.


Assembling the Skirt
-
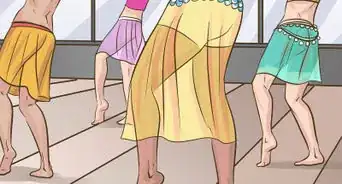
1Sew the semicircles using 1⁄2 in (1.3 cm) seam allowances. Pin the semicircles together with the right sides facing in, then sew along 1 or both of the straight edges using a 1⁄2 in (1.3 cm) seam allowance. This will give you 1 or 2 side seams.[2]
- Reverse the sewing machine when you start and finish sewing. This is known as backstitching.
- Use a straight stitch for woven materials, and a zigzag stitch for knit materials.
- Most dancers like to sew just 1 side seam on their skirts, leaving the other side seam as a slit.
-
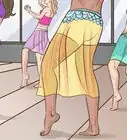
2Hem the slit, if you added it. Turn the skirt so that the wrong side is facing you. Fold both of the remaining straight edges down by 1⁄4 inch (0.64 cm), then press them with an iron. Fold them by another 1⁄4 inch (0.64 cm) and press them again. Sew the hems down as close to the inside, folded edge of the hem as possible. Remember to backstitch when you start and finish sewing.
- Use a heat setting that is appropriate for the fabric that you are working with. Most irons have labels.
- If you used 1 in (2.5 cm) seam allowances for the straight edges, then fold and press them by 1⁄2 inch (1.3 cm) both times instead.
- If you sewed side seams, consider pressing them open with your iron instead. This will give you a nicer finish.
- Pressing the hem with an iron helps smooth out the fabric so it's easier to sew.
-
3Pin the right side of the casing to the wrong side of the skirt's inner arc. Spread the skirt out on a flat surface with the wrong side facing up. Place the casing on top, right-side-down, and pin it to the small, inside arc of the semicircle.
- The end of the casing should be aligned with a slit on your skirt. If you did not leave a slit, then align it with a side seam instead.
- You're pinning the top edge of the casing to the curved edge of the arc. Leave the straight, side edges alone.
- Insert the pins perpendicular to the curved edge. Keep them about 1 inch (2.5 cm) apart.
-
4Sew the casing to the skirt using a 1⁄2 in (1.3 cm) seam allowance. Use a straight stitch if your fabric is made from a woven material, like cotton or chiffon. If your fabric is stretchy or made from a knit material, use a zigzag stitch instead.
- Remember to backstitch and to remove the pins as you sew. If you sew over them, you risk breaking your needle or bending the pins.
-
5Flip the skirt over, then fold and press the casing by 1⁄2 inch (1.3 cm). Turn the skirt so that the right side is facing you. Since you sewed the casing right-side-down, the wrong side of the casing should be visible at this point. Fold the top edge of the casing down by 1⁄2 inch (1.3 cm) and press it flat with an iron.
-
6Fold the casing down to meet the seam, then sew it. How far down you fold the casing will vary each time, but it should be between 3⁄4 and 1 inch (1.9 and 2.5 cm). It's more important that the top, folded edge of the casing aligns with the seam between the waistband and the skirt. Once you have the casing folded, secure it with pins, then sew it as close to the seam as possible, about 1⁄8 inch (0.32 cm).
- If you won't be wearing a belt with this, you should use a straight stitch for both woven and knit fabrics. The skirt will still stretch, regardless.
-
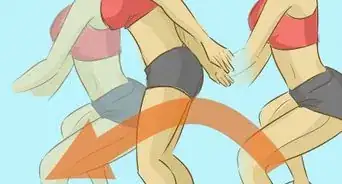
7Cut your elastic so that it fits snugly around your waist. Take your 3⁄4 to 1 in (1.9 to 2.5 cm) non-roll elastic and wrap it around your waist until you get a snug fit. Add 1 inch (2.5 cm), then cut the elastic.
- How tight you make the elastic is up to you.
-
8Insert the elastic, then overlap and sew the ends. Clip a safety pin or bobbin to the end of your elastic, then use it to guide it through your skirt's casing. Remove the safety pin or bobbin, overlap the ends by 1 inch (2.5 cm), then sew across them 3 to 4 times.
- You can use a zigzag stitch or a straight stitch but match sure that you sew across the elastic from top-edge to bottom-edge.
-
9Tuck the ends of the casing onto each other, then sew down them. For a nicer finish, fold 1 end of the casing in by 1⁄4 inch (0.64 cm), then press it flat with an iron. Tuck the other end of the casing into it, pin it in place, then sew across the seam 3 to 4 times.
- You can use a straight stitch or a zig zag stitch, but a straight stitch will look nicer.


Finishing the Hem
-
1Hang the skirt for 1 to 2 months so that the fabric can stretch. This is very important. If you don't do this, and hem the skirt first, you'll get an uneven hem. The only instance where you don't have to hang the fabric is if you are working with 1 of the following materials:[3]
- Foils
- Most knits
- Nylon tricot
- Tissue lamé
-
2Trim the hem of the skirt. Fabric can do weird and unpredictable things as it stretches, so don't be alarmed if the hem looks uneven. Hang the skirt up at a height that's convenient for you to work on, then measure it from the waistband down to where you want it to end. Insert a sewing pin, then work your way around the hem. Once you have the hem mapped out, trim the excess fabric off.
- If the hem did not change, then you are good to go.
-
3Fold and press the hem twice by 1⁄4 inch (0.64 cm). Fold and pin the hem towards the wrong side of the fabric by 1⁄4 inch (0.64 cm). Press the fabric with an iron using a heat setting that is appropriate for the fabric. Remove the pins, then fold, pin, and press the fabric by another 1⁄4 inch (0.64 cm). You don't need to add the pins back, since the ironing should keep the fabric down.[4]
- If you added a 1 in (2.5 cm) seam allowance in the beginning, then fold and press the hem by 1⁄2 inch (1.3 cm) both times instead.
- Consider sewing around the hem using a 1⁄4 in (0.64 cm) seam allowance first, then use this as a folding guide. Use a 1⁄2 in (1.3 cm) allowance for a wider hem.
-
4Sew the hem down as close as possible to the inside folded edge. If you don't plan on adding a trim to your skirt, then a straight stitch will look the nicest regardless of the type of fabric you used. Otherwise, you should use a zigzag stitch for knit fabrics.[5]
- Remember to backstitch when you start and finish sewing so that your stitching doesn't come undone.
-
5Add a trim to the bottom edge, if desired. If you left a slit on your skirt, then you could even add a trim to the hemmed edges as well. The width of the trim is up to you, but it should be wide enough to cover the stitching on the hem. Something that's at least 1⁄2 inch (1.3 cm) wide would work well. You can sew the trim down on a sewing machine or tack it down by hand.[6]
- Sequin, braided, and beaded trims are quite popular.


Community Q&A
-
QuestionIf I don't have a sewing machine, what else can I use?
 KristiknaCommunity AnswerYou can hand sew with a needle and thread, but it will take longer, and the stitches won't be as even.
 -
QuestionCan I make it fringed?
 Buggylu25Top AnswererFeel free to experiment with different embellishments, fabrics, etc. It's all about personal preference, imagination and inspiration.
Things You'll Need
- Lightweight fabric
- Matching thread
- Sewing machine
- Sewing pins
- Fabric scissors
- Regular scissors
- Paper
- Measuring tape
- Tailor's chalk or pen
- String
- 3⁄4 to 1 in (1.9 to 2.5 cm) non-roll elastic
You Might Also Like
This is a modal window.

-Step-19-Version-2.webp)
This is a modal window.
This is a modal window.


References
- ↑ http://www.shira.net/costuming/skirt-circle.htm
- ↑ http://www.shira.net/costuming/skirt-circle.htm
- ↑ http://www.shira.net/costuming/skirt-circle.htm
- ↑ http://www.shira.net/costuming/sewing/hem.htm
- ↑ http://www.shira.net/costuming/sewing/hem.htm
- ↑ http://www.shira.net/costuming/skirt-circle.htm
- ↑ http://www.shira.net/costuming/skirt-circle.htm
- ↑ http://www.shira.net/costuming/skirt-circle.htm
About This Article