This article was co-authored by wikiHow Staff. Our trained team of editors and researchers validate articles for accuracy and comprehensiveness. wikiHow's Content Management Team carefully monitors the work from our editorial staff to ensure that each article is backed by trusted research and meets our high quality standards.
wikiHow marks an article as reader-approved once it receives enough positive feedback. In this case, 93% of readers who voted found the article helpful, earning it our reader-approved status.
This article has been viewed 117,478 times.
Learn more...
Memory wire bracelets are a great way to mimic multiple bangles without all the hassle. It is a special wire that curves in on itself into coils, like a spring. When beaded and worn, it will look like several stacked bracelets instead of one. They are quite simple to make. Once you know the basics of making one, you can make more complex braided ones. You don't even have to use beads anymore; a braided leather cord can make a chic, rustic bracelet as well!
Steps
Making a Basic Bracelet
-
1Measure out at least three coils of memory wire, add 1 inch (2.54 centimeters), and cut it using a pair of wire cutters. Do not use your good, jewelry wire cutters; they are much too delicate. Use pair of heavy duty ones instead. Memory wire is hard, and it can easily dull a good pair of wire cutters.[1]
-
2Use your round-nose plies to make a small loop at one end of the wire. Pinch the end of your wire with a pair of round-nose pliers. Twist the wire around the top of the pliers to form a loop, then pull the pliers out. Use the plies to squeeze the loop smaller, if needed. This will hold the beads in place and prevent them from sliding off the end of the wire.Advertisement
-
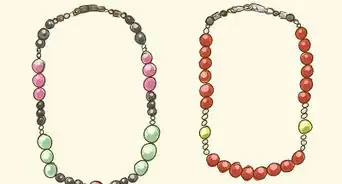
3Thread your beads onto the wire, leaving a ½ inch (1.27 centimeter) tail. You can use different shapes, sizes, and colors of beads, or just one type for something simple. You can even use a different type of bead on each coil.
- Don't cover the entire wire with beads. Leave a ½ inch (1.27 centimeters) tail at the end..
- Small beads, such as bicorns and seed beads work great for memory wire bracelets. Avoid using any large, chunky beads, especially towards the end, as they might slide past the loops.
-
4Fold the tail end of the wire into another loop. Pinch the end of the wire with your round-nose pliers, and wrap the wire around it to form a loop. Pull the pliers out, and use them to pinch the loop smaller, if necessary.
-
5Consider adding a charm using a jump ring. Use a pair of needle-nose pliers to pull apart a jump ring. Slip a charm onto the jump ring, then place the ring where you want it on the bracelet. Use the needle-nose pliers to close the ring. Great places to put charms include at either end of the bracelet, or in the middle between two beads.
-
6Finished.


Making a Braided Bracelet
-
1Cut 9 coils of memory wire. You will end up with 9 rings made out of memory wire. You can have the ends of the rings overlap a little if you'd like extra space on your bracelet.[2] Do not use your good, jewelry wire cutters for this, or they may get ruined. Use a sturdy pair of hardware pliers instead.
- For a thicker bracelet, cut 12 coils.
-
2Use a pair of round-nose pliers to make a small loop at one end of each piece of memory wire. Pinch the end of a piece of wire with the round-nose pliers. Wrap the wire over the top of the pliers to form a loop. Pull the pliers out, then pinch the loop smaller if it is too big.[3]
- Do not make a loop on both ends of the wire pieces or you won't be able to get the beads on.
-
3String your beads onto the wires, leaving a ½ inch (1.27 centimeters) tail of bare wire. The best beads to use are seed beads, but you can add some larger, bicone beads in various places for a more interesting design. Do not cover the entire wire with beads; you need that gap at the end so that you can "close" the wire.
-
4Use your round-nose pliers to make another loop at the end of each piece of beaded memory wire. This will close the wire and prevent the beads from falling off. Once you are done with all of the pieces, set them aside.
-
5Cut two 2-inch (5.08 centimeters) pieces of regular, 20-gauge beading wire. You will be using these to hold your beaded memory wire strands together.
-
6Make a small loop at the top of each piece of beading wire. The loop should be fairly small, but big enough so that the doesn't slip through the end loops on your beaded memory wire coils.
-
7String the memory wires onto one of the short beading wires. You can separate the memory wire coils with a seed bead or a spacer bead, if you'd like something fancier. Make sure that all of the memory wires are coiled in the same direction.
-
8Close the bottom of the short wire with a loop. Once you have gotten all of the memory wire coils onto the short wire, use a pair of wire cutters to trim it down to ½ inch (1.27 centimeters). Use the round-nose plies to fold the end of the short wire into a small loop. This will hold your memory wire strands together.
-
9Braid the memory wires. Separate the wires into three groups. If you used 9 coils, each group should have 3 strands. If you used 12 coils, each group should have 4 strands. Loosely braid the strands together.
-
10Slip the remaining short wire through the end loops on the beaded memory wire strands, and close it with a loop.[4] If you used seed beads or spacer beads on the first short wire, remember to use them here too. Your bracelet is now complete and ready to wear!


Making a Leather Cord Bracelet
-
1Cut 3 coils of some memory wire.[5] Get some memory wire, and measure out three coils. Cut them using a pair of wire cutters. Try to use the heavy duty kind, and not your good jewelry wire cutters. Memory wire is strong, and can easily dull a good pair of wire cutters.
-
2Cut 18 inches (45.72 centimeters) of braided leather cord. You must use braided leather cord. Regular leather cord won't work because it doesn't have any room inside for the wire.[6]
- The recommended size is 6mm. If you can't get cord in that size, use the next closest one you can find.
-
3Wrap tape around the ends of the cord to prevent it from fraying. Do not tape over the ends, or you won't be able to feed the fire through it. Try to use a narrow piece of tape; cut it in half lengthwise if needed. You will be leaving the tape on the cord. If it is too wide, it will peak out from under the caps.[7]
-
4Feed the wire through the cord. Some cords have rubber tubing inside. If your cord has rubber tubing, simply thread the wire through it. You may have to use a pair of pliers to pull the wire through the cord at the end.
-
5Trim the wire back from both ends of the coil, so that you have 2¾ coils. This will make it easier to slip the end caps on. To trim the wire, push the cord down a little, the cut the wire using a pair of wire cutters. Repeat this step for the other end of the coil as well.
-
6Glue an end cap or cord cap onto each end of the cord. Place a few drops of super glue into the cup part of the cap, then push the cap onto the end of the cord. You will need to twist the cap in order to get it all the way on. Repeat for the other end of the bracelet.
- The tape should be covered completely by the cap, so you should not have to remove it.
- The recommended size is 6mm. If you are using a different sized cord, however, then make sure that you get caps that match that cord. For example, if your cord is 4mm, then get 4mm caps.
- If you'd like to add charms to your caps, get the kind that have loops on the end.
- You can use any color your want, but silver will look best with black leather; brass will look best with brown leather.
-
7Wait 30 minutes for the glue to dry, then add some charms, if desired. Open up a jump ring, then slip a charm into it. Poke one of the ends of the jump ring through the loop at the end of an end cap, then close it.[8]
- If you'd want a simpler bracelet, you can skip this step.
-
8Let the glue dry completely before wearing the bracelet. This may take up to 24 hours. Once the glue has dried, your bracelet is ready to wear.


Community Q&A
-
QuestionHow do I make a friendship bracelet with simple materials that I don't have to buy or at least that are not too expensive?
 Community AnswerOne simple and inexpensive friendship bracelet is formed by choosing 3 complementary colors of 6-ply embroidery floss, enough for several bracelets. Cut 48 inch lengths, fold in half, cut the fold and knot that end. Using 2 strands, pick any combination of colors and braid your bracelet until it is 10- 12 inches long. Use 3 and 3 strands to tie the knot at a comfortable length. Every inch or so, add a random bead.
Warnings
- Do not use jewelry wire cutters to cut memory wire. They are too delicate and will become warped. Use heavy duty wire cutters from the hardware store instead.⧼thumbs_response⧽
Things You'll Need
=== Making a Basic Bracelet ===
- Memory wire, bracelet size
- Beads
- Round-nose pliers
- Wire cutters (heavy-duty, not jewelry)
- Charms (optional)
- 4-mm jump rings (optional)
- Needle-nose pliers (optional)
Making a Leather Cord Bracelet
- Memory wire, bracelet size
- 6mm braided cord, 18 inches (45.72 centimeters)
- Wire cutters (heavy-duty, not jewelry)
- Scissors
- Tape
- 2 6mm end caps/cord ends (get ones with loops if you want to add charms)
- Super glue
- 2 Charms (optional)
- 2 4-mm jump rings (optional)
- Needle-nose pliers (optional)
Making a Braided Bracelet
- Memory wire, bracelet size
- 20 gauge beading wire
- Beads
- Round-nose pliers
- Wire cutters (heavy-duty, not jewelry)
- Seed beads


References
- ↑ http://runningwithsisters.com/make-a-memory-wire-bracelet/
- ↑ http://www.bellaonline.com/articles/art68212.asp
- ↑ http://www.bellaonline.com/articles/art68212.asp
- ↑ http://www.bellaonline.com/articles/art68212.asp
- ↑ http://happyhourprojects.com/diy-leather-bracelets/
- ↑ http://happyhourprojects.com/diy-leather-bracelets/
- ↑ https://www.beadaholique.com/dancing-ladybug-bracelet.html
- ↑ https://www.beadaholique.com/dancing-ladybug-bracelet.html
About This Article

To make a memory wire bracelet, start by using heavy duty wire cutters to cut 3 coils of wire that are 1 inch longer than the size of your wrist. Then, use round-nose pliers to make a small loop at one end of the wire to hold the beads in place. Next, thread a variety of beads that are different shapes, sizes, and colors onto the wire, leaving a ½-inch tail. Alternatively, you can make a simple bracelet by using just one type of bead. Once you have the beads in place, use round-nose pliers to make a small loop at the other end of the wire to finish your bracelet. To learn how to make a braided memory wire bracelet, scroll down!