wikiHow is a “wiki,” similar to Wikipedia, which means that many of our articles are co-written by multiple authors. To create this article, 9 people, some anonymous, worked to edit and improve it over time.
There are 9 references cited in this article, which can be found at the bottom of the page.
The wikiHow Video Team also followed the article's instructions and verified that they work.
This article has been viewed 42,279 times.
Learn more...
With various methods, you can use paper to make almost anything, including a dagger. You can employ origami techniques to fold a dagger. You can cut out the shape and glue the pieces together to form a three-dimensional object, or you can make paper into pulp to use as clay to form your dagger.
Steps
Making a Folded Paper Dagger
-
1Use a square sheet of paper. It shouldn't be too stiff because it needs to fold easily. Also, if you are new to folding origami, you should start with a larger piece of paper.
-
2Begin with backside of the paper facing up. The pretty side of the paper should be facing the table. It doesn't matter if you're using a plain sheet of paper, though a two-sided sheet can make the folds easier to see. Also, begin with the paper making a square in front of you, not turned like a diamond.[1]Advertisement
-
3Fold the top half of the paper down. Match the top corners with the bottom corners, and then make a crease in the middle. Unfold the paper again.[2]
-
4Fold the left half of the paper to the right half. Match up the left side corners with the right side corners. Make a crease down the center. Unfold again.[3]
- At this point, the paper should be the same size you started with but with creases down the middle going horizontally and vertically.
-
5Turn the paper over. The pretty side should now be facing up.[4]
-
6Fold the paper diagonally in half. Fold it down from the top left corner to the bottom right corner, matching up the sides. Create a diagonal crease. Unfold it.[5]
-
7Fold the paper diagonally the opposite way. Fold the paper from the bottom left corner up to the upper right corner, creasing along the diagonal again. Unfold it.[6]
- At this point, you should still have the original square but with vertical and horizontal folds on one side and diagonal folds on the other.
-
8Turn the paper. Turn the paper 45 degrees so that one of the points is facing up. You should have a diamond facing you now.[7]
-
9Fold in the two side corners. Fold in each side of the diamond until the outside corner is touching the center of the diamond. Crease them, and keep them folded.[8]
- You now have a small square in the center with a triangle on the top and bottom.
-
10Flip the paper over. The backside should be facing up now.[9]
-
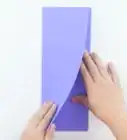
11Fold in each side to the center. Make a vertical crease that pulls each side into to the center line. You're making the whole shape skinnier.[10]
- The points of the side triangles should flip around as you fold in the sides.
-
12Fold in the points to the center. The points that flipped around with the fold should be sticking out. Fold them into the center point, creasing along the side.[11]
- You should now have four diamonds surrounded by triangles pointing inward.
-
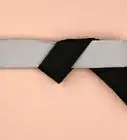
13Fold the second to last diamond in half horizontally. Tuck the bottom under the top rather than the other way around, called a mountain fold.[12]
-
14Create a valley fold going the other way. Pull out the bottom half, and halfway between the crease you made in the last step and the bottom of the same diamond, fold the paper the other way. You are creating what's called a valley fold. You are essentially making a small tuck in the paper.[13]
-
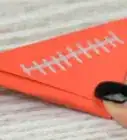
15Create the handle. For the handle, you make a squash fold.[14] You'll make valley folds from where you tucked the paper down to the bottom of the paper. Next, make small mountain folds that run diagonal from the side tips of the small diamonds at the tuck to the outer edges; these should only be as long as the bottom tip of the small diamond created by the tuck. You'll also be unfolding part of the tuck. Pull in the sides of the handle along the valley folds, using the mountain folds as a guide to flatten out part of the tuck. Flatten the creases. You should have a passable handle now.[15] ,[16]
-
16Create a squared-off bottom edge. Fold up the small triangle at the bottom of the handle to create a straight edge.[17]
-
17Make another tuck. Above the handle, you should see a small diamond. Create a mountain fold at the top of the diamond horizontally and a valley fold horizontally at the middle. You are making another layer above the handle through folding, so the bottom of the fold should line up with the top of the handle. Crease the fold.[18]
-
18Use another squash fold to create the blade. Fold vertical valley folds along the blade that line up with the handle. Create small diagonal mountain folds at the bottom corners of the blade that fold down the corners. Folding in the valley folds to meet in the middle, flatten out the triangles at the bottom as part of the crossguard of the dagger.[19]
-
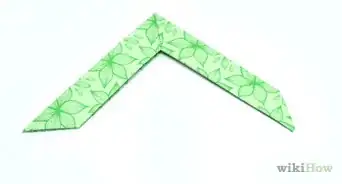
19Turn it over. The dagger is done.[20]

Making a Glued Paper Dagger
-
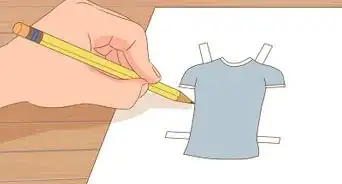
1Draw a dagger on a piece of thick paper or cardstock. Use a ruler and pictures of daggers to help you. Make it one continuous piece, and don't make it too thin, as the cut-out pieces will be difficult to line up.
-
2Cut out the dagger. Use scissors or a craft knife to cut out the dagger you created.
-
3Trace the design. Use the dagger as a template, tracing it onto other sheets of paper. You'll need at least ten sheets, though you may want more for a sturdier design.
- To make this process simpler, you can simply print out the same design of a dagger over and over.
- You can use whatever kind of paper you want for this project, though medium weight is probably best. You can even make a dagger out of book pages.
-
4Cut out the dagger. Cut out each dagger with scissors or a craft knife.
-
5Glue the daggers together. Align each dagger, and use paper glue to glue them together. Make sure to smooth out each layer so you don't get wrinkles. Add as many layers as you want until you get your desired thickness and sturdiness.
-
6Trim the dagger. Trim up any edges that are sticking out from the dagger.
-
7Press the dagger. Place the dagger between two parchment paper sheets, and put it under something heavy. Leave it to dry overnight.
-
8Add details. For instance, you could add layers to the crossguard to make it more pronounced or shapes to the handle to make jewels.
-
9Paint the dagger. Paint the dagger so it looks real. You can add scroll work to the handles and paint the jewels in various colors.
Making a Papier-Mâché Pulp Dagger
-
1Tear paper into pieces. You can use construction paper or scrap paper, such as newspaper, for this process.[21]
-
2Fill a bowl or bucket up partway with the paper scraps. Add water to the top. Leave them overnight to absorb water.
- For a quicker method, pour boiling water over the paper scraps. Leave it alone until the water cools down.
-
3Use a blender or electric mixer on the paper. Blend the paper until it is liquid.
-
4Remove excess water. Use your hands to squeeze out the water from the pulp.
- You can also use a stocking and a colander to drain out water. Just leave it over the sink for 30 minutes or so to drain the water.[22]
-
5Add paste. Use PVA glue or wallpaper paste for the mixture.[23] Add enough to make it feel like clay.
-
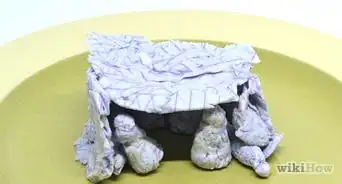
6Shape the pulp. Shape the pulp into a dagger on parchment paper. You can use a mold for this part if you have one.[26]
-
7Leave the dagger to dry. It can take a couple of days if it is thick.[27]
-
8Paint the dagger. If desired, add details to the finished dagger with paint.

Community Q&A
-
QuestionWhat if used normal glue? Is that all right?
 Community AnswerYes, it would work, but it is recommended that you use stronger glue if you want it to last.
Things You'll Need
- Paper glue
- Paper
- Scissors or craft knife
- Water
- Bucket or bowl
- Blender or mixer
- PVA glue or wallpaper paste
- Paint
- Paintbrushes


References
- ↑ http://www.origami-make.com/easy-origami-dagger/page-02.php
- ↑ http://www.origami-make.com/easy-origami-dagger/page-02.php
- ↑ http://www.origami-make.com/easy-origami-dagger/page-02.php
- ↑ http://www.origami-make.com/easy-origami-dagger/page-03.php
- ↑ http://www.origami-make.com/easy-origami-dagger/page-03.php
- ↑ http://www.origami-make.com/easy-origami-dagger/page-03.php
- ↑ http://www.origami-make.com/easy-origami-dagger/page-03.php
- ↑ http://www.origami-make.com/easy-origami-dagger/page-03.php
- ↑ http://www.origami-make.com/easy-origami-dagger/page-03.php
- ↑ http://www.origami-make.com/easy-origami-dagger/page-03.php
- ↑ http://www.origami-make.com/easy-origami-dagger/page-03.php
- ↑ http://www.origami-make.com/easy-origami-dagger/page-07.php
- ↑ http://www.origami-make.com/easy-origami-dagger/page-07.php
- ↑ http://www.origami-instructions.com/origami-squash-fold.html
- ↑ http://www.origami-make.com/easy-origami-dagger/page-07.php
- ↑ http://www.origami-make.com/easy-origami-dagger/page-08.php
- ↑ http://www.origami-make.com/easy-origami-dagger/page-08.php
- ↑ http://www.origami-make.com/easy-origami-dagger/page-08.php
- ↑ http://www.origami-make.com/easy-origami-dagger/page-09.php
- ↑ http://www.origami-make.com/easy-origami-dagger/page-10.php
- ↑ http://www.auntannie.com/CraftRecipes/QuickPapierMache/
- ↑ http://www.papiermache.co.uk/tutorials/how-to-make-pulp-ala-miranda-rook/
- ↑ http://www.papiermache.co.uk/tutorials/how-to-make-pulp-ala-miranda-rook/
- ↑ http://www.papiermache.co.uk/tutorials/how-to-make-pulp-ala-miranda-rook/
- ↑ http://www.auntannie.com/CraftRecipes/QuickPapierMache/
- ↑ http://www.auntannie.com/CraftRecipes/QuickPapierMache/
- ↑ http://www.auntannie.com/CraftRecipes/QuickPapierMache/