This article was co-authored by wikiHow Staff. Our trained team of editors and researchers validate articles for accuracy and comprehensiveness. wikiHow's Content Management Team carefully monitors the work from our editorial staff to ensure that each article is backed by trusted research and meets our high quality standards.
The wikiHow Video Team also followed the article's instructions and verified that they work.
This article has been viewed 199,956 times.
Learn more...
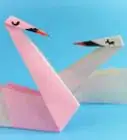
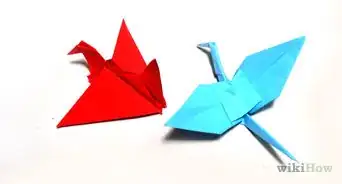
In the Japanese art of origami, paper swans are one of the most popular pieces to make. And you don't have to be an expert folder to create one yourself. With a little patience and practice, you can fold a pretty paper swan to use as a whimsical decoration in your home or even as a party favor.
Steps
Folding a Paper Swan
-
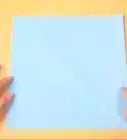
1Fold a square piece of paper in half diagonally, then open it back up. Bring 1 corner over to the opposite corner, lining up the edges. Make a crease by running your finger or fingernail firmly along the fold. Open the paper so it lies flat after you fold it.
- If you're using patterned paper, start with the blank side facing up.
- Your paper can be any size, as long as it’s a perfect square shape.
- You can use any type of paper you'd like. However, origami paper is recommended, especially for beginners, because it's thin and easy to fold cleanly.
Types of Paper You Can Use
Cardstock (textured or smooth)
Giftwrap
Napkins
Craft paper
Tissue paper
-
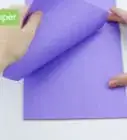
2Bring the 2 corners in towards the center crease, forming a kite. Take the 2 corners that are on either side of the crease. Fold them into the center so that the edges line up along the crease.
- Try to align the edges so that they touch. There shouldn’t be a large gap between them and they also shouldn’t overlap.
Advertisement -
3Flip the paper over and fold the 2 corners into the center crease again. Bring the 2 corners on either side of the original crease line towards the center. Line up the edges with the crease. This is the same fold you just made, but on the opposite side of the paper.
- You should now have a smaller kite shape.
-
4Fold the kite in half, bringing the bottom of the tail up to meet the top. You’re now folding the 2 corners of the original crease line. Make sure the points of the corners line up perfectly to ensure the paper is folded exactly in half. Crease the fold.
- The wider bottom layer will be the body of the swan and the thinner top layer will be the neck.
-
5Fold down the tip of the top layer to create the beak. Take the top point and bring it down towards the bottom. Crease it so it stays in place.
- Make the beak as big or as small as you’d like. However, it should be smaller than the neck and body to look proportionate.
-
6Flip the swan over and fold it in half vertically. You’re re-folding the paper along the original crease line. Press firmly along the fold to crease it. The beak and neck should be exposed.
- Make sure the beak and neck are folded in half, too.
-
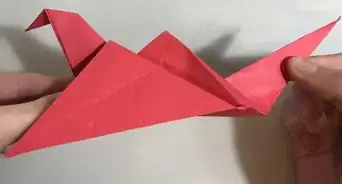
7Pull the neck and beak away from the body, pinching the fold to secure it. The neck should be at a 90 degree angle from the body. You won’t be able to make a smooth crease at the base because of the previous folds. Instead, squeeze it with your fingers to hold the neck in place.
- You can pull the beak away from the neck if you want, too. Use the same pinching method.
Using Your Paper Swan
-
1Display paper swans around your house for decor on a budget. Why spend a lot of money on decorations when you can make them yourself with just a few pieces of paper? Set a swan on a bookshelf or end table, for example. Or make a bunch of swans in different sizes and group them together for an interesting coffee table arrangement.
- If you’re putting your swan on a bookcase, use newspaper or old book pages instead of plain paper for a playful touch.
- Homemade decor personalizes and warms up any space.
-
2String swans together if you want to make a garland or mobile. Attach your paper swans to a long piece of string or twine with tape or glue. Then drape the garland on a mantel or doorway for a whimsical accent piece. Or make multiple strands and tie them to an embroidery hoop for a beautiful mobile.[1]
- Strings of paper swans hung vertically also make elegant wall art to be hung behind a bed or on a large living room wall.
-
3Fold your swan with a napkin to use it as a place setting. Since most paper napkins are squares, they make for the perfect origami paper. Set your napkin swan on top of a plate to really impress your guests. Plus, they can use the napkins during the meal. Win-win![2]
- Choose napkins that match the color scheme of your party for a pretty table.
- Let your guests take home the swans if they don't use them as a creative party favor.
-
4Attach a hanger to the swan if you want to make an ornament. Loop string around the neck or glue a piece of wire to the head so you can hang your swan. Be careful not to squeeze the string too tight so it doesn’t crunch up the paper.[3]
- Swan ornaments make great gifts, too.
- Use paper in holiday colors for an extra festive touch.


Community Q&A
-
QuestionWhat is the second easiest origami bird?
 SelficornCommunity AnswerProbably the crane but it really depends on your skills with origami. There are also different ways to fold in order to make it easier, so have a look at various patterns.
Things You'll Need
References
About This Article

To make a paper swan, start by grabbing a square piece of paper and folding it in half diagonally, then opening it back up. From there, bring the 2 corners in towards the center crease to create a shape that looks like a kite. Next, flip the paper over and fold the 2 corners into the center crease again. Once you’ve made those folds, fold the kite in half by bringing the bottom of the tail up to the top. To create your swan’s beak, fold down the tip of the top layer and crease it so it stays in place. Then, flip the paper over and fold it in half vertically. Finally, pull the neck and beak away from the body and pinch the fold to secure everything in place. For more tips, like how to display your paper swan in fun ways, read on!