X
wikiHow is a “wiki,” similar to Wikipedia, which means that many of our articles are co-written by multiple authors. To create this article, volunteer authors worked to edit and improve it over time.
This article has been viewed 36,730 times.
Learn more...
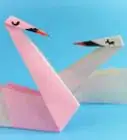
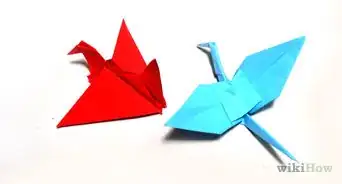
The following instruction set will instruct you on how to make an origami flying swan. Although similar to the traditional swan, the flying swan has the added ability for flapping the bird's wings.
Steps
Part 1
Part 1 of 3:
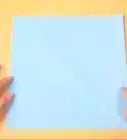
Folding the Square Base
-
1Position paper in the portrait orientation.
-
2Fold the lower right corner across to the left side. When finished, the bottom edge of the paper should now be flush with the left edge.Advertisement
-
3Fold the excess paper down over the top of the triangle fold you just made.
-
4Open the last fold and trim the excess. You should now have a square piece of paper.
-
5Fold the crease on top of itself and then unfold. You should have a piece of paper with an "X" fold when finished.
-
6Flip the paper over, fold across the horizontal axis, and unfold.
-
7Fold the paper across the vertical axis and unfold. Note: Green guide lines are for reference in the next step.
-
8Bring the edges of the 4 diagonal folds together. This corresponds to the green guide lines in the image above.
-
9With the diagonal folds together, fold the two adjacent folds on each side onto each other to create a square.


Advertisement
Part 2
Part 2 of 3:
Folding the Swan
-
1Position the square from Part 1 so that the crease runs vertically and the open end is facing down.
-
2Fold the right side flap inwards.
-
3Repeat the last step for the left side.
-
4Fold the top triangle down on top of the last two folds.
-
5Unfold the last three folds.
-
6Carefully peel back the first layer of paper at the bottom and open it upwards.
-
7After opening upwards, fold the paper on the creases that were made in steps 2, 3, and 4.
-
8Crease the opposite side in the same way as the previous step.
-
9Flip the paper over and fold the right side flap inwards.
-
10Repeat with the left side flap.
-
11Fold the top flap downwards.
-
12Unfold the last three folds.
-
13Carefully peel back the first layer of paper at the bottom and open it upwards.
-
14Fold the left side inward over the creases.
-
15Repeat with the right side.
-
16Confirm that you now have a diamond-shaped paper with two free lower flaps.
-
17Fold the right section upwards behind itself diagonally.
-
18Repeat with the left section.
-
19Carefully unfold the crease in the right section and open the fold.
-
20With the fold open, fold the right section upwards into itself so that the section extends from the inside of the body.
-
21Repeat steps 12 and 13 with the left section
-
22Carefully pull the right section downwards to reduce the angle and re-crease.
-
23Fold the left section downward to create a head shape.
-
24Fold the left wing down and crease.
-
25Flip over and repeat with the right wing.


Advertisement
Part 3
Part 3 of 3:
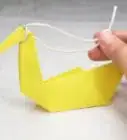
Flapping the Wings


Community Q&A
-
QuestionHow do I make the other diagonal line/crease?
 Community AnswerYou can make the other diagonal crease by either folding the paper in half again to form a smaller triangle, or unfolding the paper and spinning it once. Then fold and do the same process you did the first time.
 -
QuestionMy bird's wings won't flap on mine!
 Community AnswerYou may have made a mistake in the folds. Undo the paper and try again or use a new piece of paper. Be sure to read the steps really carefully and to check against each image.
Advertisement
Things You'll Need
- One 8.5 x 11 sheet of paper
- Pair of scissors (optional)
About This Article
Advertisement