This article was co-authored by wikiHow staff writer, Luke Smith, MFA. Luke Smith is a wikiHow Staff Writer. He's worked for literary agents, publishing houses, and with many authors, and his writing has been featured in a number of literary magazines. Now, Luke writes for the content team at wikiHow and hopes to help readers expand both their skillsets and the bounds of their curiosity. Luke earned his MFA from the University of Montana.
There are 18 references cited in this article, which can be found at the bottom of the page.
The wikiHow Video Team also followed the article's instructions and verified that they work.
This article has been viewed 110,141 times.
Learn more...
There’s no need to buy a fancy phone stand—all it takes to make your own is 1 or 2 household items and a couple of minutes. We’ll show you 4 different ways to bend or cut a DIY phone stand, either out of a paperclip, 2 binder clips, a cardboard tube, or a plastic card. Then, just set it on a flat surface to read your recipe, watch some videos, or listen to tunes hands-free!
Things You Should Know
- Straighten a paperclip, then bend it into thirds. Bend 2 small feet at the tips to create a simple wire phone stand.
- Clamp a large binder clip to the handle of a smaller binder clip to create a versatile stand out of office supplies.
- Use scissors to cut an L-shaped phone rest into a cardboard tube or a coffee cup sleeve.
- Bend a plastic card in half, then bend a small lip at the edge for a quick and sturdy stand.
Steps
Using a Paperclip
-
1Find a paperclip that is a minimum of 2.5 in (6.4 cm) long. Look around your home or office for a paperclip to use to make a phone stand. If possible, choose a paperclip that is covered in vinyl or plastic to avoid any accidental scratches to your phone.[1]
- Use a larger paperclip if you want to make a stand for a larger device such as a tablet.
-
2Straighten out the paperclip as much as possible. Use your hands or a pair of snub-nosed pliers to bend the paperclip out of its spiral shape and into a straight line. Do your best to remove any small bumps or kinks in the clip.[2]Advertisement
-
3Bend the paperclip into thirds. Use pliers (or your hands) to create 2 bends in the straightened paperclip. Make each bend ⅓ away along the length of the clip and at a 90° angle.[3]
- Aim for the paperclip to look like 3 sides of a square, with 2 “legs” on either side of the middle section.
-
4Fold the tips of the paperclip up at a 90° angles. Position the pliers close to each end of the paperclip, about 1 in (2.5 cm) from either tip. Bend each tip upwards and toward you to create 2 corners that bend in the same direction.[4]
- This creates the "feet" of the phone stand that will prevent your phone from sliding forward.
-
5Bend the 2 shorter edges of the paperclip into 90° angles. Use pliers to fold the “legs” of the clip into right angles, bending the paperclip in the middle of each leg so that this section can rest flat on your work surface.[5]
- From the side, the phone stand will look like a square “U” shape.
-
6Place your phone horizontally across the arms of the phone stand. Rest the phone stand on a flat surface so that the feet are pointing upwards. Position your phone horizontally on the stand with the back of your phone supported by the tall back of the stand.[6]
- The feet of the stand will be on the same side as the screen, stopping your phone from sliding forward.


Using Binder Clips
-
1Get 2 binder clips of different sizes and bend the arms back. Look around your home or office for a binder clip that is approximately 0.75 in (1.9 cm) in width and a second binder clip that is approximately 1.25 in (3.2 cm) in width. Bring the arms of both clips back so that they can be pressed together to open the clip.[7]
- This stand work best with binder clips of different sizes, but use 2 of the same size if that’s all you can find.
- While black binder clips are the most common, use colored binder clips if you want to make a bright phone holder which stands out.
-
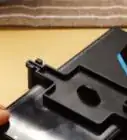
2Place 1 arm of the small binder clip inside the larger clip. Open the larger binder clip slightly. Position a single arm of the small binder clip into the opening of the larger clip. Release the arms of the larger clip so that the smaller binder clip is clamped in place. Then, lower the free arm of the smaller clip.[8]
- Your phone will rest against the face of the larger clip.
-
3Position your phone horizontally across the small binder clip. Make sure that the clip stand is resting flat with both binder clips against the table. Place your phone horizontally over the small binder clip, resting the back of your phone against the larger binder clip.[9]
- Make 2 clip stands and position them 5–6 in (13–15 cm) from each other to support a tablet.
- Alternatively, use pliers to bend the handle of a single larger clip inward slightly, creating a lip to support your phone with just a single clip.
-
4Attach a third binder clip to the big clip to rest your phone vertically. Clamp another large binder clip behind the big binder clip. Clamp it to the backward-facing arm, and make sure it’s secure. This adds stability, enabling you to rest your phone vertically.[10]

Using Cardboard
-
1Flatten 1 toilet paper cardboard tube. Find an empty cardboard toilet paper tube. Rest it on a flat surface and press down on the center to flatten the cardboard.[11]
- You might also cut a paper towel roll into thirds and use 1 of the sections.
- Alternatively, use a cardboard coffee cup sleeve instead.[12]
-
2Mark a line across the middle of the cardboard tube. Orient the flattened tube vertically on the table. Use a ruler to find the center of the cardboard tube. Draw a horizontal line through the tube with a permanent marker or a pencil.[13]
- If you don't have a ruler, just estimate where the center is and draw a line based on your best guess—it doesn’t have to be precise.
-
3Draw a line from the center point to a corner of the cardboard tube. Use a ruler or your best guess to find the middle of the centerline that you just drew. Connect this point to any 1 corner of the tube by drawing a diagonal line.[14]
- It doesn't matter what corner you choose.
-
4Mark the thickness of your phone along the centerline. Measure the thickness of your phone using a ruler. Mark this measurement with 2 small, perpendicular markings just below the centerline—make one mark immediately below where the diagonal line meets the center, and the other mark a little away from the center.[15]
- Phones tend to range from 1⁄4–1⁄2 in (0.64–1.27 cm) thick.
- It’s okay to eyeball this marking—it’ll work as long as it’s at least a bit larger than the width of your phone.
-
5Cut along the lines that you drew on the cardboard tube. Use scissors to cut along the diagonal line to the center, and then from the center to the opposite edge. Make 2 small incisions along each line that marks the depth of your phone, and fold the resulting tabs inward.[16]
- Don’t cut along the center line immediately below the diagonal line.
- Hold the cardboard tube down firmly as you cut it to ensure that it stays flat.
-
6Open the cardboard tube and lean your phone against the high back. Place your fingers inside the cardboard tube to gently open it back up into a circular shape. Rest the circular base on a flat surface. Place your phone horizontally across the incisions, with the taller piece of cardboard at the back and the shorter piece of cardboard across the front.[17]
- Your phone will sit crosswise into the tube.
- Decorate the stand with stickers, permanent marker, or colorful tape to make it unique.


Using a Plastic Card
-
1Find an old, plastic card that you don't need anymore. Look through your wallet or desk for a thin, plastic card that you no longer need. An expired loyalty card, hotel key card, or a gift card that you have already spent make ideal options. You won't be able to use the card again once you have turned it into a phone stand, so ensure that it’s one that you don't mind losing.[18]
- Avoid using a card that is either valuable or hard to replace, such as a gift card that you haven't spent yet, a credit or debit card, or a form of identification.
-
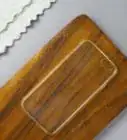
2Fold the card in half across the middle. Take one short edge of the card and bend it over to the other short edge making sure that the edges line up. Then press down on the center of the card to make a crease that bends through the center of the card.[19]
- Bend the card around the edge of a ruler if you’re having difficulty. Work slowly and deliberately to avoid snapping the card.
- This fold forms the main backing against which your phone will rest.
-
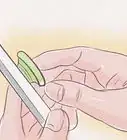
3Bend a small lip upward near the short edge of the card. Use a ruler to measure 1⁄4 in (0.64 cm) from one of the short edges of the card. At this point, make another fold in the opposite direction of the first.[20]
- This fold becomes a lip for your plastic phone stand to rest on.
-
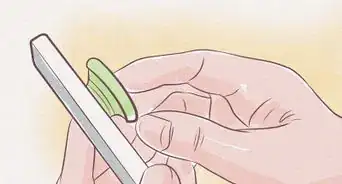
4Place your phone onto the lip of the phone stand to keep it upright. Position the phone stand so that the "V" shape is upside down and the small, lipped section is facing up and toward you. Rest your phone horizontally across the lip of the phone stand. The plastic will hold its shape as it supports your phone.[21]


Warnings
- Always place your phone stand on a flat surface for maximum stability.⧼thumbs_response⧽
References
- ↑ https://youtu.be/2qDAVEk7nxE?t=17
- ↑ https://youtu.be/2qDAVEk7nxE?t=24
- ↑ https://youtu.be/2qDAVEk7nxE?t=39
- ↑ https://youtu.be/2qDAVEk7nxE?t=54
- ↑ https://www.youtube.com/watch?v=CqzVxo3EXP0&t=16s
- ↑ https://youtu.be/2qDAVEk7nxE?t=94
- ↑ https://www.youtube.com/watch?v=wejWl7okoLY&t=19s
- ↑ https://www.youtube.com/watch?v=wejWl7okoLY&t=19s
- ↑ https://www.youtube.com/watch?v=wejWl7okoLY&t=26s
- ↑ https://youtu.be/JVwe7uX-KNA?t=13
- ↑ https://www.youtube.com/watch?v=fuP2SSxGHOs&t=7s
- ↑ https://www.cnet.com/pictures/six-free-do-it-yourself-smartphone-stands-pictures/2/
- ↑ https://www.youtube.com/watch?v=fuP2SSxGHOs&t=10s
- ↑ https://www.youtube.com/watch?v=fuP2SSxGHOs&t=10s
- ↑ https://www.youtube.com/watch?v=fuP2SSxGHOs&t=14s
- ↑ https://www.youtube.com/watch?v=fuP2SSxGHOs&t=15s
- ↑ https://www.cnet.com/pictures/handy-uses-for-cardboard-tubes/8/
- ↑ https://www.cnet.com/pictures/six-free-do-it-yourself-smartphone-stands-pictures/4/
- ↑ https://www.youtube.com/watch?v=5Cej-awq3bk&t=52s
- ↑ https://youtu.be/5Cej-awq3bk?t=65
- ↑ https://www.cnet.com/pictures/six-free-do-it-yourself-smartphone-stands-pictures/4/
About This Article