This article was co-authored by wikiHow Staff. Our trained team of editors and researchers validate articles for accuracy and comprehensiveness. wikiHow's Content Management Team carefully monitors the work from our editorial staff to ensure that each article is backed by trusted research and meets our high quality standards.
There are 9 references cited in this article, which can be found at the bottom of the page.
The wikiHow Video Team also followed the article's instructions and verified that they work.
This article has been viewed 153,879 times.
Learn more...
Totem poles are symbolic or spiritual wood carvings that many Native American tribes use. If you’ve ever seen one of these, then you know what beautiful works of art they are. Carving a real totem pole out of wood takes a lot of skill and you’ll probably have to practice for years to get it right. Luckily, you can make simpler totem poles as an easy and fun craft project at home. This is especially great if you want to occupy kids for a while. You can use construction paper or clay, so choose the method you prefer and get started!
Steps
Using Paper and Cardboard
-
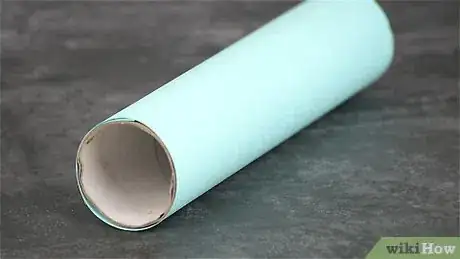
1Wrap construction paper around an empty paper towel roll. The paper towel roll is great for giving your pole some structure and support. To add color, wrap a sheet of construction paper around the tube. Then tape or glue it down so it stays in place.[1]
- You could also use a toilet paper tube to make a smaller totem pole, or tape a few toilet tubes together to make a full-size one. You just might have to trim away some of the excess construction paper if you use a smaller tube.
- If you prefer not to use construction paper, you could also leave the paper towel roll blank and decorate it without paper.
-
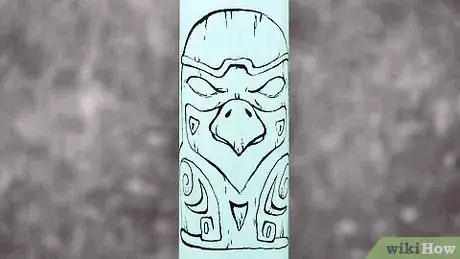
2Draw an animal face near the top of the pole. Traditional totem poles are decorated with animal faces. Pick any animal you like for your pole. Use a marker or colored pencils to draw the animal’s face at the top of the pole for a real, authentic totem look.[2]
- You can draw any animals you want, but some common figures on real totem poles include ravens, bears, wolves, thunderbirds, beavers, frogs, and even whales.[3]
- While totem poles traditionally use animals for decoration, you can decorate yours any way you want.
Advertisement -
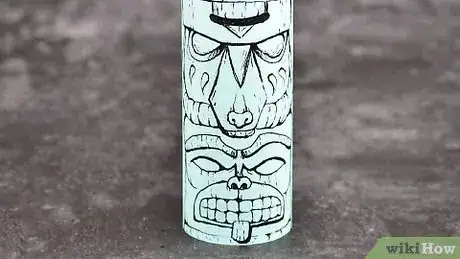
3Decorate the rest of the pole for more authenticity. Real totem poles use different animal faces going up and down the front. If you want to be traditional, then draw more animal faces beneath the first one you drew. Otherwise, you could draw any shapes you want to decorate the pole with.[4]
- Some shapes that will look great include a sun, moon, teepees, canoes, and other animals. You could also use stickers.
- If you prefer, you can also cut shapes out of other pieces of construction paper and glue them onto the pole. Get creative!
- The top is the most visible part of the pole, but Native Americans actually put their most important symbols at the bottom of the pole because the poles are read from bottom to top. Put your favorite designs here if you want to be authentic.[5]
-
4Add wings for more decoration. If you want, you can also attach some cool wings to your totem pole. Get a piece of construction paper different from the color you used for the pole. Draw 2 equal wing shapes on the paper. Cut out the shapes with scissors, then glue a wing on each side of the pole.[6] Now your pole looks like it’s ready to take off!
- The shape of the wings is totally up to you. You could make them pointy, curved,
- Try to make the shapes as close as possible, but they don’t have to be perfect. Your pole will still look great.
- If you want to, you can also decorate the wings with more shapes or faces.
- The wings will also look good around the middle of the pole. It’s up to you.
- You could also use clear tape if you don’t have glue.
-
5Attach the pole to a paper base so it stands up better. A colorful base for your pole can help it stand up better and also give it more decoration. Put some glue around the base of the pole and press it down onto the center of a colored piece of construction paper.[7]
- If you want to, you could cut the base into a different shape for some more decoration. You can draw some shapes or faces onto the base too.
Sculpting a Clay Totem Pole
-
1Flatten out a piece of clay so it’s as long as a paper towel tube. Scoop out a ball of clay and put it on a solid, flat surface. Then use a rolling pin or your hands and flatten it out. Spread it out so it’s about the same length as a paper towel tube.[8]
- For a smaller pole, you could also use an empty toilet paper roll.
- You can use any kind of modeling clay for this. Softer clay is probably easier to work with, so you might want to use a softer kind.
- The color of the clay doesn’t matter, so use whatever you like.
-
2Roll the clay around a paper towel tube. Press the tube down on one end of the clay pile. If there is any clay left on the top or bottom of the tube, then you can cut it away with a knife. Hold the clay onto the tube, then roll the tube forward. Let the clay wrap around the tube. This gives your pole some nice structure and support.[9]
- If the clay is too long, it’s fine to let it overlap around the tube. If you prefer, you could also cut away any extra clay.
- You could also tuck the extra clay underneath the tube if you don’t want to cut it off.
-
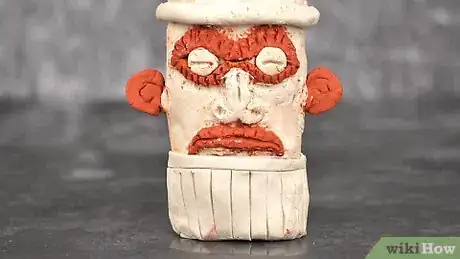
3Carve an animal face onto the top of the pole for a simple design. Totem poles are traditionally covered in animal faces, so you can make a real authentic one if you add faces to yours. Pick any animal you like and carve its face into the clay near the top of the pole.
- You don’t need special tools to carve into the clay. A barbecue stick or similar tool will work just fine.
- You can draw any animals you want, but some common figures on real totem poles include ravens, bears, wolves, thunderbirds, beavers, frogs, and even whales.[10]
- While totem poles use animals for decoration, you can decorate yours any way you want.
-
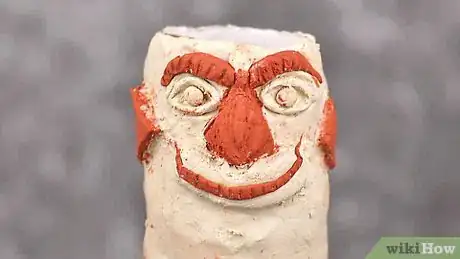
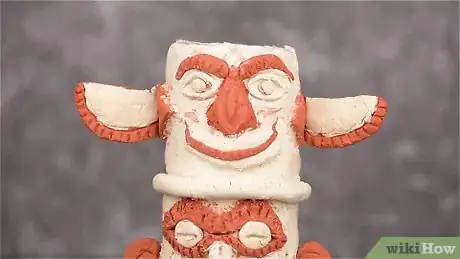
4Mold face pieces out of clay if you want a three-dimensional design. Another option for decorating your pole is molding animal pieces to stick on. This gives you a nice, three-dimensional design. Try molding a nose, eyes, mouth, eyebrows, and other facial features out of clay. Then press them onto the pole to make a face. The clay pieces should stick together.
- For more decoration, use different colored clay for the pieces you’re adding. This helps the different pieces stand out more.
- If you want to, you can combine both carving and mold to decorate your pole. A three-dimensional nose with carved eyes would look great.
-
5Make more faces and shapes around the pole. Totem poles are usually decorated with multiple animal faces going up and down the front. If you want an authentic pole, then copy this design and make more faces along the pole by either carving them in or attaching face pieces. Otherwise, you could also draw some other shapes or designs. It’s up to you!
- If you’d like, you could also paint shapes and faces onto the pole. Acrylic paint usually works best for clay.
- Native Americans actually put their most important symbols at the bottom of the pole because the poles are read from bottom to top. Put your favorite designs at the bottom if you want to be authentic.[11]
-
6Attach some clay wings to your pole. More decorative totem poles also have wings, so you can add these too if you want to. Mold 2 wings in any shape you want. Then stick them onto each side of the pole to complete the design.[12]
- If you’re out of clay or want to try something different, you could use construction paper for wings too. Cut wing shapes out of the paper and glue them to the pole.
Community Q&A
-
QuestionHow many symbols does it need for it to be a totem pole?
 Community AnswerThey can have many, but most have at least three or four.
 -
QuestionCan you make a single, one-level totem pole?
 Community AnswerSure! I'm not sure that would be a "pole" as it is traditionally defined, but it's your project, you can do whatever you want.
 -
QuestionHow do I know what animals I want?
 HumanBeingTop AnswererYou can use any animals you like, or stick to traditional animals that inhabited America when totem poles were first created. Use animals that have significance to you if you wish, or, as the article suggests, use animals that tell a story. Pick creatures that are easily recognizable in a simple form.
Things You’ll Need
Using Paper and Cardboard
- Construction paper
- Paper towel roll
- Glue or tape
- Scissors
- Markers or colored pencils
Sculpting a Clay Totem Pole
- Modeling clay
- Stick or modeling tool
- Paper towel roll
- Rolling pin
References
- ↑ https://funandeducationalactivitiesforkids.com/home/craft-cardboard-tube-totem-pole
- ↑ https://funandeducationalactivitiesforkids.com/home/craft-cardboard-tube-totem-pole
- ↑ https://www.nesd.k12.pa.us/cms/lib/PA01001139/Centricity/Domain/409/Totem%20pole%20history.pdf
- ↑ https://funandeducationalactivitiesforkids.com/home/craft-cardboard-tube-totem-pole
- ↑ https://www.warpaths2peacepipes.com/native-american-symbols/totem-pole.htm
- ↑ https://youtu.be/CaR5O-3lBJc?t=381
- ↑ https://youtu.be/CaR5O-3lBJc?t=523
- ↑ https://youtu.be/9deQNaZ4S8o
- ↑ https://youtu.be/9deQNaZ4S8o?t=58
- ↑ https://www.nesd.k12.pa.us/cms/lib/PA01001139/Centricity/Domain/409/Totem%20pole%20history.pdf
- ↑ https://www.warpaths2peacepipes.com/native-american-symbols/totem-pole.htm
- ↑ https://ceramicartsnetwork.org/wp-content/uploads/sites/5/2015/08/Pottery_Making_mayjun02.pdf
- ↑ https://www.legendsofamerica.com/na-totems/
About This Article
To make a totem pole, start by choosing the symbols you want to use, such as the raven, which symbolizes intelligence. Additionally, decide on the story you want to tell, such as your family history or the story of a famous battle. Then, gather 1 cylindrical container, like a coffee can, for each symbol and cover them with a sheet of craft paper. Next, draw and color your symbols on pieces of paper, cut them out, and glue them on the canisters. Finally, glue the canisters so they’re stacked on top of each other and let your totem pole dry for several hours. To learn how to celebrate the meaning of your totem pole with a Potlatch ceremony, scroll down!
