This article was co-authored by wikiHow Staff. Our trained team of editors and researchers validate articles for accuracy and comprehensiveness. wikiHow's Content Management Team carefully monitors the work from our editorial staff to ensure that each article is backed by trusted research and meets our high quality standards.
There are 9 references cited in this article, which can be found at the bottom of the page.
This article has been viewed 82,320 times.
Learn more...
Making your own turban is as easy as having either a large, square scarf or a length of fabric, and learning how to tie it properly. You can make a turban from a scarf by folding it into a triangle, and securing it with a few twists and knots around your head. Similarly, you can make a turban headband using a length of fabric, measuring the circumference of your head, and cutting it into a rectangle. Trying out these different turban types will help you to add your own creative flair to your outfit!
Steps
Making a Scarf Turban
-
1Tie your hair up in a low bun or a low ponytail. Make sure that your hair is free of tangles and knots. Use a hair tie or hair clips to secure your hairstyle.[1]
- Your hairstyle must be low so that the turban can easily fit around it.
-
2Fold a large, square scarf into a triangle. Lay the scarf flat on a surface such as a bed or a table. Bring 1 corner diagonally across the scarf to meet the opposite corner, creating a triangle shape.[2]Advertisement
-
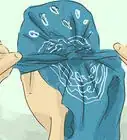
3Lay the scarf over your head with the center point against your forehead. Bow your head slightly, and place the folded triangle scarf on your head. Make sure that the center point is by your forehead, and that the sides are hanging towards your shoulders.[3]
- The base of the triangle will be against the nape of your neck.
- Make sure that the majority of your hair is covered by the triangle. If it’s not, you will need to try using a large scarf that is able to cover more of your hair.
-
4Knot the fabric length of each side just above your forehead. Bring the length of fabric on each side of your head up to the top of the turban. Twist these lengths into a firm, secure knot.[4]
- The central point of the triangle should still be hanging over your forehead, and it will be located in center of this knot.
-
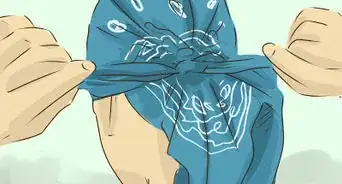
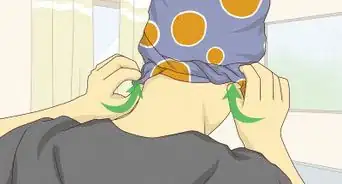
5Bring both sides together at the back of your head. Grasp the lengths of fabric that you just created a knot with. Bring 1 around each side of your head, and knot these at the base of the turban.[5]
- Make sure that this knot is also secure and tight.
- Overall, there will be 2 knots in your turban. The first will be at the front, and the second will be at the base of your head.
-
6Tuck in the loose ends at the front and back of the turban. Fold the small triangle of fabric by your forehead over the knot at the front of the turban. Repeat this with any loose ends of fabric at the back to make the turban feel tight.[6]


Making a Turban Headband
-
1Measure the circumference of your head and add on 6 in (15 cm) to it. Use a tape measure to measure from the nape of your neck to just above your forehead. Then add 6 in (15 cm) to the measurement that you took.
- This means that if you’re head circumference was 22 in (56 cm), your final measurement will be 28 in (71 cm).
-
2Measure out a rectangle on a 36 in (91 cm) length of fabric. Fold your fabric in half. Measure out a rectangle that is your final head measurement across by 4.5 in (11 cm) wide. Use chalk to mark out the rectangle.
- Use pins to hold the folded fabric together while you are measuring it out.
- For example, if your final head measurement was 28 in (71 cm), your rectangle on the fabric will be 28 in × 4.5 in (71 cm × 11 cm).
- While any fabric will do, a thicker, jersey type material is best. You can also use the fabric from an old t-shirt if you prefer.[7]
- Approximately 36 in (91 cm) will work well for making a few headbands, depending on the width of the fabric.
-
3Cut out the rectangle. Use fabric scissors to cut around the chalk outline that you made. Keep the pins holding the folded fabric together while you cut out the rectangle.
- Remove the pins holding the fabric together once you have finished cutting out the rectangle.
-
4Wrap the headband around your head. Center the middle of the fabric at the nape of your neck. Tie the 2 sides in a knot just above your forehead.
- Keep the fabric folded in half as you tie it around your head to make the headband thicker.
- The knot will create a bow-like shape just above your forehead.


Making a 1940s Vintage Costume Turban
-
1Get a scarf that is approximately 59 in (1.5 m) long. Find a fabric that isn't slippery like silk to help your turban stay secure. If possible, use a scarf that matches the color or pattern of your outfit to create a true vintage style.[8]
-
2Place the middle of the scarf over your hair with the front edge folded in. Estimate where the middle of the length of the scarf is. Place this edge against your forehead. Fold this edge under slightly to create a neat line.[9]
- The opposite edge of the scarf should brush against the nape of your neck.
-
3Tie the sides of the scarf at the back of your head. Gently bring the sides of the scarf around your head. Twist these into a firm knot to keep the turban secure.[10]
- If a small flap of material appears just above the knot at the back of your head, gently tuck it into the knot so that it doesn't stick up.
-
4Bring the sides of the scarf to your forehead and use 1 to make a loop. Twist the 2 sides together into a knot on the front edge of the scarf. Leave 1 of the sides only halfway pulled through the knot to create a loop.[11]
- After you have made the loop, spread it out like a fan. This will be 1 side of the bow that you are making.
-
5Create a loop with the other side. Tuck the other side of the scarf behind the knot. Leave it only halfway pulled through again to create another loop.[12]
- Also fan this loop out to create the other half of the bow.
-
6Tuck the loose ends into the turban. Gather each loose end of scarf and tuck these behind the knot. You can also tuck these under the fabric that's next to the knot if that fits better.[13]
- Make sure that you tuck in each loose end tightly to keep your turban secure.
-
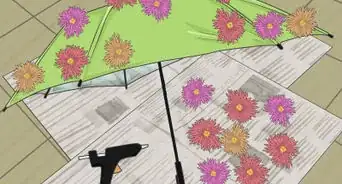
7Decorate the turban with a small cluster of flowers. Use brightly colored flowers to embellish your 1940s style turban. Tuck the flowers into the knot so that they are just in front of the bow. Flowers that contrast with the scarf color work the best.[14]
- You can use real flowers if you prefer, otherwise artificial flowers will also work well as they will last for many future costumes!


Things You’ll Need
Making a Scarf Turban
- Hair ties or clips
- Large, square scarf
Making a Turban Headband
- Tape measure
- 36 in (91 cm) of fabric
- Chalk
- Pins
- Fabric scissors
Making a 1940s Vintage Costume Turban
- 59 in (1.5 m) long scarf
- Decorative flowers

References
- ↑ https://honestlywtf.com/diy/diy-turban/
- ↑ https://honestlywtf.com/diy/diy-turban/
- ↑ https://honestlywtf.com/diy/diy-turban/
- ↑ https://honestlywtf.com/diy/diy-turban/
- ↑ https://honestlywtf.com/diy/diy-turban/
- ↑ https://honestlywtf.com/diy/diy-turban/
- ↑ https://www.theguardian.com/lifeandstyle/2009/sep/22/craft-project-turban-women
- ↑ https://youtu.be/EWjaOYr8Hu8?t=21
- ↑ https://youtu.be/EWjaOYr8Hu8?t=34
About This Article

To make a turban with a scarf, start by tying your hair back in a low bun and folding a large, square scarf in half so that it forms a triangle. Next, place the scarf over your head so the center point of the triangle is by your forehead and the sides are hanging down to your shoulders. Then, bring the sides of the scarf around the back of your head before pulling them up to the top and tying the ends into a firm, secure knot just above your forehead. Afterwards, pull the lengths of fabric to the back of your head and loop them into a knot under your bun. To learn more, like how to make a 1940s vintage style turban, scroll down!