This article was co-authored by Mona Schmitt. Mona Schmitt is a DIY craft expert who tackles furniture makeovers, home decor, jewelry, crafts, & sewing. Her YouTube channel, CraftKlatch, has over 100,000 subscribers.
This article has been viewed 120,711 times.
Witch costumes are always in style for Halloween. If you are planning to dress up as a witch this year or if your child wants to go as a witch, then you may want to create your own costume to save money or just for fun. Making your own witch hat will give you a chance to customize this important part of the costume however you want and you do not even need to know how to sew!
Steps
Creating the Cone
-
1Gather your materials. Creating a witch’s hat is easy and it only requires a few items. Before you get started, you will need:[1]
- black craft foam
- string
- scissors
- wire
- duct tape
- ribbon
- trim material such as feathers or faux fur
- embellishments such as plastic spiders, buttons, or bows
-
2Measure and cut your foam into a cone shape. Take your string and hold the end at the corner of your craft foam. Then, extend the string several inches with your pencil in hand. Use the string and your pencil to trace the bottom of the cone. You can make the cone as tall as you would like it to be.[2]
- When you have finished tracing the curved line for your cone bottom, use your scissors to cut along this line. When you are done, you should have a triangular piece of craft foam with a circular bottom.
- You can also use an Exacto knife to get more precise edges as you cut out your craft foam, but it is not necessary.[3]
Advertisement -
3Cut your wire. Next, cut a piece of wire that is slightly shorter than the tallest part of your cone. You can measure the cone from the base to the tip to see how long to make your wire piece or just hold the wire against the cone and make the cut.[4]
-
4Tape the wire to the center of the cone. Lay your piece of wire onto the center part of the cone shape, as if you are dividing the cone in half with the wire. One end of the wire should be at the pointy end of the cone and the other end should be at the base. Then, take a piece of duct tape that is longer than the wire and apply it over the wire lengthwise.[5]
- Make sure that there is a little space between the end of the wire and the edge of the cone when you tape it down. Otherwise, the wire may poke through the top of the hat or poke you in the head when you are wearing it.
- Trim off any excess duct tape after you have secured the wire to the cone. There should not be any duct tape going over the edge of the craft foam.
-
5Apply more duct tape to one edge. You will need to apply a couple of pieces of duct tape to the edge of the hat to secure the edges and form your cone. Take a piece of duct tape and secure it to the flat edge of the cone and then apply another piece over that one so that it overlaps a bit.[6]
- Then, fold over the other edge of the cone and press the duct tape in place to secure the edges.
- Make sure that the wire and the duct tape are on the inside of the cone when you secure the edges.

Creating the Hat Brim
-
1Measure and cut the brim. To create the hat brim, you will need to lay out another piece of craft foam and hold a piece of string in the center. Then, holding your pencil and the other end of the string in the other hand, draw a circle. This circle will be the brim for the cone shape, so make sure that it is large enough.[7]
- After you have measured the brim, cut along the edges of the circle you have traced. Try to cut along the line as evenly as possible because any jagged edges will show.
-
2Use a heat gun or blow dryer to flatten the brim. When you have finished cutting out your brim, lay it out on the table again and use a heat gum or blow dryer to flatten out any curved edges.[8] If your brim is already pretty flat, then you do not need to worry about flattening it more.[9]
- You can also lay a couple of heavy books on the craft foam and leave them on for a few hours or overnight to flatten out the brim piece.
-
3Cut out the center of the brim piece. Next, fold the brim piece in half so that the edges are even. Make a cut in the center of the brim piece and then move outwards. Keep cutting until you have created a small circle in the center of the brim piece. Then, cut four slits in the inner edges of the brim piece to add some more flexibility.[10]
- Keep in mind that the inner circle will need to be large enough to fit over your head, but not larger than your head or it may be too loose.
-
4Check to make sure that the brim fits on your head. Try the brim on your head before you move on to make sure that it is a good fit. If it feels to snug, then you can adjust it. If it is too loose, then you will need to create a new brim with a new piece of craft foam.[11]

Finishing the Hat
-
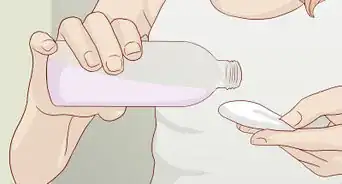
1Use ribbon to cover the seam of the cone. Before you attached the cone to the brim, you can cover up the cone seam with a piece of black ribbon. Use your hot glue to secure the ribbon to the cone.[12]
-
2Glue the cone to the brim. You will also need to use hot glue to attach the cone to the hat brim. To glue the brim to the cone, apply hot glue to the base of the cone and press the cone into the hat brim.[15]
- Make sure that the cone is centered over the hat brim as you secure it with hot glue.
- If you want to embellish your hat, you can also apply some feathers or faux fur to the area where the cone meets the brim. Just use your hot glue gun to secure your embellishments to the base of the cone.[16]
-
3Bend the cone how you want. After you have completed your hat and the glue is dry, you can shape the cone how you would like it to look by bending it slightly. The wire inside of the cone will allow you to create a bent or crushed shape to the cone of your hat.[17]
- Try bending the cone in two or three places to give it a worn look.
-
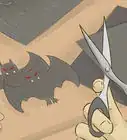
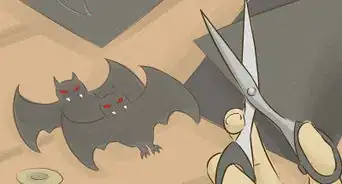
4Add other finishing touches. You can also enhance your witch’s hat with other types of items, such as plastic spiders, a bow, or some buttons. Choose items that will compliment your costume.[18]
- Apply any embellishments to your witch’s hat with a dab of hot glue.
Community Q&A
-
QuestionDoes my hat have to be black, or can it be a different color?
 Community AnswerThey are traditionally black, but it's your own unique creation, so feel free to make it whatever color you like.
 -
QuestionCould I put a black chiffon scarf on it?
 Community AnswerYes, as long as the scarf isn't too heavy. You can do whatever you want.
 -
QuestionHow do I make the brim of the hat wavy?Community AnswerYou could buy a hat that has a metal ring in the brim and bend it slightly.
Warnings
- Be extra careful when using a hot glue gun! It can burn you if it gets on your skin.[19]⧼thumbs_response⧽
References
- ↑ https://www.youtube.com/watch?v=K4qIUs8jpM0
- ↑ https://www.youtube.com/watch?v=K4qIUs8jpM0
- ↑ http://www.firelilycosplay.com/craftfoam.html
- ↑ https://www.youtube.com/watch?v=K4qIUs8jpM0
- ↑ https://www.youtube.com/watch?v=K4qIUs8jpM0
- ↑ https://www.youtube.com/watch?v=K4qIUs8jpM0
- ↑ https://www.youtube.com/watch?v=K4qIUs8jpM0
- ↑ http://www.firelilycosplay.com/craftfoam.html
- ↑ https://www.youtube.com/watch?v=K4qIUs8jpM0
- ↑ https://www.youtube.com/watch?v=K4qIUs8jpM0
- ↑ https://www.youtube.com/watch?v=K4qIUs8jpM0
- ↑ https://www.youtube.com/watch?v=K4qIUs8jpM0
- ↑ http://blog.consumercrafts.com/craft-basics-main/how-to-hot-glue-tips/
- ↑ http://blog.consumercrafts.com/craft-basics-main/how-to-hot-glue-tips/
- ↑ https://www.youtube.com/watch?v=K4qIUs8jpM0
- ↑ https://www.youtube.com/watch?v=K4qIUs8jpM0
- ↑ https://www.youtube.com/watch?v=K4qIUs8jpM0
- ↑ https://www.youtube.com/watch?v=K4qIUs8jpM0
- ↑ http://blog.consumercrafts.com/craft-basics-main/how-to-hot-glue-tips/
- Videos provided by CraftKlatch
About This Article

To make a witch hat, start by cutting some black craft foam into a cone shape. Then, cut a piece of wire that's as tall as the cone and tape it to the center of the cone with duct tape. Next, roll the foam into a cone and tape the inside edges together with more duct tape. Once you've done that, cut out a large circle from the craft foam for the brim of the hat, and then cut a circle out from the center so the brim will fit on your head. Finally, hot glue the cone to the brim and cover the seam with ribbon. To learn how to decorate your witch hat, scroll down!