This article was co-authored by wikiHow Staff. Our trained team of editors and researchers validate articles for accuracy and comprehensiveness. wikiHow's Content Management Team carefully monitors the work from our editorial staff to ensure that each article is backed by trusted research and meets our high quality standards.
There are 7 references cited in this article, which can be found at the bottom of the page.
This article has been viewed 65,881 times.
Learn more...
Happy chickens tend to lay more eggs, so there's no reason not to appease them by making them their very own, custom-made chicken feeder.[1] By creating a feeder that distributes chicken feed on its own, you'll simultaneously save yourself work and cut down on wasted grain. Although an automatic feeder may sound complicated, in reality it's an inexpensive and relatively simple way to improve your setup. While the feeder's size should depend on the number of chickens you're keeping, the process for making a feeder will follow the same basic process.
Steps
Cutting Out Your Pieces
-
1Purchase a cheap large bin.[2] Aim to pick up a big bin without wheels. Because the feed holes will be placed near the bottom, a wheeled bin might get in the way of the feed holes you'll want to make. A 30 gallon trash bin should be enough to hold 150 pounds of chicken feed.
- While you're at a hardware store, pick up six pipe elbows and six pipe end caps.
-
2Mark the bin where you want to make holes.[3] Take a marker and outline your planned feeding holes by drawing circles in marker of the same diameter as your PVC pipes. Make your marks equally spaced from one another. This will maximize the effectiveness of your feeder.
- These holes should be located near the bottom of the bin.
- The marks should denote where the saw should start.[4]
Advertisement -
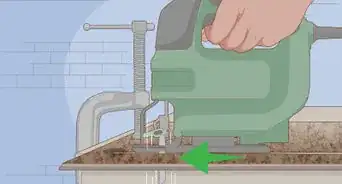
3Make holes with a hole saw.[5] Create the holes at the bottom of the bin with a hole saw. When you pick up a hole saw, you should make sure the diameter matches the pipe you're using. There should be six holes made for a 30 gallon trash bin.
- If you are using a smaller bin size, you should use a lesser amount of openings as best suits the bin.
- It's a good idea to spin the hole saw in reverse. This will result in a cleaner cut.
-
4Cut openings on the inside end of the pipe fittings.[6] Cut the bottom two inches of the pipe, cutting about 150 degrees around. These windows will allow the grain to pour in inside the bin.
-
5Fit the pipe fittings in the holes. Once you've made the proper openings in the back of each pipe fitting, fit them to protrude out of the holes you made with the hole saw. Reach into the bin and fit them from the inside out. It's a good idea to do this immediately upon making the holes and modifying the pipes. If your holes aren't big enough, you can make the holes slightly bigger with a precision knife. Excess gaps can be covered over with caulking if need be.
- The "female" end of the PVC pipe should fit on the inside of the feeder bin.
-
6Make grain windows with pipe caps.[7] A grain window should strike a balance between allowing the chickens accessibility to the grain, and keeping the grain from pouring out of the feeder. Cut the top two thirds out of each of your pipe caps. When it comes time, you will place them on the feeder holes with the remaining third of the cap placed on the bottom.
- This may be done with a precision knife.
- It's good idea to sand down the edges you cut to prevent roughness.
- Offering a “window” (rather than an open hole) will prevent the chickens from unnecessarily wasting the feed.[8]
Assembling the Feeder
-
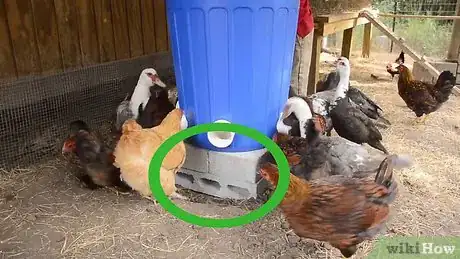
1Place modified pipe caps on the pipes.[9] The modified pipe caps (with two thirds of the front missing) are intended to act as a grain window. Fix them onto the fronts of your PVC feeder holes. Try to make the bottom third as level to the ground as you can. Chickens will be sticking their heads in, and an uneven window can make it difficult for them to properly access the grain.
-
2Waterproof the edges with caulking.[10] Water risks spoiling your grain. Particularly if you're tending your chickens in a rainfall-heavy area, squeeze a caulking tube around the outside edge where the PVC tube and bin meet. This will waterproof the cracks, helping to ensure that moisture won't be able to get in when the feeder isn't in use.
-
3Secure the feeder with wood blocks.[11] If there's a concern that your bin will be moved or fall out of place, you can nail blocks of wood to the bin to keep it in place. This is an optional step, as bigger bins should be secured naturally by the weight of the chicken grain.
-
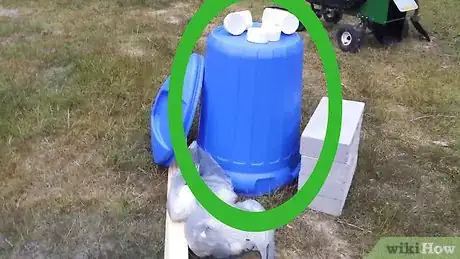
4Place the bin atop concrete slabs.[12] If you give the bin some elevation, you'll be able to place the feeding openings at a relative head level with the chickens. This also has the effect of keeping the grain away from ground level, where dirt and grime my risk getting mixed in with the grain.
-
5Add a lid to the bin. Securing your chicken feeder with a lid will make sure that nothing unwanted falls in. it's also a good idea if there's a risk of rainfall entering and damaging the grain. Most garbage bins will come with a pre-fitted lid.
-
6Feed your chickens. Place your feeder somewhere where your chickens will be able to access it easily. To load the feeder with grain, remove the lid and insert the grain by the bucketful. Because the grain's weight can be used to stabilize the feeder, you should make a habit of keeping the feeder at least half-full.
-
7Make changes if necessary. Once the feeder is set up, you should watch how the chickens react to it. Make an effort to notice any potential problems that may arise, either with regards to the grain's accessibility or feeder's stability. If you spot something amiss, you can make your modifications as needed.
Warnings
- Make sure the garbage bin you're using is perfectly clean before you transform it into a feeding bin. Ideally, it should never have been used to house actual trash. If this is the case, you should scrub every inch of the bin down thoroughly before moving on.⧼thumbs_response⧽
Things You'll Need
- A large plastic garbage bin.
- PVC pipe fittings. Six pipe elbows and six pipe end caps.
- A hole saw, for making holes in the garbage bin.
- Caulking, for waterproofing the cracks.
References
- ↑ http://www.survivopedia.com/diychickenfeeder/
- ↑ https://www.youtube.com/watch?v=7zzj5Gl5EXA
- ↑ https://www.youtube.com/watch?v=7zzj5Gl5EXA
- ↑ http://flannelacres.com/2015/01/17/easy-automatic-chicken-feeder/
- ↑ https://www.youtube.com/watch?v=7zzj5Gl5EXA
- ↑ https://www.youtube.com/watch?v=wEs3WxN2owI
- ↑ http://flannelacres.com/2015/01/17/easy-automatic-chicken-feeder/
- ↑ http://flannelacres.com/2015/01/17/easy-automatic-chicken-feeder/
- ↑ https://www.youtube.com/watch?v=7zzj5Gl5EXA
