X
wikiHow is a “wiki,” similar to Wikipedia, which means that many of our articles are co-written by multiple authors. To create this article, 23 people, some anonymous, worked to edit and improve it over time.
The wikiHow Video Team also followed the article's instructions and verified that they work.
This article has been viewed 95,752 times.
Learn more...
Origami is a fun way to fold paper into all sorts of things. By making an origami book, you can make an origami creation that you can actually use as a small notebook or sketchpad.
Steps
Method 1
Method 1 of 2:
Using an 8.5”x11” Sheet of Paper
-
1Fold the paper in half. Counting the front and back of each sheet, this method will make a sixteen-page origami book. Start by taking the 8.5”x11” piece of paper and folding it in half “hamburger style.”
- This means folding along the 11” side, leading you with a 5.5”x8.5” paper.
-
2Fold a second time in the same direction. Take the folded piece of paper and fold it in half one more time in the same direction. This will leave you with a very narrow paper approximately 2.75”x8.5” in size.Advertisement
-
3Unfold the paper. Now that you have marked those two creases, you want to unfold the paper entirely. The unfolded page will be 8.5”x11” again, and it will have creases separating the paper into four rows.
-
4Fold the paper in half in the opposite direction. With the page still fully unfolded, you want to turn the direction 90 degrees and fold the paper in half again but “hot dog style” this time.
- The folded sheet will be 4.25”x11”.
-
5Fold the paper in half again in the same direction. Just like you made the second fold in the same direction with the “hamburger style” fold, you want to do it again with the “hot dog style” fold. When you fold the paper in half again, it will be roughly 2.125”x11”.
-
6Unfold the paper completely. Now that you’ve made these two fold, unfold the paper completely until it’s 8.5”x11” again. This time the creases will form sixteen evenly sized little rectangular boxes across the page.
-
7Fold the paper in half “hamburger style” again. With all of the creases made, you’re ready to start forming the paper into a book. Start by folding the paper along the very first “hamburger style” fold so that it is 5.5”x8.5”.
-
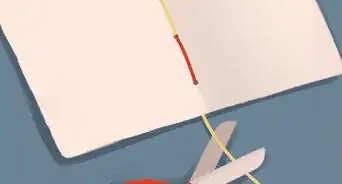
8Cut along the three creases on the spine. Turn the spine of the folded paper toward you and use a pair of scissors to cut the creases that run perpendicular to the spine of the fold. There should be three such creases and you want to cut each halfway down the paper.
- The halfway point down the paper will be easy to see since it’s where the next crease that runs parallel to the spine intersects along the creases you’re cutting.
-
9Unfold the page. With the three cuts along the creases done, open the page again. It will now be the 8.5”x11” page but with two slats in the middle of the page.
-
10Cut the slats. With the page open, turn it so that the slats in the page look like an equal sign, and then make a perpendicular cut along the pre-existing crease in the equal sign. This will form four separate flaps in the middle of the page.
-
11Fold the four flaps back. Once you have made the flaps, fold the flaps outward toward the edge of the page. There will be pre-existing creases at the edge of the flaps from the earlier folds, and since all of the rectangles earlier were of an equal size, when you fold the flaps over, they should be roughly flush with the edge of the page.
- When you fold the flaps back, there will be a gap in the middle of the page that makes it look a bit like a window.
-
12Turn the page over. With the flaps still folded over, you want to turn the entire page over. This will put the flaps side of the page facedown on your work table.
-
13Fold the top and bottom to the center. Take the top row of the paper and the bottom row of the paper and fold both of them in toward the center of the page. After you make the folds, the page will be the same size as though you had folded it “hot dog style,” which is 4.25”x11”.
-
14Fold the sheet in half “hot dog style.” With the top and bottom folded toward the center, you now want to fold the entire sheet “hot dog style.”
- The sheet will be roughly 2.125”x11” in size and the flaps you folded over earlier will be on the outside edges of the page.
-
15Push the left and right sides together to form a diamond. Lift up the paper off the table and push the two ends of the paper toward each other without folding it. When looking at it from the top, this will make the middle section bow out along the pre-existing creases into a diamond shape.
-
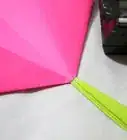
16Gather it into an X shape. As you continue to push the ends toward each other, the diamond shape will get smaller and the ends you’re holding and the bowed out ends will form an X shape.
-
17Fold in half at the center. The pages will be sort of fanned out as though you had opened a book the entire way until the covers touch. To finish the book, you simply need to fold from the center as though you were closing the book.
Advertisement
Method 2
Method 2 of 2:
Using Five Origami Sheets
-
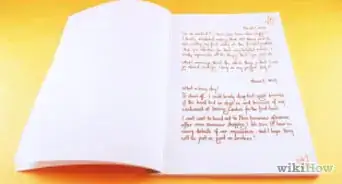
1Fold four origami sheets in half. Using standard 6”x6” origami sheets, this book will be quite small. For something you can actually write in, you may want to use larger 12”x12” sheets. Begin by folding all four sheets in half.[1]
- The pages in the book will be 1/4 the size of the sheets you use.
-
2Cut all four sheets in half. With all four sheets of origami paper folded in half, cut along the creases. You will end up with eight separate sheets that are twice as long as they are wide.
- 3”x6” if you’re using standard size origami sheets.
-
3Fold one of the sheets in half. Take the first of the eight sheets and fold it in half “hot dog style.” This will leave you with a sheet that is now 1/4 as wide as it is long—1.5”x6” for a standard sheet.
-
4Fold the same sheet in half again in the opposite direction. You want to fold the same sheet in half again, but this time along the opposite axis. You will once again have a sheet twice as long as it is wide but 1.5”x3”.
-
5Fold the top portion back on itself. Take the top half of the previous fold and fold it in half but make the fold back on itself. To do this, take the edge of the top piece and fold it back so that it is flush with the spine of the fold from step 4.
-
6Fold the bottom portion back on itself. This step is the same as step 5; however, it is for the bottom portion of the paper. The bottom part of the paper from the fold in step 4 will stick out farther than the top after you folded it back on itself. Fold this bottom portion back on itself the same as you did the top portion.
- After this fold, the paper will be a 1.5”x1.5” square (for standard size sheets) with accordion folds that give the sheet a W shape when looked at from the top.
-
7Repeat steps 3-6 for six more of the sheets. To make more pages for the book, you will repeat steps 3-6 for a total of seven of the sheets you cut in half earlier. A total of seven sheets will provide ten pages in your finished book.
- You can simply discard the eighth sheet from the earlier cuts.
-
8Arrange the folded pages. Once you have all of the page pieces folded, you need to arrange them. For this step, you will look down at the top of the pieces so that they all have a squiggle W or M shape. Arrange them in a line so each proceeding piece faces the opposite direction.
- Looking at it from the top, the pieces will look like one long squiggle of MWMWMWM.
-
9Fit the pieces together. Take the last section of the first piece and the first section of the piece after it in the line and fit the latter section inside the former section by slipping it into the fold created in step 3.
- You will repeat this step for all five over page pieces until they form one long connected accordion chain.
- Though optional, using a glue stick to attach the overlapping portion of each page section will add a bit more strength to the finished product.
-
10Cut the fifth full origami sheet in half. With the pages done and all connected, you can now make the covers for the book. Begin by taking the final full sheet of origami paper and cutting it in half.
- Since this page will make the covers for the book, you can use a piece that is a different color or that even has a design.
-
11Fold the top and bottom edge toward the center. Take half of the page you just cut and fold the top and bottom edges of it toward the middle of the page. You want to fold it “hot dog style,” so the width of the sheet gets smaller rather than the length.
- If you want to make sure the cover is slightly larger than the pages, don’t quite fold the edges exactly to the middle. Instead leave about a 1mm gap.
- Definitely make sure that if you chose designed paper, the design faces out.
-
12Center the text block in the cover. Take the section of pages and squeeze it down, so it is fully compressed, and then place it in the center of the cover piece. You can make sure the piece is centered by folding the covers piece (which will be long) around the pages and making sure the two ends come together evenly.
- Pinch a small crease on each side of the text block where the spine meets with the cover.
-
13Fold the excess length of the covers. The front and back cover will both be too long, but don’t cut them. Instead make a small crease where the covers reach the edge of the pages. Makes a fold along this crease for both the front and back cover.
-
14Slide the front and back page into the cover folds. The folds you made to form the cover in step 11 will form a small slot. Once you’ve folded the excess length of the covers inward, you can use the first and last pages of the page section as a tab and slide them into the slots in the front and back covers respectively.
- Though not necessary, you can strengthen the book by using a glue stick on the tabs to glue them to the inside of the slots in the covers.


Advertisement
Community Q&A
-
QuestionDo I use glue in the first method?
 RaireFox14Community AnswerOrigami isn't typically made with glue, but if needed, glue can be used to make a fold hold better.
 -
QuestionCan I write in any of the books?
 Community AnswerYes, if you use paper on which you can write.
 -
QuestionHow can I add a cover to the book?
 Community AnswerSimply create a cover and glue it to the spine, then fold it around to the front and back of the book.
Advertisement
Things You’ll Need
- One 8.5”x11” sheet of paper
- Five sheets of Origami paper
- Scissors
- Glue stick


References
About This Article
Advertisement