This article was co-authored by wikiHow staff writer, Dev Murphy. Our trained team of editors and researchers validate articles for accuracy and comprehensiveness.
wikiHow’s Content Management Team carefully monitors the work from our editorial staff to ensure that each article meets our high quality standards.
There are 13 references cited in this article, which can be found at the bottom of the page.
The wikiHow Video Team also followed the article's instructions and verified that they work.
This article has been viewed 996,056 times.
Learn more...
Do you want to start a scrapbook, nature journal, or diary? You can, of course, buy a suitable book at the store, but if you really want to make it your own, perhaps it's time to rediscover the not-quite-lost art of bookbinding. If you’re not sure where to begin, it’s easier than you think, and you can bind your own book today using materials that you likely already have around the house. Keep reading to learn different bookbinding methods, from the simple to the more complex.
Things You Should Know
- To bind your book with tape, first staple the pages along the crease, and then reinforce the staples with a strip of linen tape or cotton tape. For a thick book, use several layers of tape.
- If you want to bind with ribbon, punch holes every 1⁄4 inch (0.64 cm) along the edge of the pages. Thread a piece of ribbon in and out of each hole and secure it with a knot.
- Sew your book together by marking 5 equally spaced dots along the crease with a pencil, and then using a needle and thread to pierce the holes and sew the binding on.
Steps
Binding with Tape
-
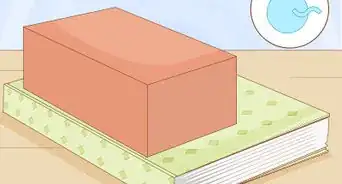
1Fold your pages in half and stack them folded. Make sure the fold is crisp by using a bone folder or running the top of your nail over it to smooth it down. You can fold pages individually or fold multiple pages together. Folding individual pages is better as it will ensure each page is folded precisely, but folding multiple pages at once will save you time. Stack the pages together folded, not open.
- If you have too many pages to fold crisply, try creating packets of signatures. A signature is a group of 4 sheets folded down the center.[1]
- Most books are folded hamburger style (i.e., by folding the shorter ends of the paper together), but you can fold however you want.
-
2Open your pages and staple them together at the crease. Be sure to staple with the crease facing down, so the flat part of the staple faces out and the staple “arms” rest on the inside of the crease. Use a long reach stapler if your regular stapler can’t reach the middle crease. Staple your pages 3 time at even intervals.[2]
- If you made signatures, staple each signature separately and then stack your stapled signatures. Leave the stack unstapled.
Advertisement -
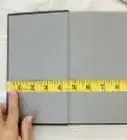
3Use a pencil to mark a 1⁄2 inch (1.3 cm) margin. If you don’t give yourself a large enough margin, some of the page’s contents may be obscured. Any words printed within 1⁄2 inch (1.3 cm) of the crease will become part of the binding and therefore be impossible to read.[3]
- If you’re binding a book of material printed from Microsoft Word, make sure your pages have a “gutter” margin of about 1⁄2 inch (1.3 cm) before you print them. The gutter margin is the inside margin, the margin that will be partially obscured when the book is bound.[4]
-
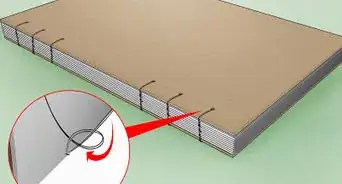
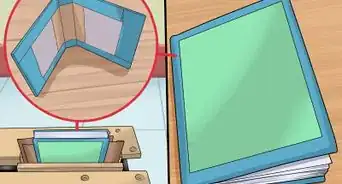
4Cut a piece of binding tape about 2 inches (5.1 cm) longer than your book. Make sure your tape is strong enough to hold the book together—linen tape or cotton tape will give your book the support it needs. Your tape can be colorful or simple: it won’t be seen once the book is finished.[5]
- Avoid using masking tape or clear tape. These tapes won't be strong enough to support your book.
-
5Apply the tape lengthwise to the spine, with half the tape on each cover. Instead of attempting to place the tape on the book, place the tape on a flat surface sticky-side up and press the book into it: this will ensure you maintain a straight, even tape line. Press the book into the middle of the tape, and fold the rest of the tape to cover the other side of the book.[6]
- If your book is thick, leave a larger margin of tape so you have enough tape to cover the spine and still reach the other side.
- Use your fingers to press the tape around the book’s spine so that it covers both the bottom of the book, the spine, and the top of the book.
- If your book has many pages or several signatures, you might want to tape it more than once to reinforce it. Repeat the process of taping the book until the book’s binding feels secure.
-
6Cut the excess tape. Because your tape was longer than the book itself, you’ll have some excess tape on the top and bottom of the book. Use scissors or an X-ACTO knife to cut the tape, making sure to cut it as close to the book’s page as possible.[7]
- Avoid folding leftover tape over the book, as this may make your book harder to open. Trim any excess tape.

Using Ribbon
-
1Ensure your pages have at least 1 inch (2.5 cm) of margin on the left-hand side. If you printed your pages using Microsoft Word, you should automatically have 1 inch (2.5 cm) of border. If you wrote your pages by hand, make sure the writing has a margin. If you don’t have a margin, any words on the left-hand edge will be impossible to read.[8]
- If you want to bind a page that doesn’t have a margin, you could either paste the page into a larger page with an adequate margin, or “build” a wider margin by gluing or taping a strip of paper to the inner edge of the page.
-
2Punch a hole 1⁄2 inch (1.3 cm) from the top and bottom corners of the top page. Use a handheld hole-punch to create a hole 1⁄2 inch (1.3 cm) from the top of the page and 1⁄2 inch (1.3 cm) from the left-hand side, and then repeat the process on the bottom of the page, measuring 1⁄2 inch (1.3 cm) from the bottom and 1⁄2 inch (1.3 cm) from the left-hand side.[9]
- If you’re having trouble measuring and hole-punching at the same time, mark where the hole should be with a pencil before hole punching.
-
3Use a ruler to draw a faint line connecting the two holes. The line should run from the top of the cover to the bottom in a straight line, and you only need to do this on the top page, though you will be using your markings as a guide to holepunch the entire stack of pages. Be sure to use a pencil so you can erase the line later on.[10]
- You can also choose to draw a thick line with pen or permanent marker if you want the line to remain on the cover.
-
4Stack the pages and hole-punch the book every 1⁄4 inch (0.64 cm) along the line. Using your top page as a guide, hole-punch the entire stack of pages. Each hole must be on the line. Use a ruler to make sure your holes are in the proper spots. You’ll be threading the ribbon through these holes later on.[11]
- Consider measuring and marking the spots with your pencil prior to punching the holes, for accuracy.
- To make sure your pages don't slip out of place while you punch your holes, clamp them together with binder clips or clothespins.
-
5Measure and cut a piece of ribbon that’s twice as long as your book. Go all out! This is where you can really start to get creative with your book cover. Almost any ribbon will work, but keep in mind that if it's made of too thick material or if it's too wide, you may struggle to fit it through your hole punches.[12]
- Choose a simple black tape for a classic look, or go for a colorful design if you want something more personalized.
-
6Thread the ribbon in and out of each hole. Start from the top hole and move your way down the spine, lacing your ribbon up through one hole and down through another, until you’ve laced each hole. Make sure you don’t completely pull the ribbon through the first hole, since you’re going to tie the ribbon binding closed.[13]
- If your ribbon isn’t long enough, remove it and cut a longer piece.
-
7Loop the ribbon back through the top and bottom holes and tie it. Once your ribbon has been laced through each punched hole, tie it off with a simple knot or a fancy bow, and cut off any excess. Now your book is complete![14]
- Looping the ribbon a second time reinforces the binding. Depending on how many pages you have, loop it a third time for an even stronger binding.

Sewing the Binding
-
1Fold your pages in half. Use a bone folder or the top of your nail to get a crisp fold. You can fold individually or in groups, depending on how many pages you have. Folding individually will ensure your pages are folded precisely, but folding multiple pages at a time will make the process go faster.[15]
- It’s common to fold your pages hamburger style—i.e., fold the 2 short ends together—but fold your book however you wish!
-
2Use a ruler to measure how long the spine is and divide it by 6. This bookbinding method requires 5 holes at the crease. They should be equally spread apart, but the spacing between the dots will depend on how large your paper is.
- For example, if you have a paper that’s 8.5 by 11 in (22 by 28 cm) printer paper, dividing that by 6 gives you 1.4 inches (3.6 cm), meaning you'd space your holes 1.4 inches (3.6 cm) apart.
- If you know your page measurements, you don’t have to measure. If you don’t know, or if you’re not using a standard page size, make sure you measure precisely.
-
3Mark your measurements on the page with a pencil. Do this on the inside of the crease, and use a ruler to make sure your measurements are precise. These dots are known as stations, with the first station being the one on the “bottom” of the page and the fifth station being the one on the “top” of the page.[16]
- For example, if you have a paper that’s 8.5 by 11 inches (22 by 28 cm), your first dot will be 1.4 inches (3.6 cm) from the edge. Then, each progressive dot will be 1.4 inches (3.6 cm) up from the previous dot. Your fifth dot should be 1.4 inches (3.6 cm) away from the top of the page.
-
4
-
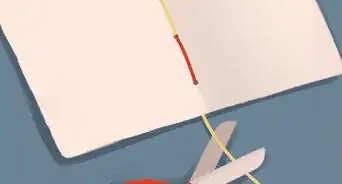
5Pull 2 inches (5.1 cm) of thread through the page at the third station. Use a needle to sew your binding, starting with the third station (that is, the station in the exact middle), not the top or bottom station. Hold the remaining thread with your non-dominant hand to make sure you don’t accidentally pull too much through. Leave the rest of the thread on the spool for now to ensure you have enough to stitch the whole spine.[18]
- You can use whatever color thread you like, but remember your thread will be visible!
-
6Put your needle through the fourth, fifth, and fourth station again. Your needle and thread should be on the inside of the crease at station 4 to start. Pull it through the fifth station to the outside crease, and then back through to the inside at station 4 again.[19]
-
7Go through the second, first, and second stations. Make sure your needle goes outside the second station, inside the first station, and then back outside the second station again. Once you’ve finished this step, your thread should be facing away from the crease.[20]
-
8Pull your thread through the third station, cut it from the spool, and tie a knot. Every station should be threaded, and your book should now have thread both inside and outside of the crease. Tie the thread on the inside of the crease and pull firmly.[21]
- You can tie whatever knot you’d like as long as it firmly keeps the sewing in place.


Single Sheet Binding
-
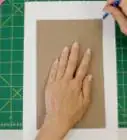
1Reinforce the edge of each page and cover with clear tape. Running tape along the spine edge of each piece of paper you will be binding will help reduce the chances that your stitching will tear out. Place half of the tape on one side of each piece of paper, and fold it over to the other side. Repeat with every page.[22]
- In single sheet binding, you don’t fold your pages like you do for other bookbinding methods, but this means that you run the risk of the stitching tearing out of your pages if they are not reinforced well enough.
- You can use thick cardstock or thick cardboard as your cover.
-
2Make 3 marks on the edge of each page, evenly spaced apart. Make your first mark 1⁄2 inch (1.3 cm) in from the spine and 3⁄4 inch (1.9 cm) down from the top of the page. Put the last mark 1⁄2 inch (1.3 cm) in from the spine and 3⁄4 inch (1.9 cm) up from the bottom of the page. Your third mark will fall at the middle point between the other two, 1⁄2 inch (1.3 cm) in from the spine. Make the marks against your ruler to make sure they’re straight. Repeat the process on the bottom of the stack of pages.[23]
- Perform this same process on the front and back covers as well.
-
3
-
4Multiply the cover area and the page count and cut 6 threads of that length. Multiply the length and width of the top page or book cover (if you're using a cover) to get the area, and then take that number and multiply it by the number of pages in your book. This is the length in inches or centimeters your thread should be. Make sure you cut 6 individual pieces of thread.[25]
- If you have 20 pages, and your area is 2.25 inches (5.7 cm) long, you will need 45 inches (110 cm) of thread for each thread.
-
5Put your binding needle and thread through the first hole on the bottom page. Bring your thread around and tie a knot in the thread against itself using your binding needle. The knot should be on the side of the paper that faces “up,” not the edge.[26]
- Once you’ve tied the knot, you can trim off the end and tuck it in for a cleaner look.
-
6Thread the needle through the back cover's first hole. Pull the thread until it pulls the paper flush with the back cover’s edge, and then thread the needle under the first loop you made.[27]
- When threading the needle under the first loop you made, make sure you go under both threads, not through the loop.
-
7Thread all holes with a new needle and thread, adding more pages as you go. Repeat the threading and looping process with each subsequent page for each hole, until you've stitched the top cover. After you've stitched one hole, don't remove the needle, as you'll need it again when you stack a new page on. Use a new needle for each thread.[28]
- If you want to give your book some whimsy, choose a different color thread for each binding hole, or keep all of the thread colors the same for a more uniform style.
- For a sturdier book, loop your needle and thread around the stitch below the page you’re currently working on, starting on the third page.
-
8Tie the threads to secure them. Once you’ve threaded all the pages and covers, looped the thread, and hooked the needle under the first loop, thread the needle under the previous stitch, then thread the needle back inside the book to tie a knot. Put the needle through the inside stitch, leaving a small loop in the thread you've just wound through the stitch, and then tie a knot by putting the needle through the loop and pulling it taut.[29]


Community Q&A
-
QuestionI noticed you say to use waxed thread above. Can I use waxed dental floss, which is made from polyester?
 wikiHow Staff EditorThis answer was written by one of our trained team of researchers who validated it for accuracy and comprehensiveness.
Staff AnswerwikiHow Staff EditorStaff AnswerYou can use dental floss if you wish, but bear in mind some dental floss is stretchy, not to mention minty. -
QuestionCan I use double sided tape instead of staples?
 Community AnswerYes, but staples are much stronger. It's unlikely your book will stay together very long if you use tape.
 -
QuestionHow long does this project take (approximately)?
 Community AnswerIt depends on which method you choose to use. The taping method is the shortest and easiest, and each method takes progressively more time, with the single sheet binding method taking about half a day.
Things You'll Need
Binding with Tape
- Stapler
- Linen tape or cotton tape
- Scissors or X-ACTO knife
Using Ribbon
- Ruler
- Hand-held hole-puncher
- Pencil
- Ribbon
Sewing the Binding
- Ruler
- Awl
- Needle
- Thread
Mastering Single Sheet Binding
- 6 threads
- 6 binding needles
- Awl
- 2 hard boards (such as cardstock or cardboard)
- Ruler


References
- ↑ https://www.youtube.com/watch?v=xF3P8bI_MNM&feature=youtu.be&t=29
- ↑ http://www.readwritethink.org/files/resources/printouts/HowToBindBook.pdf
- ↑ http://www.readwritethink.org/files/resources/printouts/HowToBindBook.pdf
- ↑ https://www.firstwriter.com/layout/margins.shtml
- ↑ https://www.ibookbinding.com/blog/bookbinding-supplies-and-materials/
- ↑ http://www.readwritethink.org/files/resources/printouts/HowToBindBook.pdf
- ↑ http://www.readwritethink.org/files/resources/printouts/HowToBindBook.pdf
- ↑ http://www.readwritethink.org/files/resources/printouts/HowToBindBook.pdf
- ↑ http://www.readwritethink.org/files/resources/printouts/HowToBindBook.pdf
- ↑ http://www.readwritethink.org/files/resources/printouts/HowToBindBook.pdf
- ↑ http://www.readwritethink.org/files/resources/printouts/HowToBindBook.pdf
- ↑ http://www.readwritethink.org/files/resources/printouts/HowToBindBook.pdf
- ↑ http://www.readwritethink.org/files/resources/printouts/HowToBindBook.pdf
- ↑ http://www.readwritethink.org/files/resources/printouts/HowToBindBook.pdf
- ↑ http://www.designsponge.com/2013/03/bookbinding-101-five-hole-pamphlet-stitch.html
- ↑ http://www.designsponge.com/2013/03/bookbinding-101-five-hole-pamphlet-stitch.html
- ↑ http://www.designsponge.com/2013/03/bookbinding-101-five-hole-pamphlet-stitch.html
- ↑ http://www.designsponge.com/2013/03/bookbinding-101-five-hole-pamphlet-stitch.html
- ↑ http://www.designsponge.com/2013/03/bookbinding-101-five-hole-pamphlet-stitch.html
- ↑ http://www.designsponge.com/2013/03/bookbinding-101-five-hole-pamphlet-stitch.html
- ↑ http://www.designsponge.com/2013/03/bookbinding-101-five-hole-pamphlet-stitch.html
- ↑ https://www.youtube.com/watch?v=04vt8YfT7XM&feature=youtu.be&t=59
- ↑ https://www.youtube.com/watch?v=04vt8YfT7XM&feature=youtu.be&t=110
- ↑ https://www.youtube.com/watch?v=04vt8YfT7XM&feature=youtu.be&t=132
- ↑ https://www.youtube.com/watch?v=04vt8YfT7XM&feature=youtu.be&t=175
- ↑ https://www.youtube.com/watch?v=04vt8YfT7XM&feature=youtu.be&t=211
- ↑ https://www.youtube.com/watch?v=04vt8YfT7XM&feature=youtu.be&t=220
- ↑ https://www.youtube.com/watch?v=04vt8YfT7XM&feature=youtu.be&t=261
- ↑ https://www.youtube.com/watch?v=04vt8YfT7XM&t=338s
About This Article
To bind a book, start by folding your pages in half and stapling them together at the folded crease. Then, cut a piece of binding tape that's about 2 inches longer than your book and lay it sticky-side up on a flat surface. Next, line up the creased edge of your book with the center of the tape and press your book down into the tape. Finally, wrap the other half of the tape around your book's spine and then cut off any excess tape at the top and bottom. To learn how to bind a book using ribbon or thread, scroll down!


wikiHow’s Content Management Team carefully monitors the work from our editorial staff to ensure that each article meets our high quality standards. This article has been viewed 996,056 times.