This article was co-authored by Lois Wade. Lois Wade was a high school librarian for four years. She is experienced in repairing books, resewing bindings, and protecting books, along with general book care and organization.
wikiHow marks an article as reader-approved once it receives enough positive feedback. In this case, 95% of readers who voted found the article helpful, earning it our reader-approved status.
This article has been viewed 1,021,575 times.
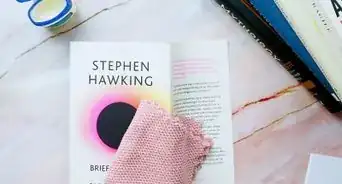
Is your favorite book falling apart or shedding pages or its cover? It easier than you think to repair your book! Using a book or binding glue can help you reattach pages that have come loose from the book. You can also use that glue to tighten up any space that has appeared between the text block – the chunk of pages that make up your book – and the spine of the book. Binder tape is a great way to reattach a cover that’s started to fall off.
Steps
Reattaching Loose Pages
-
1Purchase an acid-free book or binding glue. Most craft or hobby stores carry book or binding glue. It usually comes in a tall, thin tube. Make sure you purchase an acid-free glue: if you use a glue with acid in it, it can cause the pages of your book to disintegrate or eat away at the spine of the book.[1]
-
2Remove the loose pages. Set them aside so you don’t get any glue on them. Make sure you set them aside in the right order. You don’t want to accidentally glue them back into your book out of order![2]Advertisement
-
3Apply a thin layer of the glue. Open the book and squeeze some glue onto the inside of the book’s spine, where the pages have pulled away. Using a popsicle stick, spread the glue so that it covers the spine evenly.[3]
-
4Set the pages back on the spine. Make sure you have them in the right order first! Then carefully line up the top and bottom of each set of pages so they’re even with the pages still attached to the spine of the book. Firmly press the edge of the set of pages to the spine so that the edge evenly attached to the spine.[4]
- You might need to wiggle the pages a bit to get them to line up exactly with the rest of the book. That’s okay, but work quickly so the pages don’t end up sticking where they’re not supposed to!
-
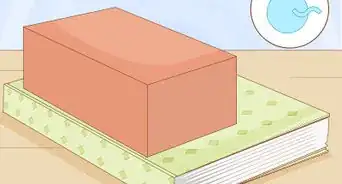
5Hold the book closed with a rubber band. This helps keep all the pages evenly in place while the glue dries. You can also stack other, heavier books on top of the book you’ve repaired.[5]
-
6Let the book dry for 24 hours. After the 24 hours are up, carefully remove the rubber band (or other books) and gently flip through the pages of the book. They should all feel secure. If they don’t, you may need to repeat the gluing process.[6]

Tightening a Gap Between the Pages and Spine
-
1Gather your equipment. You’ll need book adhesive, knitting needles or plastic rods (for applying the adhesive), wax paper, and a piece of flat plastic. It’s best if your adhesive is in a tall bottle, since this will allow you to cover the needles or plastic rods for application to the spine.[7]
-
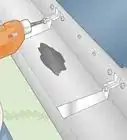
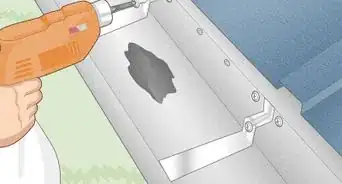
2Stand the book on its tail. Then very gently, use one hand to open the gap between the pages and the hinge as far as possible without causing more damage.[8]
-
3Dip the needle or rod in adhesive. Then gently insert the needle or rod into the gap between the pages and spine and twirl it against both the text block and the spine. This should ensure an even coat of adhesive to both parts, which will help it adhere better.[9]
- If there is a gap all along the entire spine of the book, you’ll need to flip the book over so it’s resting on its top and repeat the process.
-
4Lay the book flat. Firmly and evenly press the text block so that it is flat against the spine. Then use your piece of flat plastic to press the endpaper (the blank pages at the beginning of the book) into the hinge. This helps make sure that all of the pages stick to the spine and none of them tear.[10]
-
5Place a piece of wax paper between the cover and pages. You should press it back as far into the hinge as it will go. This prevents any adhesive from leaking out onto the cover of the book and will make sure your book opens properly when it’s dry.[11]
-
6Run your flat piece of plastic along the hinge. This is the little indent between the edge of the spine and the cover of the book. Apply even pressure as you run your plastic along this ridge.[12]
-
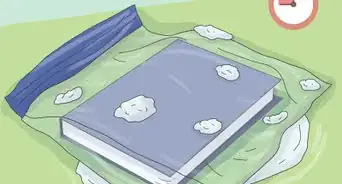
7Press the book overnight. Set the book on top of a flat board, with a knitting needle slightly thicker than the cover of the book resting on top of the bottom board. Place the book on the bottom board, lining up the knitting needle with the hinge of the book. Repeat this process with a knitting needle resting on the top hinge and another board on top. Set about 10 lbs (4.5 kg) of weight on top of the book and leave it overnight.[13]

Repairing a Broken Hinge
-
1Remove the hinge from the book. It’s harder to repair a hinge that’s still clinging to the book by threads, so removing it actually makes your life easier. Cut away any threads or loose paper so that the text block is even and clean.[14]
-
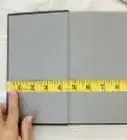
2Cut a piece of single-stitched binder tape. You can find this type of tape in most craft stores. Cut the tape so that it’s the same height as the text block. Don’t use the height of the cover for measuring the tape since the text block is usually shorter than the cover and you’ll end up with too much tape.[15]
-
3Apply adhesive to one side of the tape. It’s best to use a brush for this application since it lets you apply the adhesive evenly.[16]
-
4Attach the tape to the text block and spine. Hold the tape by the dry tabs and line up the stitching with the edge of the text block. Stick one tab with adhesive to the first page of the text block and the other to the spine of the text block. Use a flat piece of plastic to rub the tape, ensuring that it sticks to the text block.[17]
-
5Let the adhesive dry. This can take anywhere from a few hours to overnight. You should be able to tell if the adhesive is dry by running your finger over the top – you’ll be able to feel if there’s any wetness under the tape.[18]
-
6Place waxed paper on top of the text block and in the spine. You should lay it on top of the binder tape that is already glued to the text block and under the binder tape that hasn’t been glued yet.[19]
-
7Apply adhesive to the other two tabs. Then gently bring the cover up so the edge of the cover fits along the seam of the binder tape.[20]
-
8Press the spine firmly against one tab. This should be the tab sitting parallel to the spine, between the spine and the text block. When you pull the cover up, the spine should lay flat against this tab.[21]
-
9Attach the last tab to the cover. Smooth it with a flat piece of plastic so that it lays flat against the cover. Close the book and run your flat plastic piece along the spine so that the tab sticks to the spine.[22]
-
10Secure with rubber bands and let dry overnight. The rubber bands will help all of the adhesive dry evenly and make sure that the tabs all lay flat against the spine and text block. Let it all dry overnight so that it doesn’t fall apart when you pick it up.[23]
-
11Remove the rubber bands and waxed paper. Open your book carefully and flip through the pages so the book can adjust to the repair.[24]
Community Q&A
-
QuestionWhere is the best place to find binding supplies?
 Community AnswerSpecialty on-line stores, including Amazon, will sell book binding supplies. Artist's supply or scapbook stores may also carry these supplies. Keep in mind that you may not always get everything in one place, and may have to shop around.
 -
QuestionMany of our church hymnal covers are starting to tear along the binding. Is tape the best way to repair this?
 Community AnswerI do not recommend using everyday Scotch tape for repairing tears in pages. Look for archival tape made specifically for this. It has a paper-like feel to it, isn't shiny and is acid-free or pH-neutral. At a glance it may look like thin, see-through white tape, but it goes on clear and will last a long time.
 -
QuestionWhat can I use instead of binder tape for a book that has separated from its cover?
 Community AnswerTyvek is great for this. Cut up a Tyvek envelope, and use the flexible, neutral PVA glue from the craft store. This makes a strong, permanent and attractive hinge. Use parchment paper to isolate the repair.
Warnings
- Never use packing tape or duct tape on a book. The first will peel loose in about three years. The second will turn to goo in the same amount of time and will ruin your book. Do not use scotch tape either: the adhesive layer will fail after a few years.⧼thumbs_response⧽
- Don't attempt to repair a valuable or rare book, as attempts to repair might inadvertently damage or reduce the value of the book significantly. Use the "Find a Conservator" feature on the American Institute for Conservation's website to find a conservator to help fix your book.⧼thumbs_response⧽
Things You'll Need
- Plastic or book binding glue.
- Single stitched binder tape.
- Sharp scissors.
- A bone-folder or similar hard, smooth object like a ruler.
- Carpenter's rubber bands or a book press.
- Knitting needles
- Plastic rods
- Waxed paper


References
- ↑ https://www.youtube.com/watch?v=RxfmugOfXtE
- ↑ https://www.youtube.com/watch?v=RxfmugOfXtE
- ↑ https://www.youtube.com/watch?v=RxfmugOfXtE
- ↑ https://www.youtube.com/watch?v=RxfmugOfXtE
- ↑ https://www.youtube.com/watch?v=RxfmugOfXtE
- ↑ https://www.youtube.com/watch?v=RxfmugOfXtE
- ↑ http://www.philobiblon.com/bkrepair/BookRepair.html
- ↑ http://www.philobiblon.com/bkrepair/BookRepair.html
- ↑ http://www.philobiblon.com/bkrepair/BookRepair.html
- ↑ http://www.philobiblon.com/bkrepair/BookRepair.html
- ↑ http://www.philobiblon.com/bkrepair/BookRepair.html
- ↑ http://www.philobiblon.com/bkrepair/BookRepair.html
- ↑ http://www.philobiblon.com/bkrepair/BookRepair.html
- ↑ http://ideas.demco.com/blog/book-doctor-series-book-binding-repair-1/
- ↑ http://ideas.demco.com/blog/book-doctor-series-book-binding-repair-1/
- ↑ http://ideas.demco.com/blog/book-doctor-series-book-binding-repair-1/
- ↑ http://ideas.demco.com/blog/book-doctor-series-book-binding-repair-1/
- ↑ http://ideas.demco.com/blog/book-doctor-series-book-binding-repair-1/
- ↑ http://ideas.demco.com/blog/book-doctor-series-book-binding-repair-1/
- ↑ http://ideas.demco.com/blog/book-doctor-series-book-binding-repair-1/
- ↑ http://ideas.demco.com/blog/book-doctor-series-book-binding-repair-1/
- ↑ http://ideas.demco.com/blog/book-doctor-series-book-binding-repair-1/
- ↑ http://ideas.demco.com/blog/book-doctor-series-book-binding-repair-1/
- ↑ http://ideas.demco.com/blog/book-doctor-series-book-binding-repair-1/
About This Article

The best way to repair a book’s binding depends on what’s wrong with it. If pages have fallen out of your book, you can use an acid-free book or binding glue to reattach them. Remove the loose pages and spread a thin layer of glue over the spine using a popsicle stick. Then, align the loose pages over the glue and press them into the spine. Stack something heavy on top of the book and let it dry for 24 hours. If there’s a gap between the spine and pages of your book, you can use book adhesive to close it. First, stand the book up and use your finger to open the gap between the spine and pages. Spread book adhesive around inside of the gap using a knitting needle, then lay the book flat and square the block of pages. Partially open the cover and use a bone folder to press the endpaper into the hinge of the book. Then, place a piece of wax paper between the cover and endpaper to protect it from the adhesive. Now close the book and run the bone folder down the hinge on the outside. Place the book on a wooden board and align knitting needles that are thicker than the cover with the outer hinges of the book. Place another wooden board on top followed by 10 pounds (4 ½ kg) of weight. Press the book overnight. To repair a broken hinge, first fully remove the hinge from the book so it’s easier to work with. Cut a piece of single-stitched binder tape that’s the same length as the text block and apply book adhesive to one side with a brush. Next, stick one of the tape tabs to the spine of the text block and stick the other tab to the endpaper. Rub both tabs with a bone folder and let them dry overnight. Then, place one piece of waxpaper over the endpaper and one piece over the spine. Apply book adhesive to the other two tabs on the tape, then bring the cover up so it aligns with the seam on the tape. Rub the free tab on the tape onto the inside of the cover using the bone folder. Close the book and run the bone folder down the outside of the spine. Finally, secure the book with rubber bands and let it dry overnight. For tips on repairing a broken hinge on the spine, keep reading!